The Anchorage
Personal website of Gregory K. Maxey, Commander USN (Retired)
The Anchorage
Personal website of Gregory K. Maxey, Commander USN (Retired)
The information, illustrations and code contained in my "Microsoft Word Tips" are provided free and without risk or obligation.

However, the work is mine. If you use it for commercial purposes or benefit from my efforts through income earned or time saved then a donation, however small, will help to ensure the continued availability of this resource.
If you would like to donate, please use the appropriate donate button to access PayPal. Thank you!
Since their introduction with Word 2007, Microsoft has continued to add enhancements to content controls with each application upgrade. Checkbox content controls were introduced in Word 2010. There are several powerful and useful new enhancements included with Word 2013. This Microsoft Word Tips & Microsoft Word Help page provides a summary of these enhancements and demonstrates some practical applications using both the built-in user interface and VBA.
![]() Note: Word 2013 was in pre-release beta when this tips page was originally published. Some of the features and issues discussed may not exist or may be relevant in the final release version.
Note: Word 2013 was in pre-release beta when this tips page was originally published. Some of the features and issues discussed may not exist or may be relevant in the final release version.
The following list provides a summary of the content control enhancements introduced with Word 2013:
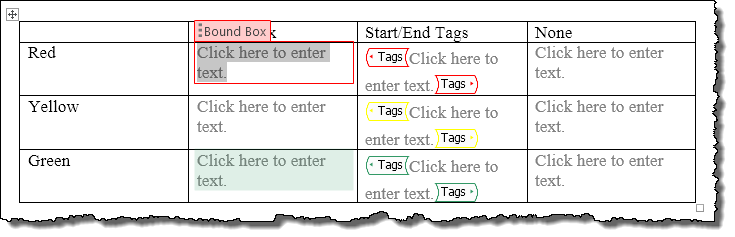
The content control color and appearance properties can be used to apply color and define how the control appears in the document. The table below illustrates the three available appearance properties 1) Bound box, 2) Start\End tags and 3) None with a color property applied to each control.
![]() Notes:
Notes:
1. Color property applied to Bound Box controls is only displayed when the control is selected or on mouse hover over the control.
2. The appearance property "None" suppresses the display of any applied color.
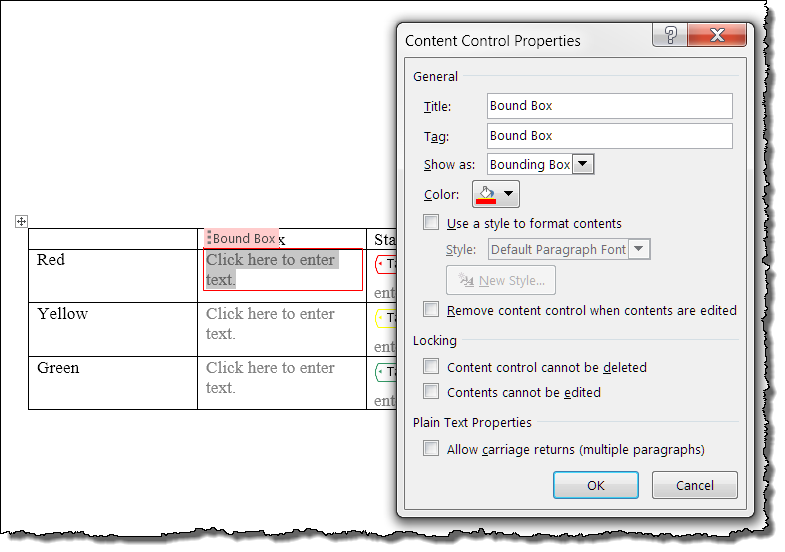
Color and appearance properties can be applied by the user by selecting the control and using Developer>Controls>Properties. This displays the Content Control Properties dialog shown below:
Other than simply preference, I personally don't see a practical application for the appearance property.
However, the color property has interesting potential. The following demonstrates how you could apply a color property using VBA in the ContentControlOnExit event. Here I have created a content control for entering quarterly sales in a company report.

When the user enters data and exits the control, the OnExit event validates a numeric entry and the number entered is compared to a defined performance standard. The control is then color coded to indicate satisfactory, marginal or unsatisfactory a performance result.
Private Sub Document_ContentControlOnExit(ByVal ContentControl As ContentControl, Cancel As Boolean)
  Select Case ContentControl.Title
    Case "Quarterly Sales"
      If Not IsNumeric(ContentControl.Range.Text) Then
        Cancel = True
        Exit Sub
      End If
      Select Case CSng(ContentControl.Range.Text)
        Case Is < 1000
          ContentControl.Color = wdColorRed
        Case 1000 To 1200
          ContentControl.Color = wdColorYellow
        Case Else
          ContentControl.Color = wdColorGreen
      End Select
  End Select
lbl_Exit:
  Exit Sub
End Sub
With the XML Mapping Task Pane you can now easily map content controls to a data node in a document customXMLPart without any knowledge of VBA or reliance on third party software. For more on mapped content controls see: Mapped Content Controls
The XML Mapping Task Pane is displayed when you select the Ribbon Developer tab>Mapping group>XML Mapping Pane control. The pane is displayed on the right hand side of the document. It provides a listing of all customXMLParts available in the document with an option to add a new part.
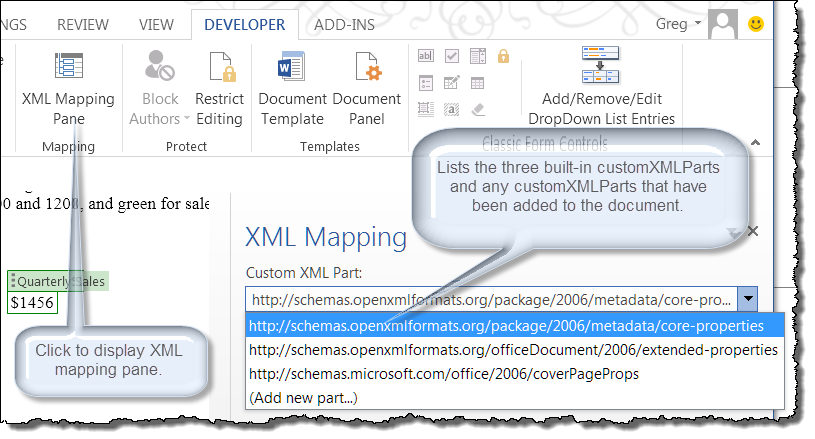
![]() Note: Each Word document contains three built-in customXMLParts that are required for Word to function properly. These built-in customXMLParts cannot be renamed or deleted.
Note: Each Word document contains three built-in customXMLParts that are required for Word to function properly. These built-in customXMLParts cannot be renamed or deleted.
Selecting one of the customXMLParts displayed provides a listing of the data nodes that can be used for content control mapping.
While you can use the one built-in customXMLParts for data mapping, for this discussion I am going to show you how to create your own customXMLPart and map content controls to its data nodes.
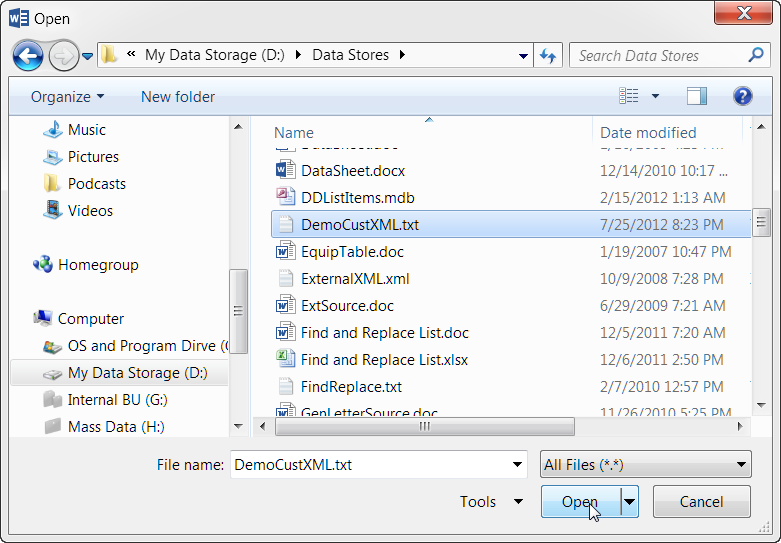
The first step is to create the xml text and add the customXMLPart. The xml text can be created in any text editor (including Word). For this demonstration, I am going to use Notepad.
![]() Notes:
Notes:
1. The "xmlns" defines the namespace assigned to the script and aids in its identification. You can use practically any namespace you like.
2. The xml script contains four data nodes. You can add or nodes or rename the nodes shown to suit your particular mapping needs.
<?xml version="1.0" encoding="UTF-8" standalone="no"?>
<DemoXMLNode xmlns="http://CustomDemoXML.htm">
<Name></Name>
<DOB></DOB>
<Gender></Gender>
<Occupation></Occupation>
</DemoXMLNode>
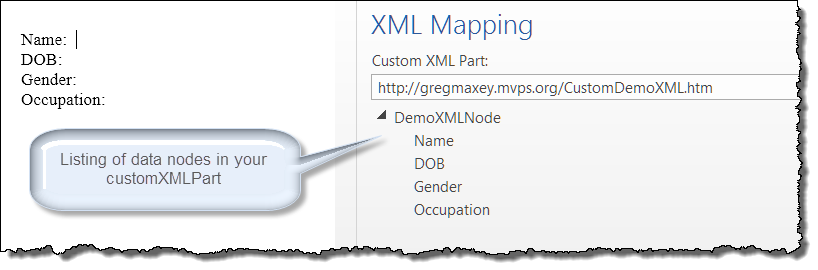
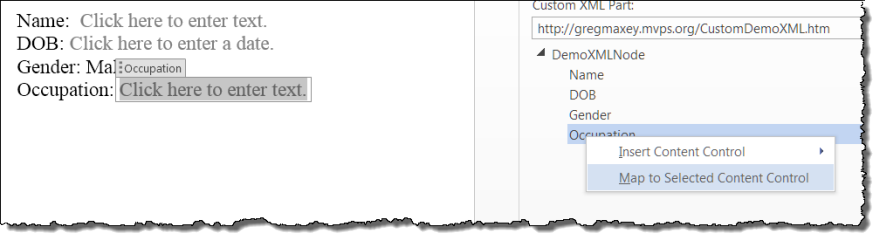
Now using the XML Mapping task pane, select the customXMLPart you just added. This will provide a list of the data nodes in the customXMLPart
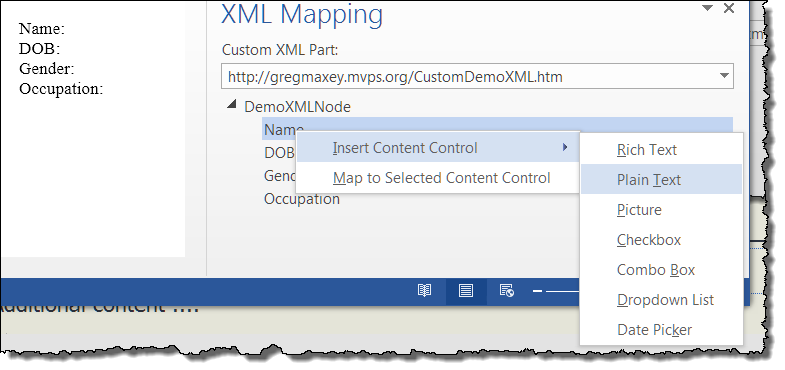
With the cursor located as shown above, select the "Name" node and then select "Insert Content Control>Plain Text"
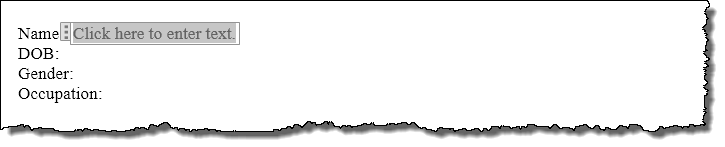
A mapped content control of the type selected is added at the insertion point.
The XML Mapping pane is fairly rudimentary. While is works flawlessly as described above, it does not provide any means to add to, modify or delete the customXMLPart. Unless you know, or are willing to learn, how to modify the customXMLPart using VBA or other third party software, careful planning on your part in defining the xml script will be paramount to your success using this feature.
With Word 2013, you can now map rich text content controls to a xml data node. This means that in addition to simple text mapping, all content control content including formatting, tables, shape objects, etc. is mapped and stored in the xml data node.
Continuing the demonstration above, I've manually added, titled and selected a rich text content control to use as the "Occupation" field.
I then used the XML Mapping Task Pane to - Map to Selected Content Control.
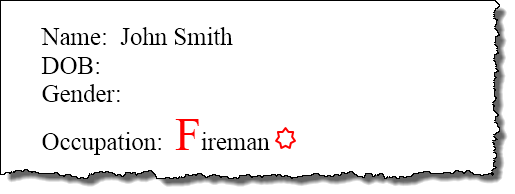
Next I entered some formatted text and a shape object in the mapped rich text control. I realize this isn't a very clever example, but I wanted to keep it simple. ![]()
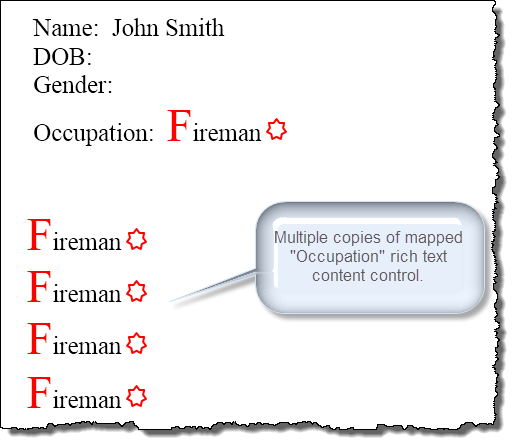
I can now copy and paste the mapped rich text control to one or multiple other locations in the document and the content and formatting are mapped to each location.
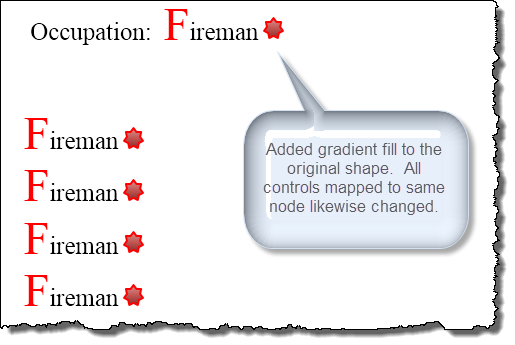
If I modify the original content control or any of the copies then the contents and formatting of all the mapped controls are likewise changed!
The repeating section content control enables your document users to add additional data entry fields according to their particular needs. In the following example, I've created a table for entering information about a user's heirs.

Next I added a plain text, picture, dropdown list and date picker content controls in the table cells.
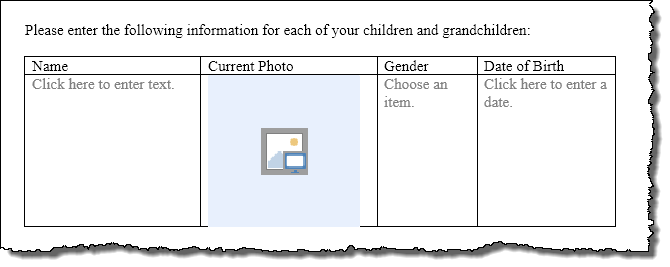
Next I selected the table row and added a repeating section content control.
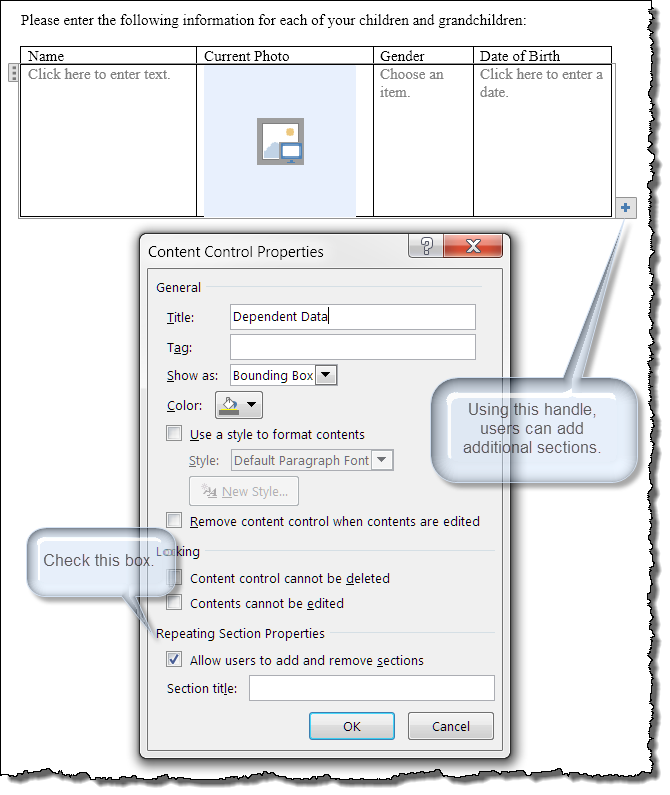
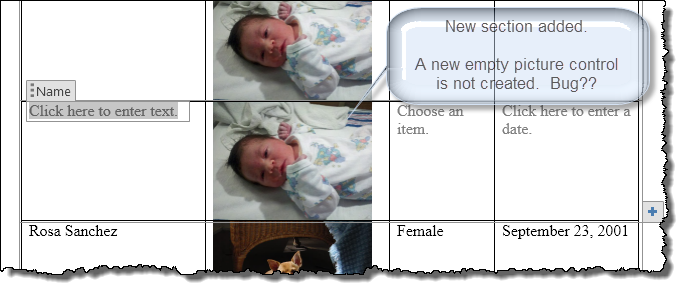
I added two additional sections.
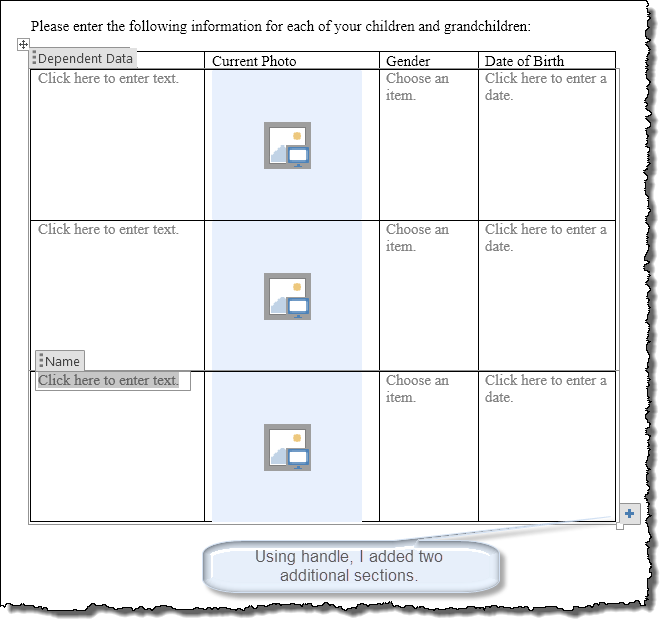
Finally, I entered the data.
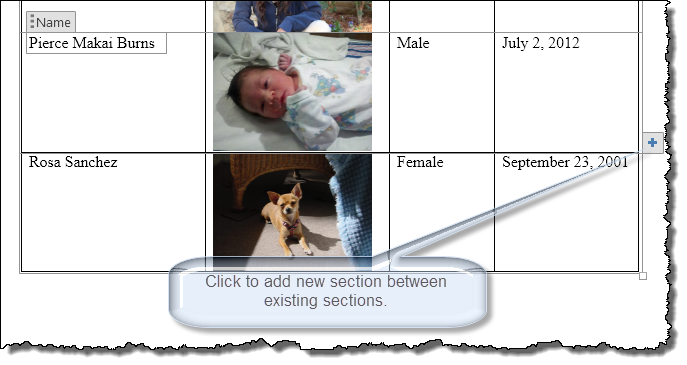
If you select one of the internal sections, the blue "+" handle is moved adjacent to the selected section. This way you can add sections between existing sections. You can also use the mouse right click context menu to insert addition sections, delete sections, or delete the entire content control. The context menu is shown later in this tips page.
The properties dialog shown above has an option to "Allow users to add and remove sections."
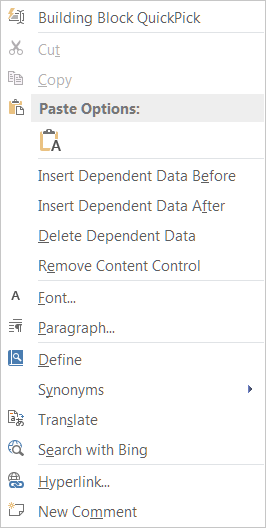
While there is no handle or other visible indicator displayed, you can do this by simply selecting the the table row and deleting it or by selecting anywhere in the repeating section control and using the mouse right click context menu shown below:
The following rules define how the context menu is configured:
![]() Note: Special thanks to Word MVP Jay Freedman for slogging through and defining the rules shown above.
Note: Special thanks to Word MVP Jay Freedman for slogging through and defining the rules shown above.
In the example above, I inserted the repeating section content control around a single table row. Repeating section content controls can also be inserted around one or more paragraphs containing text or text and other content controls, or even a single table cell.
Using some simple VBA techniques, you can also insert or delete sections and resolve the repeated (not empty) picture control described above:
Sub AddOrDeleteARepeatingSectionAndClearImage()
Dim oRSCC As ContentControl
Dim oCC As ContentControl
Dim oRS As RepeatingSectionItem
Set oRSCC = ActiveDocument.SelectContentControlsByTitle("Dependent Data").Item(1)

With oRSCC
  .AllowInsertDeleteSection = True
  'Add a section before the first section.
  Set oRS = .RepeatingSectionItems(1).InsertItemBefore
  For Each oCC In oRS.Range.ContentControls
    If oCC.Type = wdContentControlPicture Then
      If oCC.Range.InlineShapes.Count > 0 Then
        oCC.Range.InlineShapes(1).Delete
      End If
    End If
  Next oCC
  'Add a section after the last section.
  Set oRS = .RepeatingSectionItems(.RepeatingSectionItems.Count).InsertItemAfter
  For Each oCC In oRS.Range.ContentControls
    If oCC.Type = wdContentControlPicture Then
      If oCC.Range.InlineShapes.Count > 0 Then
        oCC.Range.InlineShapes(1).Delete
      End If
    End If
  Next oCC
  'Delete the last section just added.
  'Set oRS = .RepeatingSectionItems(.RepeatingSectionItems.Count)
  'oRS.Delete
  End With
End Sub
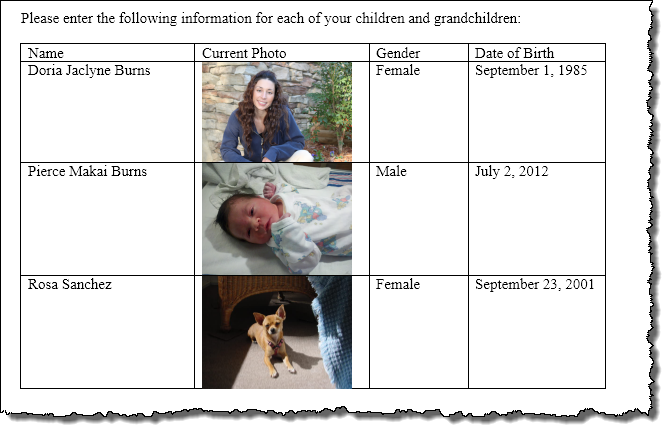
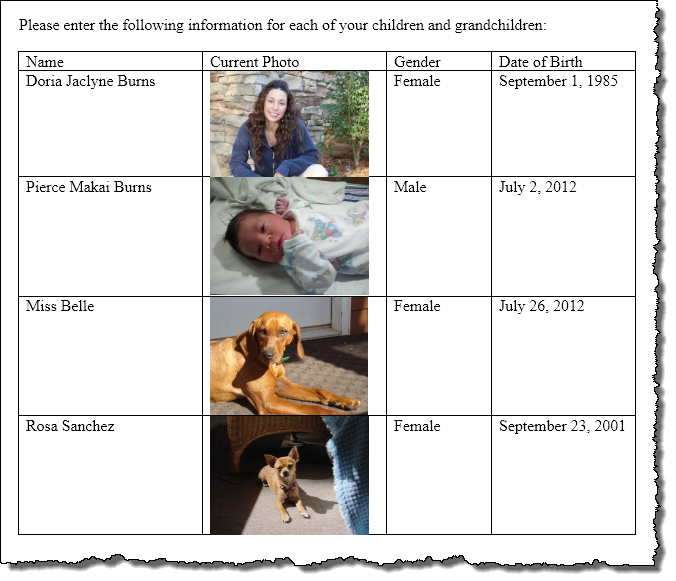
Selecting the repeated picture control shown above you can "change picture." After doing this and entering the remaining data the finished list is presented below.
You can also create and insert mapped repeating section content controls using VBA. The following code produces a table with controls similar to the one shown above:
Sub CreateAndInsertRepeatingCCDataTable()
Dim oRng As Range
Dim oTbl As Table
Dim oCustXMLPart As CustomXMLPart
Dim oCC As ContentControl
Dim oCustNode As CustomXMLNode

  'Delete current CustomXMLPart if exists.
  DeleteCurrentXMLPart "httx://CC_Enhancements_Word_2013"
  'Add customXMLPart
  Set oCustXMLPart = ActiveDocument.CustomXMLParts.Add
  oCustXMLPart.LoadXML ("<?xml version='1.0' encoding='UTF-8' standalone='no'?>" _
  & "<DemoNodes xmlns='httx://CC_Enhancements_Word_2013'>" _
  & "<DemoNode><Name></Name><Current_Picture></Current_Picture><Gender></Gender>" _
  & "<DOB></DOB></DemoNode></DemoNodes>")
  'Debug.Print oCustXMLPart.XML
  Set oRng = Selection.Range
  Set oTbl = ActiveDocument.Tables.Add(oRng, 2, 4)
  With oTbl
    .Cell(1, 1).Range.Text = "Name"
    .Cell(1, 2).Range.Text = "Current Photo"
    .Cell(1, 3).Range.Text = "Gender"
    .Cell(1, 4).Range.Text = "DOB"
    .Style = "Table Grid"
  End With

  Set oRng = oTbl.Cell(2, 1).Range
  Set oCustNode = oCustXMLPart.SelectSingleNode("/ns0:DemoNodes[1]/ns0:DemoNode[1]/ns0:Name[1]")
  Set oCC = ActiveDocument.ContentControls.Add(wdContentControlText, oRng)
  oCC.XMLMapping.SetMappingByNode oCustNode

  Set oRng = oTbl.Cell(2, 2).Range
  Set oCustNode = oCustXMLPart.SelectSingleNode("/ns0:DemoNodes[1]/ns0:DemoNode[1]/ns0:Current_Picture[1]")
  Set oCC = ActiveDocument.ContentControls.Add(wdContentControlPicture, oRng)
  With oCC
    .XMLMapping.SetMappingByNode oCustNode
    .SetPlaceholderText , , "Click and enter name"
  End With
  Set oRng = oTbl.Cell(2, 3).Range
  Set oCustNode = oCustXMLPart.SelectSingleNode("/ns0:DemoNodes[1]/ns0:DemoNode[1]/ns0:Gender[1]")
  Set oCC = ActiveDocument.ContentControls.Add(wdContentControlDropdownList, oRng)
  With oCC
    .XMLMapping.SetMappingByNode oCustNode
    .DropdownListEntries.Add "Male", "Male", 1
    .DropdownListEntries.Add "Female", "Female", 2
    .SetPlaceholderText , , "Select gender"
  End With
  Set oRng = oTbl.Cell(2, 4).Range
  Set oCustNode = oCustXMLPart.SelectSingleNode("/ns0:DemoNodes[1]/ns0:DemoNode[1]/ns0:DOB[1]")
  Set oCC = ActiveDocument.ContentControls.Add(wdContentControlDate, oRng)
  With oCC
    .XMLMapping.SetMappingByNode oCustNode
    .DateDisplayFormat = "MMMM dd, yyyy"
    .SetPlaceholderText , , "Click and select DOB"
  End With
  Set oRng = oTbl.Rows(2).Range
  Set oCC = ActiveDocument.ContentControls.Add(wdContentControlRepeatingSection, oRng)
  oCC.XMLMapping.SetMapping ("/ns0:DemoNodes[1]/ns0:DemoNode")
lbl_Exit:
  Exit Sub
End Sub

Sub DeleteCurrentXMLPart(ByRef strNamespace As String)
Dim oXMLPart As CustomXMLPart
  On Error Resume Next
  Set oXMLPart = ActiveDocument.CustomXMLParts.SelectByNamespace(strNamespace).Item(1)
  oXMLPart.Delete
  On Error GoTo 0
lbl_Exit:
  Exit Sub
End Sub
![]() Notes:
Notes:
1. See: Installing Macros for instructions on how to set up and use the macros provided in this Microsoft Word Help & Microsoft Word Tips page.
2. Repeating section content controls in Word 2013 documents are converted to rich text content controls if the document is opened in a earlier Word version.
The object model contains a new constant as part of the wdInformation constants that enables you to determine if the selection is within a content control. With that information, you can then use one of the other methods "ParentContentControl," to capture and work with content control programmatically.
Sub DemoConstant_wdInContentControl()
Dim oCC As ContentControl
  If Selection.Information(wdInContentControl) Then
    Set oCC = Selection.Range.ParentContentControl
    oCC.Range.Text = "You found me and you can work with me programmatically now!!"
  End If
lbl_Exit:
  Exit Sub
End Sub
The enhancements to content controls in Word 2013 certainly serve to make a good thing better. Unfortunately the Microsoft developers have still not provided a content control change event. Until this event is developed, content controls will never be the powerful document automation tool which they have the potential to be.
That's it! I hope you have found this tips page useful and informative.
The information, illustrations and code contained in my "Microsoft Word Tips" are provided free and without risk or obligation.
However, the work is mine. If you use it for commercial purposes or benefit from my efforts through income earned or time saved then a donation, however small, will help to ensure the continued availability of this resource.
If you would like to donate, please use the appropriate donate button to access PayPal. Thank you!
This page was last updated on
May 31, 2022
Website
Privacy Statement
Back to top ![]() Back to
Word Tips
Back to
Word Tips