The Anchorage
Personal website of Gregory K. Maxey, Commander USN (Retired)
The Anchorage
Personal website of Gregory K. Maxey, Commander USN (Retired)
The information, illustrations and code contained in my "Microsoft Word Tips" are provided free and without risk or obligation.

However, the work is mine. If you use it for commercial purposes or benefit from my efforts through income earned or time saved then a donation, however small, will help to ensure the continued availability of this resource.
If you would like to donate, please use the appropriate donate button to access PayPal. Thank you!
The purpose of this Microsoft Word Tips & Microsoft Word Help page is to publish and describe my "Content Control Tools" Word template add-in.
A general description of content controls with links to several related tips pages is available here: Content Controls.
The Content Controls Tools add-in leverages many of the techniques and processes published in earlier pages and brings those processes together with several new features into one compact add-in tool that you can use to empower content controls and simplify working with them in your templates and documents.
![]() Note: This tips page was created using screen graphics from Word 2013
& 2010. Several advanced features of the add-in (e.g., rich text content control mapping) are not available in earlier Word versions. If you have an earlier Word version then your actual display when using the add-in will appear differently.
Note: This tips page was created using screen graphics from Word 2013
& 2010. Several advanced features of the add-in (e.g., rich text content control mapping) are not available in earlier Word versions. If you have an earlier Word version then your actual display when using the add-in will appear differently.
Working on this project was like solving a riddle and it was by far more ambitious and time consuming of any project before it. With each step it seemed that I would stumble on or uncover a new complication. Thanks for all the feedback from users. Through that feedback I have been able to track down and resolve many issues that I hadn't discovered on my own.
The add-in user interface consists of a userform that is initiated from either a control on the ribbon add-ins tab or quick access toolbar (QAT). The ribbon and QAT controls are shown below.
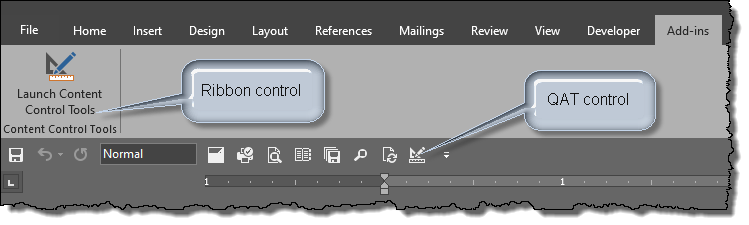
Clicking either control displays the add-in userform. Tabs on the form's multi-page control are used to configure the add-in for six basic functions:
Below the multi-page control are a common notification frame and command button controls.
![]() Notes:
Notes:
1. The selected page tab when the userform is displayed depends on what content controls, if any, are present in the document. If there are no content controls in the document the "Basic Mapping" tab is selected and the Single and Global tools tabs as are disabled as shown below.
2. Some of the graphics used to publish this tips page may not faithfully reflect the current configuration of the add-in or display the current version number. I will attempt to note differences when they occur.
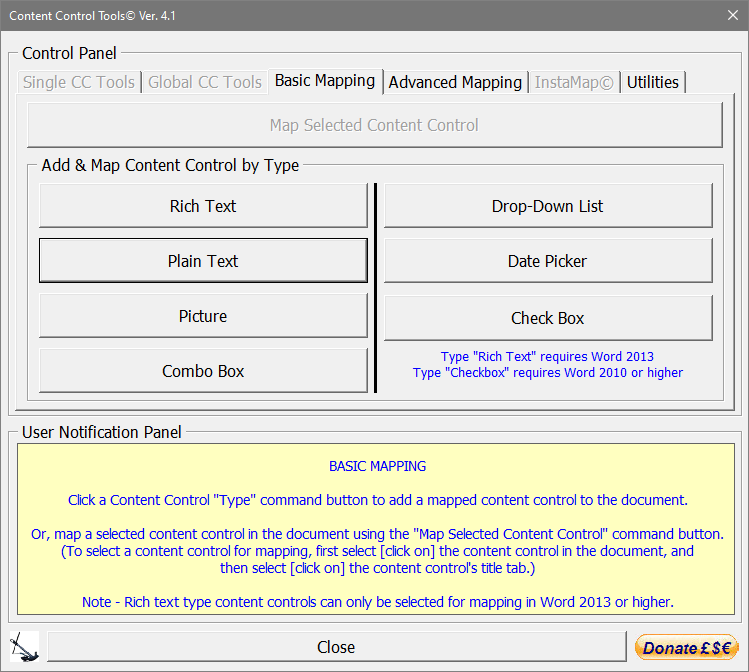
The Basic Mapping page is displayed by default when the add-in is initiated and there are no content controls contained in the document. In this situation, the "Map Selected Content Control" command button is naturally disabled.
![]() Note: In Word 2010, the "Rich Text" command button is disabled. In Word 2007, the "Rich Text" and "Checkbox" command buttons are disabled.
Note: In Word 2010, the "Rich Text" command button is disabled. In Word 2007, the "Rich Text" and "Checkbox" command buttons are disabled.
Clicking an enabled content control type button initiates a process to create and insert a new mapped content control in the document at the insertion point\selection.
![]() Note: You would typically insert content controls with the selection collapsed to the insertion point. However, if content (e.g., text or graphic) is selected the add-in will perform and alert you to invalid actions just as if you had used the controls on the Developer tab to create and insert content controls.
Note: You would typically insert content controls with the selection collapsed to the insertion point. However, if content (e.g., text or graphic) is selected the add-in will perform and alert you to invalid actions just as if you had used the controls on the Developer tab to create and insert content controls.
For this example, I clicked the "Plain Text" command button.
First you are is prompted to provide a valid content control title.
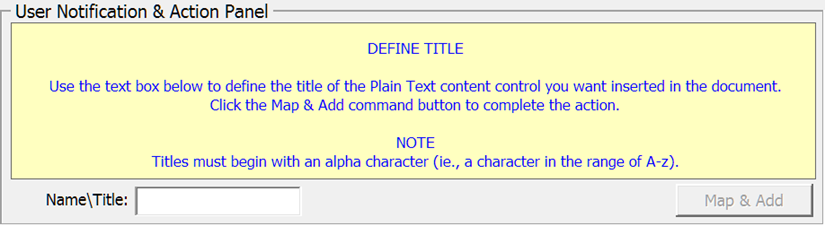
Because the new content control will be bound (mapped) to a data node in a document CustomXMLPart, automatically created by the add-in, and the defined title is used to define the node name, the title must:
The use of other characters in the title could result in an invalid CustomXMLNode name and is therefore prohibited.
![]() Note: If your final content control title must contain special characters e.g., "Name & Address," then you can change the title of the content control in the finished template/document after all mapping procedures using the add-in are finished.
Note: If your final content control title must contain special characters e.g., "Name & Address," then you can change the title of the content control in the finished template/document after all mapping procedures using the add-in are finished.
Entering a valid title enables the "Add & Map" command button.
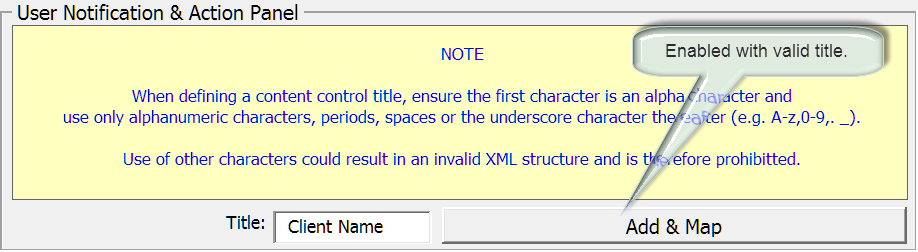
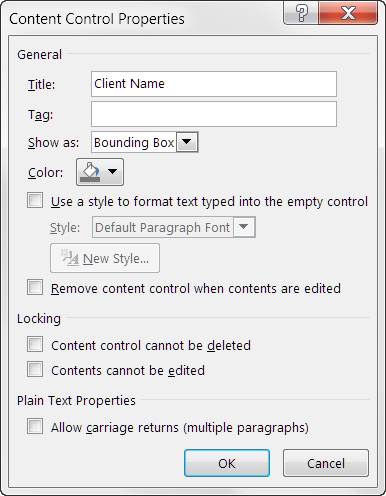
Clicking Add & Mapp displays the built-in content controls properties dialog preset with the title you previously defined.
Using this dialog, you can set other properties as required. When finished, click the "OK" button.
![]() Note: Due to an apparent design oversight in Word, clicking "Cancel" on the properties dialog box cannot be detected programmatically. Therefore, clicking "Cancel" when using this add-in with any Word version will simply ignore any property settings you make. It will not cancel or reverse the process of inserting the defined control in the document.
Note: Due to an apparent design oversight in Word, clicking "Cancel" on the properties dialog box cannot be detected programmatically. Therefore, clicking "Cancel" when using this add-in with any Word version will simply ignore any property settings you make. It will not cancel or reverse the process of inserting the defined control in the document.
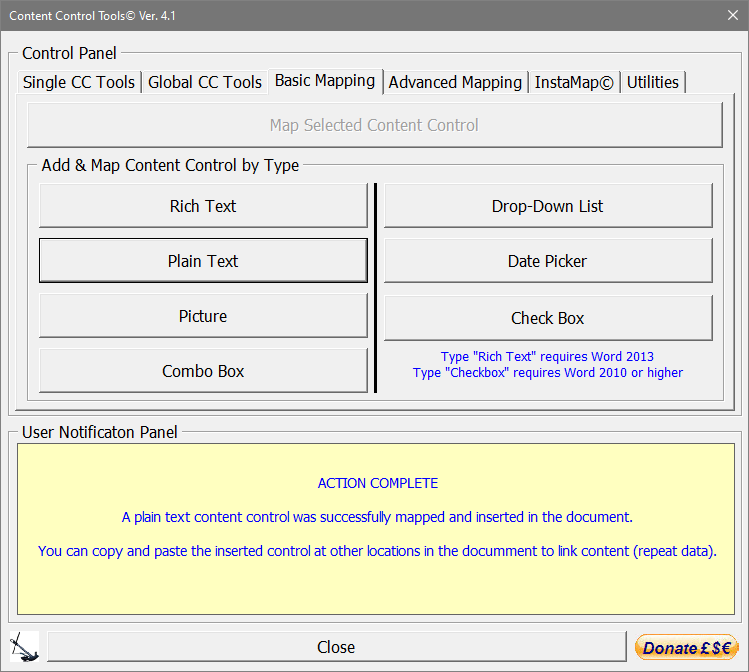
The following shows the userform after the content control is created, mapped and inserted in the document. As the document now contains a content control, the Single CC Data\Tools, Global CC Tools and InstaMap© page tabs are enabled.
Qualified content controls with valid titles that exist in a document when the add-in is initiated can be mapped and bound to a data node using the Map Selected Content Control command button.
To map an existing content control:
![]() Notes:
Notes:
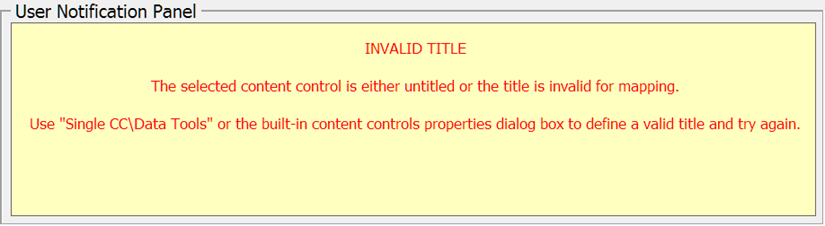
1. Untitled content controls or content controls with invalid titles cannot be mapped.
2. Once mapped, a content control can be copied and then pasted to one or more other locations within the document. The original and each copy are linked together and to the CustomXML data node. Data entered in any of the linked controls is repeated at each linked control location and stored in the data node.
![]() Note: When using the Basic Mapping tools, each content control you create and map is bound to its own unique data node. This means if you create and map two or more content controls using the same title, then your document CustomXMLPart will have two or more data nodes with the same name. There is no relationship created between the two controls. Therefore, if your intent is for your like titled content controls to act as clones to one another, you should simply create and map one content control and then copy and paste that control as required. This way each like titled control is bound to the same data node.
Note: When using the Basic Mapping tools, each content control you create and map is bound to its own unique data node. This means if you create and map two or more content controls using the same title, then your document CustomXMLPart will have two or more data nodes with the same name. There is no relationship created between the two controls. Therefore, if your intent is for your like titled content controls to act as clones to one another, you should simply create and map one content control and then copy and paste that control as required. This way each like titled control is bound to the same data node.
The Advanced Mapping page provides utilities for viewing and working with document CustomXMLParts and several advanced mapping capabilities. Using the controls on the Advanced Mapping page you can:
![]() Note:
With Word 2007 and all subsequent version, document contains three built-in CustomXMLParts. You can use these parts for content control mapping, but you cannot delete these CustomXMLParts, or insert, append or delete CustomXMLNodes associated with these parts.
Note:
With Word 2007 and all subsequent version, document contains three built-in CustomXMLParts. You can use these parts for content control mapping, but you cannot delete these CustomXMLParts, or insert, append or delete CustomXMLNodes associated with these parts.
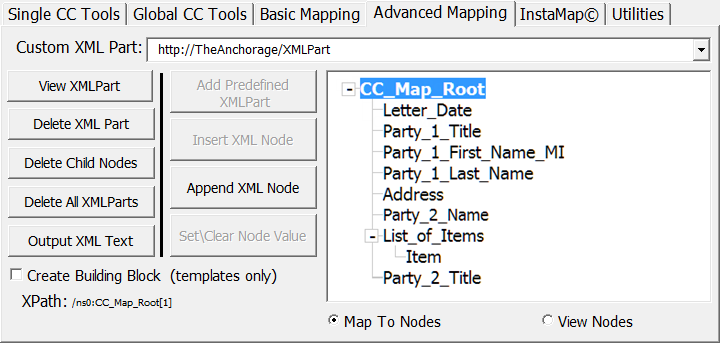
Previously, I defined and created a mapped plain text content control titled "Client Name" using the Basic Mapping tools. Continuing that demonstration, I have now clicked the Advanced Mapping tab shown below:
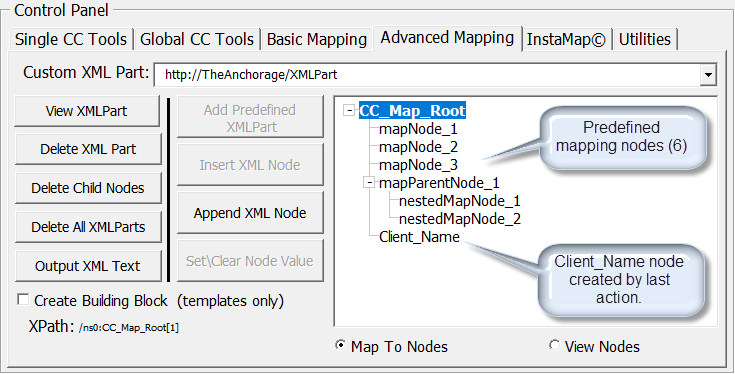
Notice the Custom XML Part combobox control displays "http://TheAnchorage/XMLPart" This is the namespace (or identifier) of the default CustomXMLPart created automatically by the add-in when I created the content control "Client Name" using the Basic Mapping tools.
All controls created and mapped using the Basic Mapping tools are mapped to this CustomXMLPart. The default CustomXMLPart has six (6) predefined mapping nodes which you can use to create content controls using the selected node mapping tools (discussed below) or delete at your discretion.
Notice the CustomXMLNode "Client_Name" was appended to the root node "CC_Map_Root." All content controls created using the Basic Mapping tools will have an associated CustomXMLNode appended to the root node.
![]() Note: CustomXMLNode names cannot have spaces. Any spaces you use in defining node names or content control titles are converted by the add-in to underscore "_" characters.
Note: CustomXMLNode names cannot have spaces. Any spaces you use in defining node names or content control titles are converted by the add-in to underscore "_" characters.
Some command buttons on the Advanced Mapping page will be disabled or change appearance depending on the status of the CustomXMLParts and what you are doing with the tools. For example, in the illustration above Add Predefined XMLPart, Insert XML Node and Reset/Clear Node are disabled:
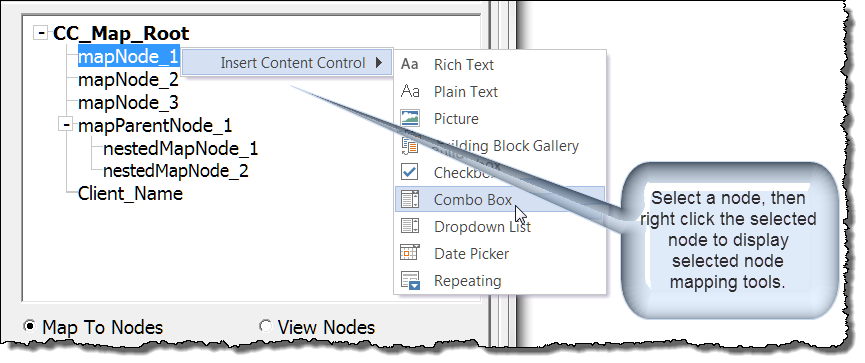
Using the Advance Mapping "Selected Node Mapping Tools," you can create and map all qualified content control types in your document or template. To enable the Selected Node Mapping Tools, click on the node you want to use and then right click:
![]() Notes:
Notes:
1. With Word 2013 and later, Selected Node Mapping Tools enable you to create and map building block gallery and repeating section content controls.
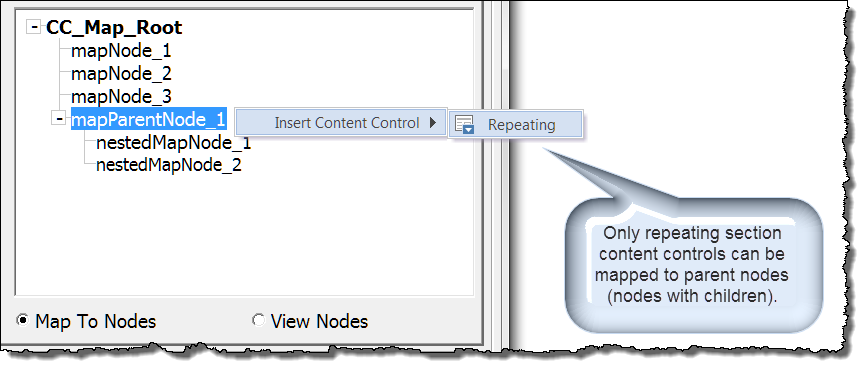
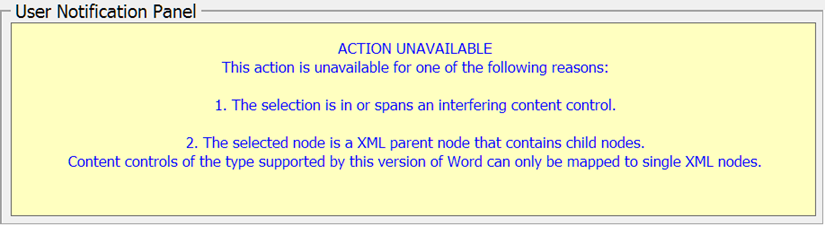
2. Content controls (except repeating section content controls) can only be mapped to single "childless" element nodes. If you map a content control to a single childless node and later append one or more child nodes to that node, the mapping will be lost.
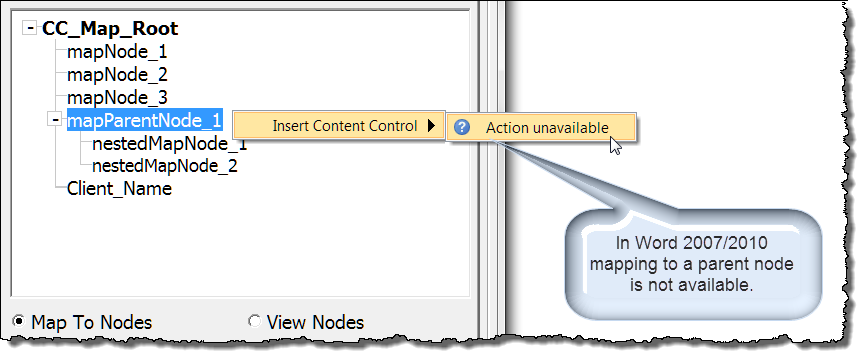
Click "Action unavailable" when displayed for an explanation of the mapping restriction.
After you select the type of content control you want to map to a node and create, the built-in content control dialog box is displayed. Using the dialog, you can assign a title and set other properties as required. Clicking "OK" in the dialog will complete the action.
![]() Note: As you are mapping to a predefined CustomXMLNode, there is no restriction on the title you assign the control. However, I feel it is a best practice to assign content control titles that match the associated node name. Remember, spaces in content control titles are converted to "_" in the associated node name.
Note: As you are mapping to a predefined CustomXMLNode, there is no restriction on the title you assign the control. However, I feel it is a best practice to assign content control titles that match the associated node name. Remember, spaces in content control titles are converted to "_" in the associated node name.
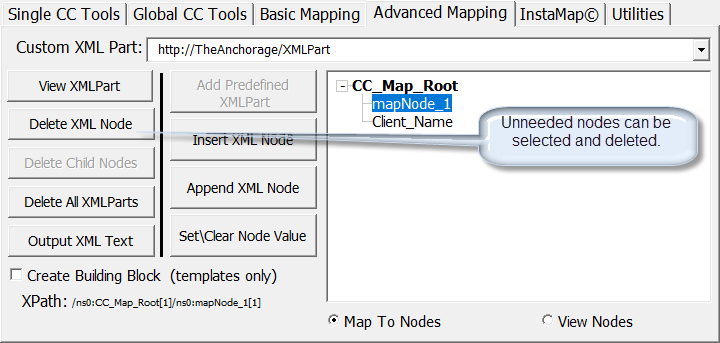
In the illustration below, I've used the "Delete XML Node" button to delete unwanted nodes in the CustomXMLPart.
Here I have deleted the last predefined node, selected the root node and appended several new nodes to the root node.
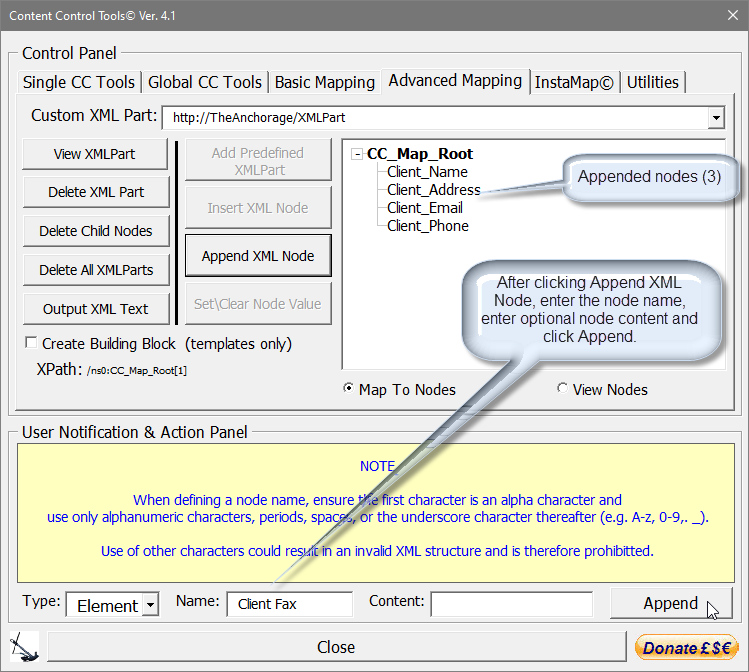
![]() Note: Append adds (appends) a new child node to the selected root or other parent node. Insert adds (inserts) a new sibling node above the selected node.
Note: Append adds (appends) a new child node to the selected root or other parent node. Insert adds (inserts) a new sibling node above the selected node.
Now I can use the Selected Node Mapping Tools and these new nodes to create and map content controls. Or, I can use an existing document content control using Map to Selected Content Control.

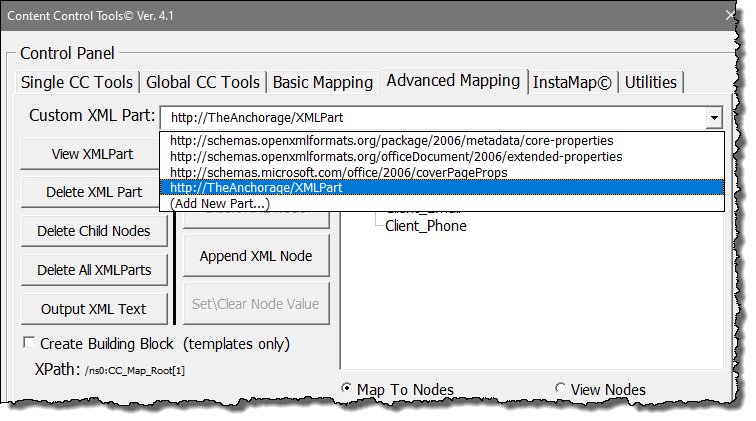
The Custom XML Part combobox lists all CustomXMLParts in the active document\template. Using this list, you can select and view individual CustomXMLParts or add parts from external XML format files.
Using the "View Nodes" option button allows you to review the content and XPath of a selected node. In the illustration below I have selected the built-in CustomXMLPart "core-properties" and selected the "creator" node. Data in this node is associated with the Document Property "Author."
XPath defines the route (or map) to the associated CustomXMLPart. By moussing over and clicking on the displayed XPath, you can copy it to the clipboard.

The remainder of the Advanced Mapping features are self-explanatory.
The Global CC Tools page provides utilities that you can use to perform selected functions on single, multiple or all content controls in a document at the same time.
In the discussion to this point, I've added and mapped five plain text content controls using either Basic or Advanced Mapping tools. The following illustrates the Global CC Tools page listing these five content controls.
![]() Note: Version 1.1 adds the ability to suppress content control placeholder text when printing. The Flag Mapped and Unflag Mapped features in the Utilities group have been removed in Version 2.2.
Note: Version 1.1 adds the ability to suppress content control placeholder text when printing. The Flag Mapped and Unflag Mapped features in the Utilities group have been removed in Version 2.2.
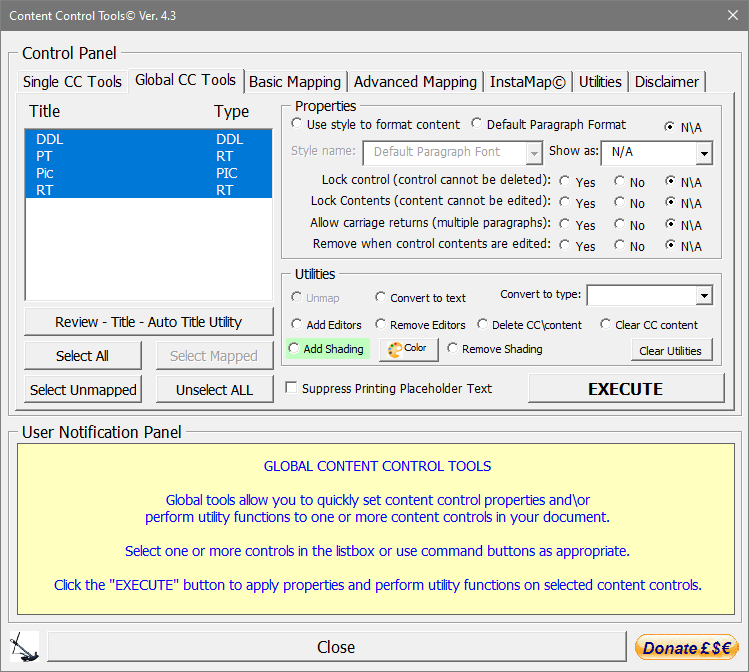
When the page is displayed, all content controls in the document are listed alphabetically by title and selected in the list.
The "Review - Title - Auto Title Utility" was introduced with version 3.0. It is adapted from a similar utility fully described in my Extract Data from Forms tips page.
You can use the other command buttons under the list to revise the selection or select/de-select individual controls using the mouse.
Using the controls in the "Properties" or "Utilities" section, you can quickly set/reset properties or perform utilities on all content controls selected in the list.
Provides global tools for applying properties common to most types of content controls.
While it is a good practice to set properties when you create your content controls, it can be time consuming and sometimes be frustrating when you need to later edit those properties.
For example, assume that for the purpose of illustration, you have a document containing 100 content controls, each with the "Content control cannot be deleted" property set. Now you find that you need to relocate (cut and paste) a large segment of that document. You select the text and find to your chagrin that the "Cut" command on the ribbon home tab is disabled! In frustration you might pound the "Del" key only to have Word inform you that the "The modification is not allowed because the selection is locked!"
Rather than spending the several minutes it would take to select and remove the property from the content controls in the selection, you can use Global Tools to remove the property from all content controls, relocate the text, then use Global Tools to reapply the property.
![]() Note: Some properties listed are not applicable to all content controls (e.g., Allow carriage returns (multiple paragraphs) is only applicable to plain text content controls).
Note: Some properties listed are not applicable to all content controls (e.g., Allow carriage returns (multiple paragraphs) is only applicable to plain text content controls).
Each available property has three options. You can either apply the property, reset (clear) the property, or ignore (N/A) the property and leave it unchanged.
With the utility tools, you can:
Unmapping a content control breaks the link between the content control and associated CustomXMLNode.
![]() Note: Unmapping does not delete the CustomXMLNode or otherwise affect the mapping CustomXMLPart. To delete an unused node, use the Advanced Mapping tools.
Note: Unmapping does not delete the CustomXMLNode or otherwise affect the mapping CustomXMLPart. To delete an unused node, use the Advanced Mapping tools.
Applying "editors" and making content controls editable regions in documents with restricted editing "No changes (read only)" provides an excellent and superior alternative to legacy formfields and protected documents when creating forms. See: Content Control Fill-In Form
Select this checkbox to suppress printing any visible content control placeholder text in the document. You do not need to click the "Execute" button after checking or unchecking this feature.
![]() Note: Suppressing content control placeholder text (PHT) is a extremely fickle and imperfect process. For more on this topic see my "Content Controls - Do Not Print Placeholder Text" tips page.
Note: Suppressing content control placeholder text (PHT) is a extremely fickle and imperfect process. For more on this topic see my "Content Controls - Do Not Print Placeholder Text" tips page.
The Single CC Data\Tools page provides a convenient place to view information and set properties on a single selected content control. This eliminates the chore of locating individual controls in the document and repeating the steps to open the properties dialog.
Simply select the listed content control that you want to review\edit. The list contains each content control in the document listed by title and sorted alphabetically.
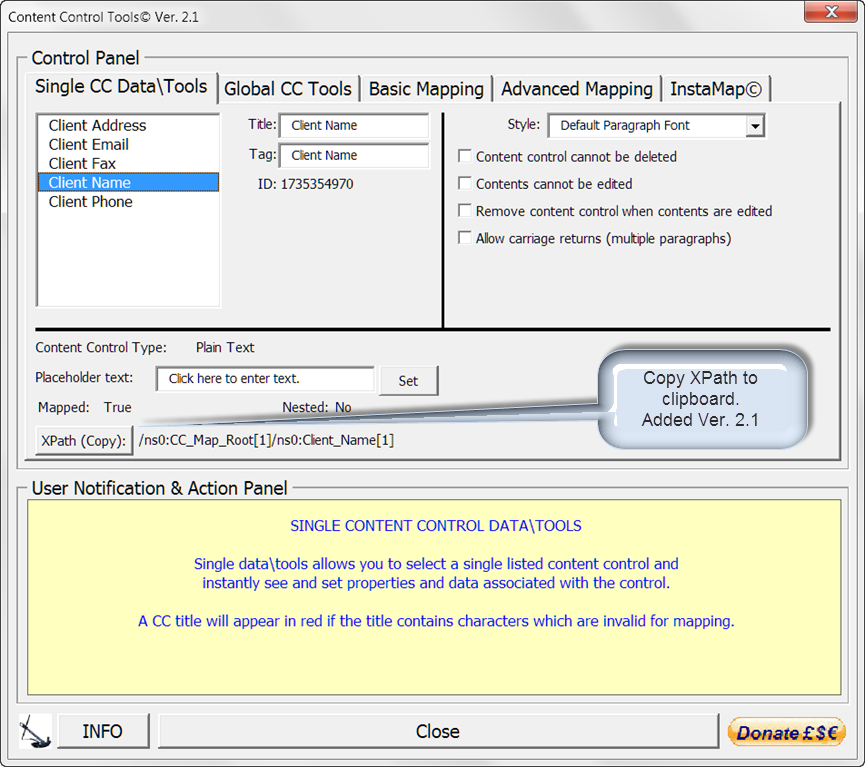
Using the Single CC Data\Tools page you can:
In the illustration below, I've added a new untitled Combo Box type content control to my document and selected it in the list.
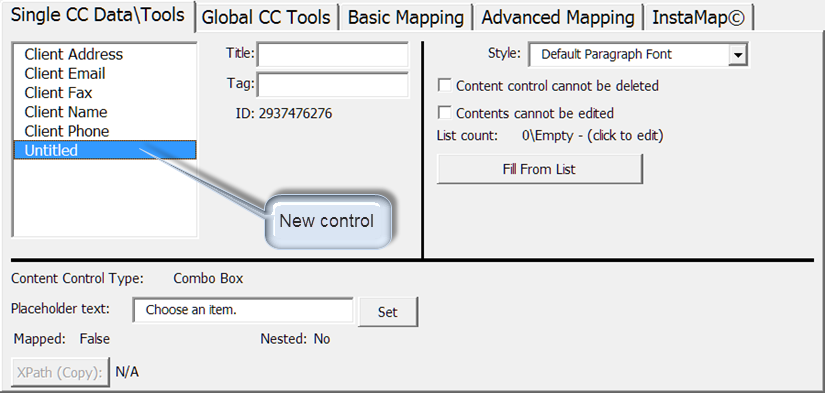
Notice the property controls have been reconfigured according to the type of content control selected.
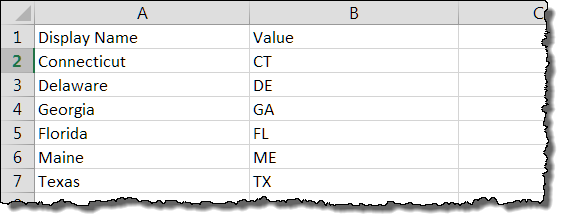
For dropdown list and combo box type content controls, I can edit/modify the list members by clicking the list count data label or by using a predefined list from an external Excel spreadsheet, Word document, or comma separated values .txt file.
Clicking the list data label displays the built-in properties dialog. Use it in the normal way to edit or add items to the list.
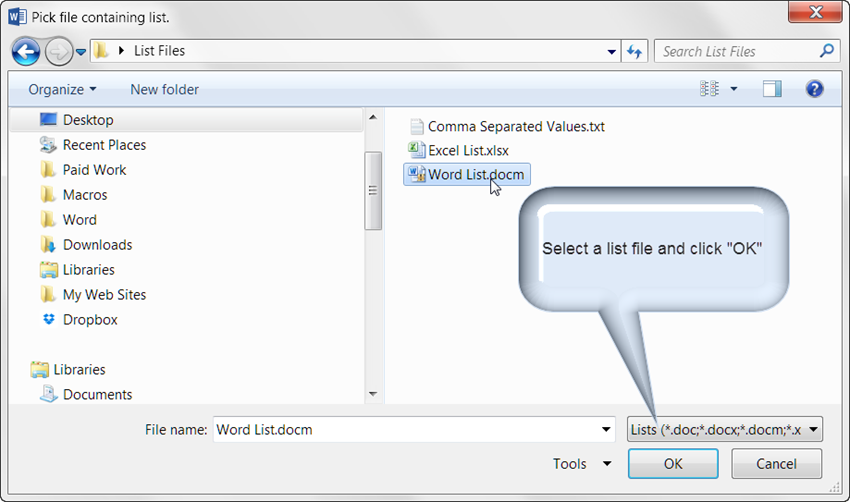
Clicking "Fill From List" displays a file picker dialog. Using this dialog, navigate to and select the file containing the list.
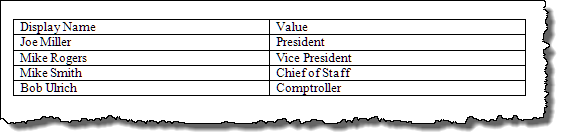
![]() Note: When populating a list by using either the built-in dialog or an external list, it is important to remember that each list member has two parts. The first part "Display Name" is the value you want to see displayed in the document when the list member is selected. The other part "Value" is the data that is stored in an associated CustomXMLNode when the content control is mapped. Typically "Display Name" and "Value" are the same but they don't have to be. You must also ensure the each item in your list is a unique item and not repeated elsewhere in the list.
Note: When populating a list by using either the built-in dialog or an external list, it is important to remember that each list member has two parts. The first part "Display Name" is the value you want to see displayed in the document when the list member is selected. The other part "Value" is the data that is stored in an associated CustomXMLNode when the content control is mapped. Typically "Display Name" and "Value" are the same but they don't have to be. You must also ensure the each item in your list is a unique item and not repeated elsewhere in the list.
When using a predefined list, ensure the following:
![]() Note: If using comma separated values, the values define both the "Display name" and the "Value."
Note: If using comma separated values, the values define both the "Display name" and the "Value."

With the exception of tools involving a command button (e.g., "Fill Form List" and "Set" etc.), most actions performed on this page occur instantaneously in real time (i.e., the content control title changes as you type in the title text box).
Last but not least is the InstaMap© page. InstaMap© is, in my opinion, the crown jewel of the template add-in and can provide a single click mapping solution for most document layouts.

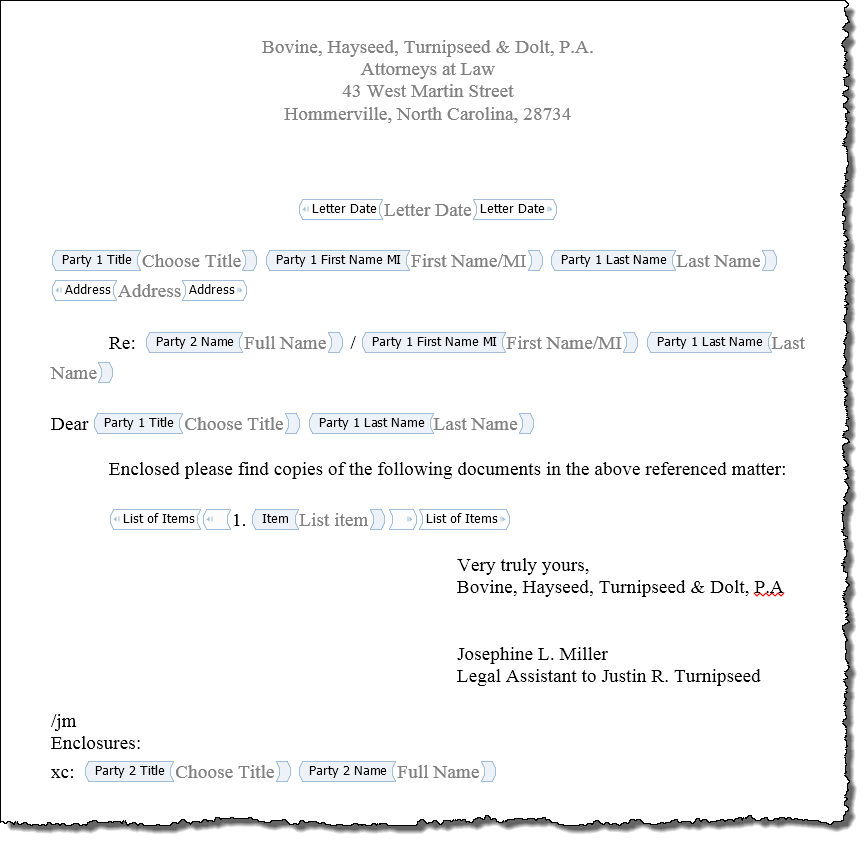
InstaMap© was designed primarily for use in mature documents\templates which already contain qualified/properly titled or taggged content controls. The following illustrates a mature (nearly complete) template.
The template was prepared using Word 2013 and contains fourteen qualified content controls. I have used the Word 2013 content control property "Show As" to display the controls with Start\End tags so you can see that each control has a valid title.
No attempt to map the content controls using the tools already discussed or by any other method has been made.
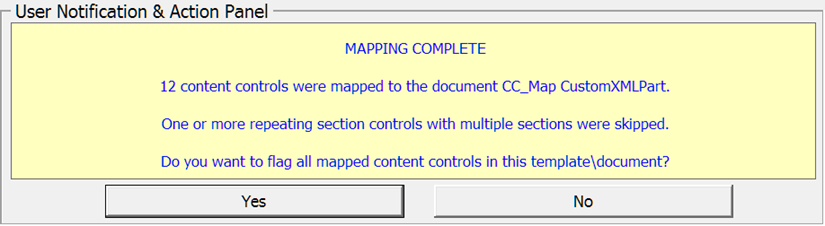
Processing this document with InstaMap© results in the following:
![]() Note: The query and "Yes/No" option related to flagging mapped content controls was removed with version 2.2.
Note: The query and "Yes/No" option related to flagging mapped content controls was removed with version 2.2.
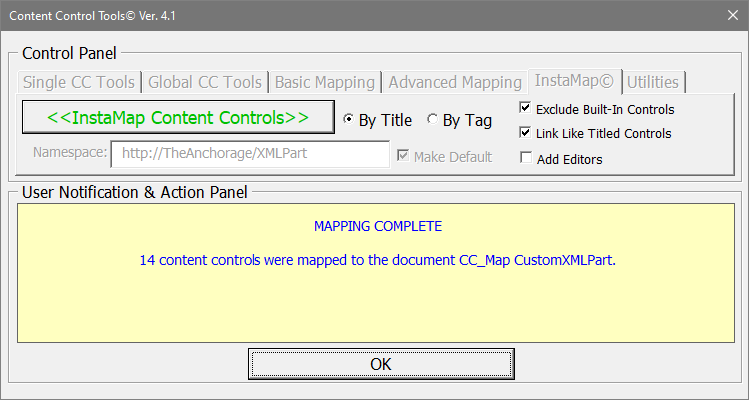
Notice InstaMap© automatically mapped all 14 qualified content controls in the document.
Now let's look at the CustomXMLPart used for mapping by switching to the Advanced Mapping page.
Notice that the same CustomXMLPart (Namespace: http://TheAnchorage/XMLPart) that is used by the Basic and Advance Mapping tools is used.
![]() Note: When InstaMap© is used to create the CustomXMLPart "CC_Mapping_Part" it does not create the default mapping nodes seen previously.
Note: When InstaMap© is used to create the CustomXMLPart "CC_Mapping_Part" it does not create the default mapping nodes seen previously.
With version 4.1 and later, InstaMap facilitates mapping document content controls by tilte or tag with the default by tag. This feature allows you to map content controls with a visible title displayed in the document content control tab. Naming conventions for content control tags are the same a described previously for titles.
Disabled in the website download version of the add-in. Premium (paid users) may define there own namespace and set it as default.
The CustomXMLPart contains only nine (9) mapping nodes. This is because the InstsMap option to "Link Like Titled Controls" was used so all instances of like titled content controls are mapped to a single common node. This links like titled content controls such that data entered in one control is repeated in the other like titled controls.
![]() Note: Uncheck "Link Like Titled Controls" on the InstaMap© tab page if you want each content control regardless of title to be mapped to its own unique data node.
Note: Uncheck "Link Like Titled Controls" on the InstaMap© tab page if you want each content control regardless of title to be mapped to its own unique data node.
In certain documents, the document creator may have used one or more document properties (e.g., Author, Company, etc.). These document properties are actually content controls mapped to one of the three CustomXMLParts built-in it every Word document. In most cases you will want to ensure this option is checked to preserve the existing mapping. Unchecking this open will result in the content control being unmapped from the built-in CustomXMLPart and remapped to the new CustomXMLPart used by Instamap.
With this feature checked, all mapped content controls in the main text section of the document only are configured as editable regions in document with "Editing restrictions - No changed (Read only).
When InstaMap© is used in documents with untitled content controls or expanded repeating section content controls, or when previous mapping using CC_Mapping_Part has already been performed, the sequence of observed events may be different.
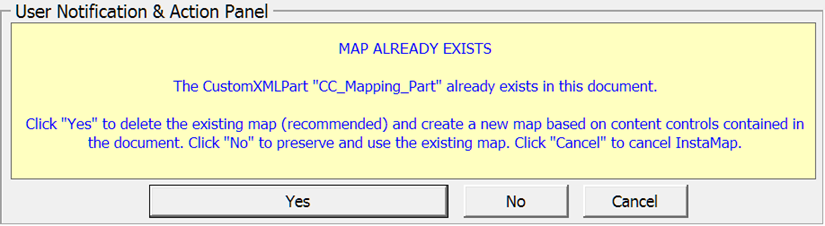
If previous mapping using the "CC_Mapping_Part" has already been performed, initiating the InstaMap process will result in the following display. There is really no point in preserving the existing map so "Yes" is always the recommend action.
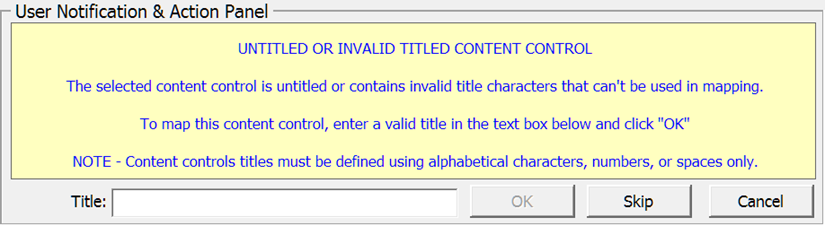
If an otherwise qualified, but untitled content control is encountered during the InstaMap process, you are prompted to provide a valid title. You can provide a valid title or elect to skip mapping the untitled control.
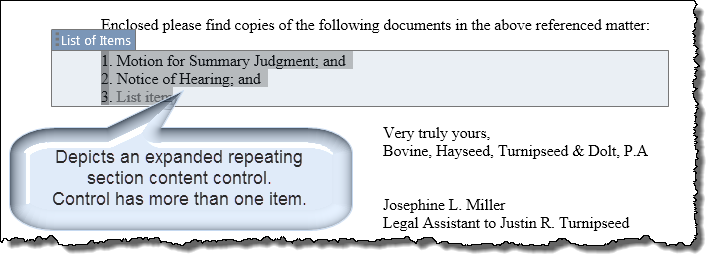
If a repeating section content control is encountered that is expanded (i.e., contains more than the default single section), that repeating section control and all nested content controls it contains will be skipped and not mapped.
The Utilities page tab was introduced with version 3.0 and expanded with versions 3.1, 3.4 and 3.5. It provides docking space for launching auxiliary utilities.
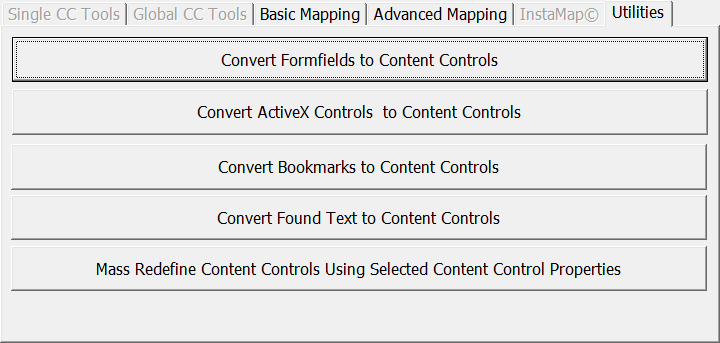
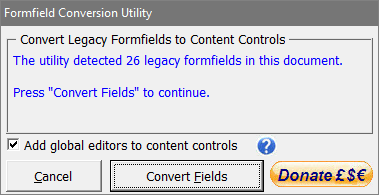
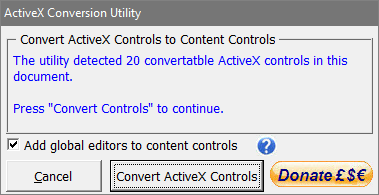
The "Convert Formfields to Content Controls utility is described in detail in my Extract Data from Forms tips page. It and the Convert ActiveX controls are similar in form and function.
 |
 |
Inspired by a burst of interest in content controls by my old friend Graham Mayor, I decided to include my take on a couple of utilities that he has created for his content controls add-in. Unlike formfields and ActiveX controls, bookmarks can exist as a single point (zero-width) in a document, one or more bookmarks can be nested within other bookmarks and bookmarks can overlap each other. The following depicts a relatively complex bookmark arrangement.
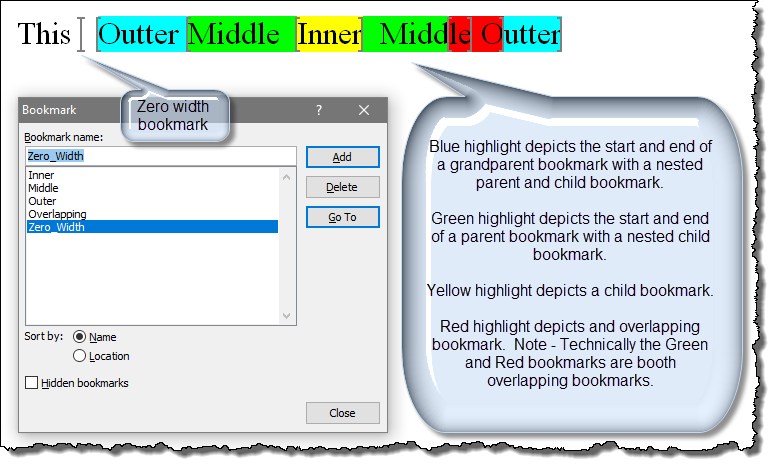
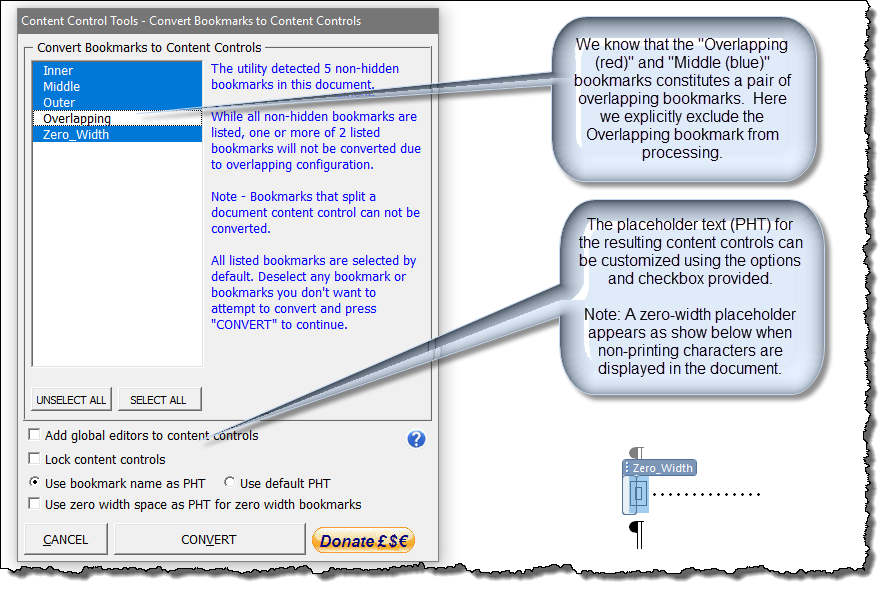
Unlike the previous two utilities described, only selected bookmarks are converted using the bookmark conversion utility. This permits the user to choose which bookmarks to convert. In cases of overlapping bookmarks, it is impossible to control with code which bookmark in a pair of overlapping bookmarks to convert. For the sake of this discussion, in this case we will excluded the overlapping "red" bookmark.
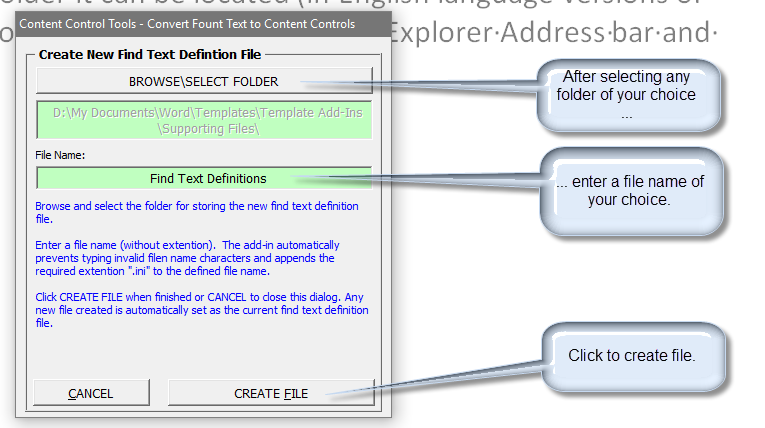
Again inspired by Graham, this utility enables you to replace each occurrence of selected "find text definitions" found in the current document with a content control. The find text definitions are user defined and stored in one or more external text (.ini format) files. On first use, the following sequence of dialogs are displayed and the first action is to create a find text definitions file and the first find text definition.

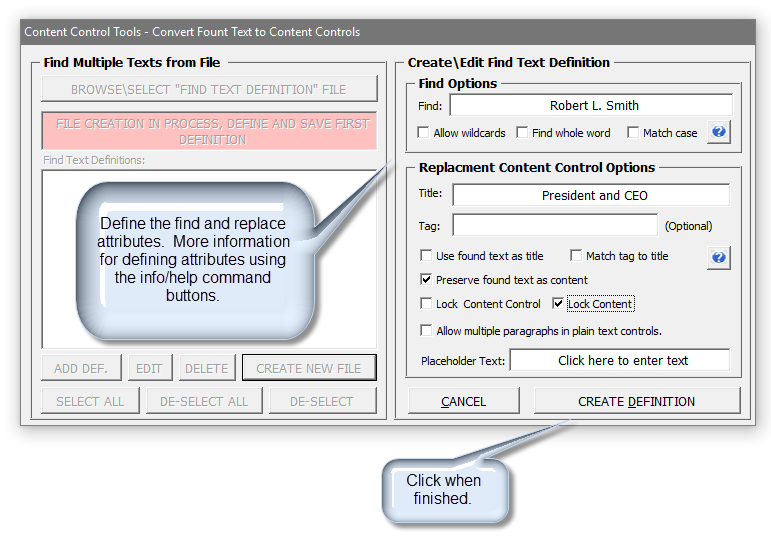
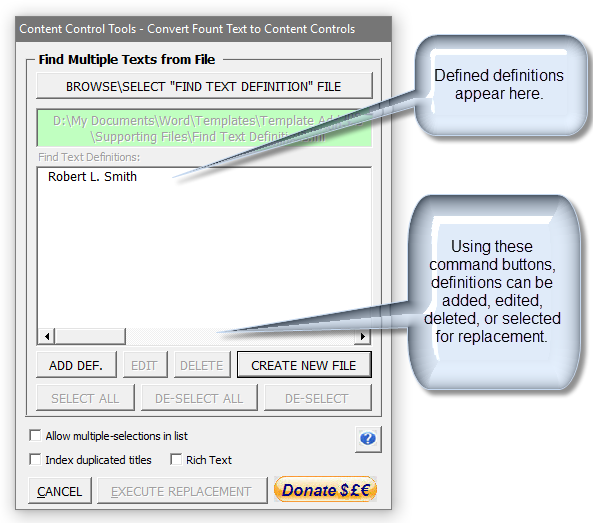
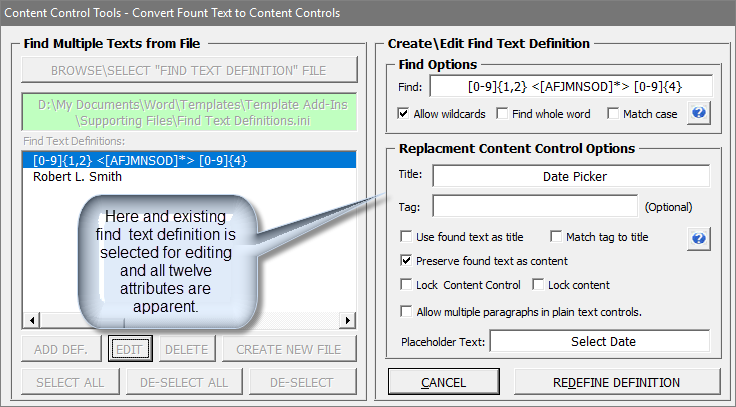
Each find text definition consists of the following twelve attributes in this order:
Only the "Find string" attribute is normally visible in the find text definition list. The list horizontal scroll bar can be use to review the other attributes or simply select the definition and click "Edit."
The utility employs two global attributes:
More information information on the attributes and there use is included in the add-in info\help dialogs.
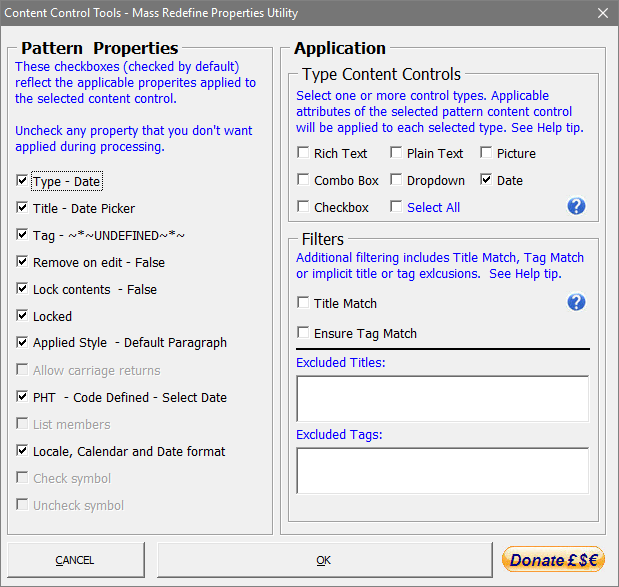
With the Mass Redefine Properties utility, you can select a "pattern" content control in your document and apply the selected controls properties to multiple other controls in the document. The info\help dialogs provide additional usage information.
Mapping rich text content controls containing existing tables (or any content for that matter) is impossible using Words native XML Mapping Pane. I found mapping existing rich text content a perplexing problem in both the Advanced Mapping and InstaMap processes of the add-in. A particularly challenge was faithfully mapping rich text content when the content control contains a table at/near the content control end range. The following illustrates three cases:
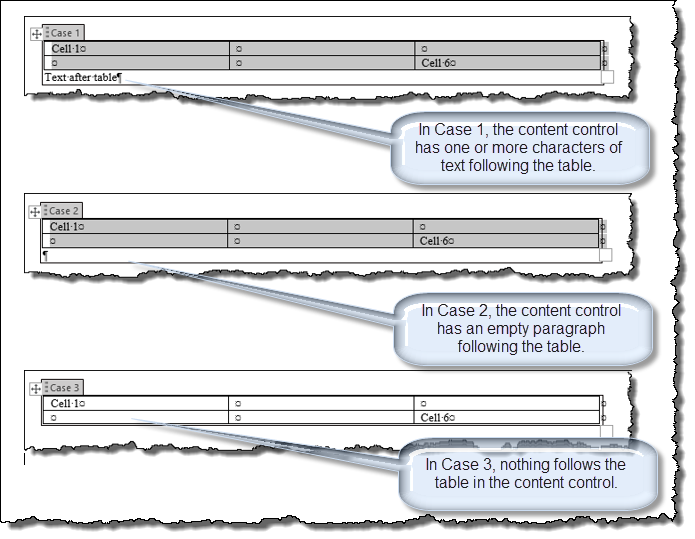
The following shows the result of some earlier processing attempts with these cases. As you will see, something was clearly amiss.
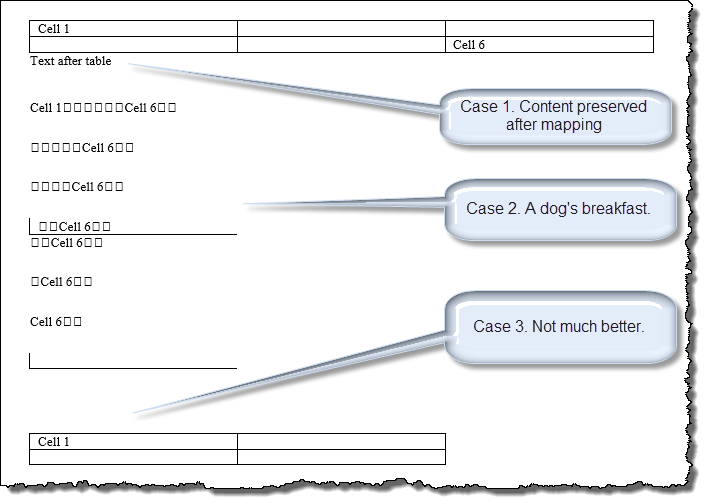
The problem is related to how Microsoft goofed up defining the content control range boundaries. When processing rich text content controls containing tables, the add-in accommodates this condition. After processing, content controls meeting case 2 or case 3 conditions may include a blank single space and paragraph following the table in the content control range. Thanks
When Microsoft deprecated the standard TreeView control with the release of the Office 64 bit suite, I thought that the "Advanced Mapping" tools page of the add-in was doomed to the dust bin of history. Without that control I was at a loss as to how to provide and display the XML structure of the CustomXMLParts.
To my pleasant surprise, Jan Karel Pieterse (JKP Application Development Services) assisted by Peter Thornton produced an enhanced a custom TreeView class which, with some assistance by Peter, I have substituted for the standard treeveiw control. It works masterfully and is available here: http://www.jkp-ads.com/Articles/treeview.asp
A special thanks to Peter for his work on the control and his assistance implementing it in this project. I would also like to thank Jay Freedman and Graham Mayor for their reviews and comments.
That's it! I hope you have found this tips page informative and find the add-in useful. You can download the template add-in here: Content Control Tools
![]() For more on template add-ins and how to load them, see: Organizing Your Macros/Template Add-ins at: Installing Macros
For more on template add-ins and how to load them, see: Organizing Your Macros/Template Add-ins at: Installing Macros
The information, illustrations and code contained in my "Microsoft Word Tips" are provided free and without risk or obligation.
However, the work is mine. If you use it for commercial purposes or benefit from my efforts through income earned or time saved then a donation, however small, will help to ensure the continued availability of this resource.
If you would like to donate, please use the appropriate donate button to access PayPal. Thank you!
This page was last updated on
March 09, 2021
Website
Privacy Statement
Back to top ![]() Back to
Word Tips
Back to
Word Tips