The Anchorage
Personal website of Gregory K. Maxey, Commander USN (Retired)
The Anchorage
Personal website of Gregory K. Maxey, Commander USN (Retired)
The information, illustrations and code contained in my "Microsoft Word Tips" are provided free and without risk or obligation.

However, the work is mine. If you use it for commercial purposes or benefit from my efforts through income earned or time saved then a donation, however small, will help to ensure the continued availability of this resource.
If you would like to donate, please use the appropriate donate button to access PayPal. Thank you!
This Microsoft Word Tips & Microsoft Word Help page introduces and provides instructions for using the "Content Control/Variable/Bookmark & Document Property Tools (or CC/V/BM & DP)" Word template add-in.
This add-in has a long history. It was originally developed with longtime friend and Word MVP Graham Mayor and is the culmination of well over a hundred hours of development and testing.
Unfortunately due to personal business and unplanned travel, Graham was unavailable to assist with the design and testing of the version 3.0 which introduced features for working with mapped content controls. His presence was sorely missed!!
Graham has since returned to the fold and the current version 4.6 includes some of our combined work to enhance content control dropdown list development.
The impetus for this project is the lack of visibility and everyday user access to two very useful and powerful Word features; the "document variable" and the "mapped" content control.
![]() Note: "Qualified" types as mentioned in this tips page, refers to the types of content controls available in the applicable Word application version in use.
Note: "Qualified" types as mentioned in this tips page, refers to the types of content controls available in the applicable Word application version in use.
We have retained the features for working with bookmarks and document properties introduced in our, now obsolete, "Document Variables, Bookmarks & Properties" add-in. This results in a single compact and versatile add-in for working with all five principal data storage collections in your documents.
![]() Notes:
Notes:
1. Testing and development with this add-in has been limited to the U.S. English version of Microsoft Word 2007/2010/2013/2016 in a Windows 7 and Windows 10. Lack of access, time and resources has prevented further testing. Unfortunately feedback confirms that the variances in other language versions of the Microsoft products involved can prevent the add-in from functioning properly in those versions.
2.
Items annotated using rose colored flags in the illustrations below indicate changes and additions introduced in version 3.0.
3.
With any large development work changes are inevitable. While the illustrations were current with the release of version 3.0, there may be future changes that are not fully or accurately illustrated.
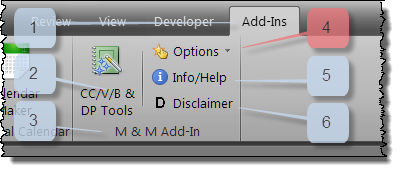
When the add-in loads it alters the Ribbon as follows:
![]() Note: with version 4.6, the "Disclaimer" control has been replaced with a "Reset" control you use to reset the Add-In configuration to default values.
Note: with version 4.6, the "Disclaimer" control has been replaced with a "Reset" control you use to reset the Add-In configuration to default values.
![]() Notes:
Notes:
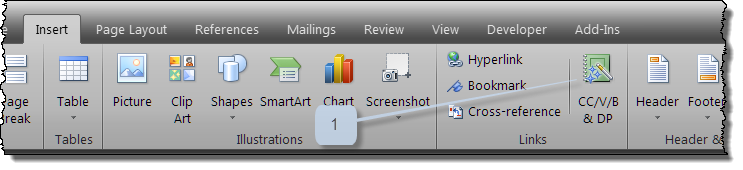
1. This feature may affect the normally displayed size of the built-in "Hyperlink, Bookmark and Cross-Reference" controls. These controls will display size "normal" when displayed with the add-in button control regardless of how they might display (i.e., large or normal) on their own.
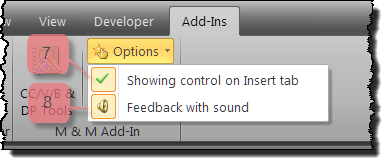
2. This feature was the single biggest point of contention between Graham and me during development. He wanted the controls on the Insert tab and I felt they belonged on the Add-Ins tab. The result is our form of compromise.
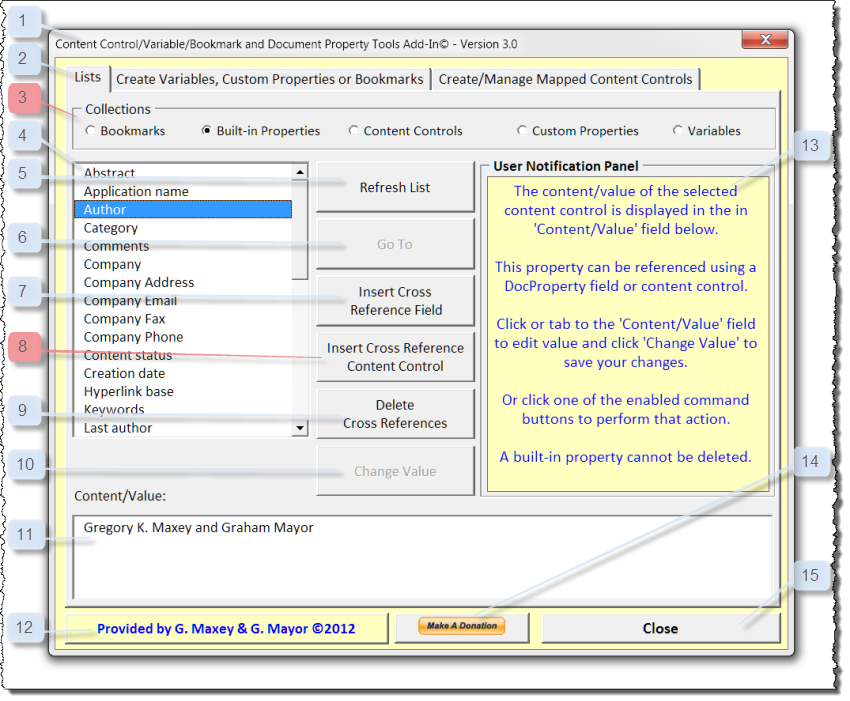
The add-in consists of a three part multi-page control and common elements. The functions of the common elements and the "Lists" tab page is described below:
![]() Note: Values in certain Built-in Document Properties are calculated values and cannot be changed.
Note: Values in certain Built-in Document Properties are calculated values and cannot be changed.
![]() Note - One or more command button or other control will be disabled depending on which collection option is selected.
Note - One or more command button or other control will be disabled depending on which collection option is selected.
The "User Notification and Action Panel" depicted below is is shown configured to delete the selected bookmark:
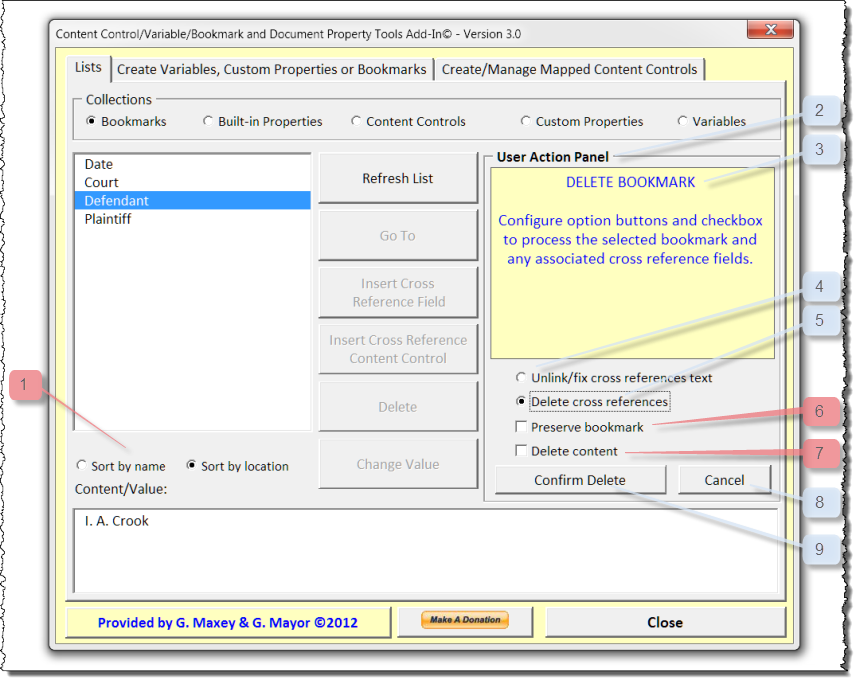
![]() Note: The location sort is based on the item's location in the various document story ranges starting with the main text range, then footnote range, followed by end note range etc., and not how the item might physically appear in the document.
Note: The location sort is based on the item's location in the various document story ranges starting with the main text range, then footnote range, followed by end note range etc., and not how the item might physically appear in the document.
![]() Note: When "Delete content" is checked the "Preserve bookmark" checkbox is automatically unchecked and disabled.
Note: When "Delete content" is checked the "Preserve bookmark" checkbox is automatically unchecked and disabled.
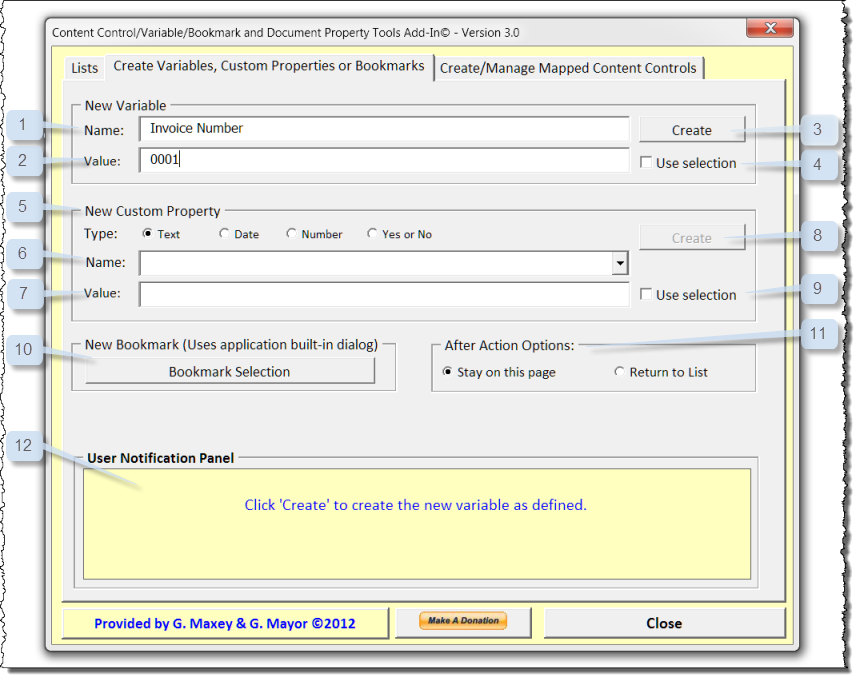
Using the "Create Variables, Custom Properties or Bookmarks" tab you can define and create new document variables, custom document properties or bookmarks.
![]() Note: Word provides 35 pre-defined custom document properties (without values). This field is a combo box which allows you to choose from one of the pre-defined properties and assign a value or define your own new property name.
Note: Word provides 35 pre-defined custom document properties (without values). This field is a combo box which allows you to choose from one of the pre-defined properties and assign a value or define your own new property name.
![]() Note: Values for custom document properties are type dependent. For example, if you opt to create a "Date" type custom document property then the value you define must be in a valid recognizable date format.
Note: Values for custom document properties are type dependent. For example, if you opt to create a "Date" type custom document property then the value you define must be in a valid recognizable date format.
With version 4.6, this portion of the add-in has been simplified to make it easier for casual users to employ. The illustrations and explanations that follow are not a detailed as those above. For a more sophisticated (ergo complex) CC tool, see my: Content Control Tools tips page.
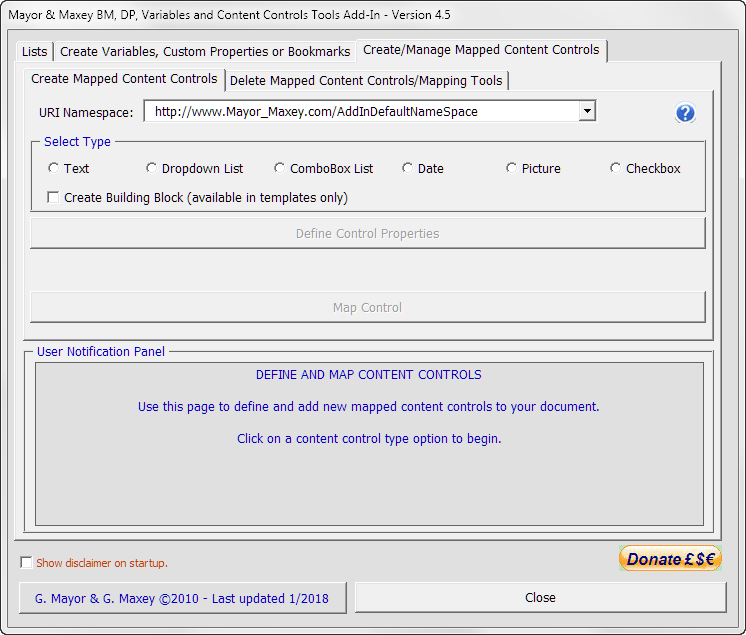
The "Create/Manage Mapped Content Controls" tab page consists of a two part multi-page control (page 1 "Create Mapped Content Controls" displayed above).
With the Create Mapped Content Controls page, you can:
![]() Note: To insert or map richtext or repeating section CCs, see my Content Control Tools tips page.
Note: To insert or map richtext or repeating section CCs, see my Content Control Tools tips page.
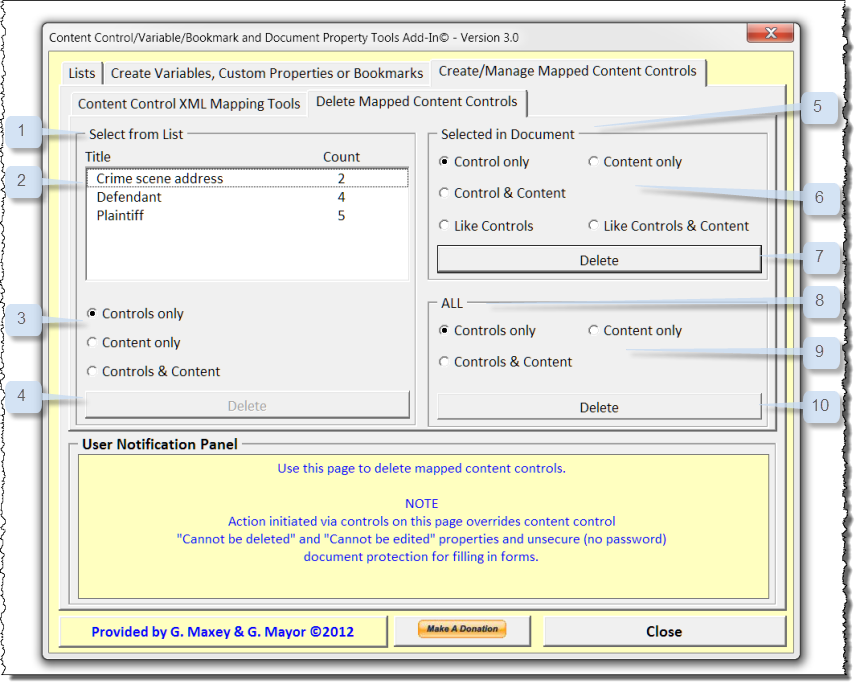
Using the "Delete Mapped Content Controls/Mapping Tools" tab you can use several methods to remove unwanted mapped controls from your document.
![]() Note - All delete actions initiated from this page tab override any "Content control cannot be edited", "Content control cannot be deleted" and unsecure (no password) document protection for forms.
Note - All delete actions initiated from this page tab override any "Content control cannot be edited", "Content control cannot be deleted" and unsecure (no password) document protection for forms.
![]() Note: This is where unique title discipline mentioned earlier becomes important. When you insert a cross reference content control using this add-in or if you copy and paste a mapped content control in your document to another location in your document, you have created for all intents and purposes a clone. It is only logical that the clone will retain the title and XML mapping path. Should you later change title of a like mapped content control it could affect the accuracy of this list and the accuracy of the subsequent delete actions.
Note: This is where unique title discipline mentioned earlier becomes important. When you insert a cross reference content control using this add-in or if you copy and paste a mapped content control in your document to another location in your document, you have created for all intents and purposes a clone. It is only logical that the clone will retain the title and XML mapping path. Should you later change title of a like mapped content control it could affect the accuracy of this list and the accuracy of the subsequent delete actions.
![]() Note: By the nature of mapped controls if you delete the content in one the content is deleted from all like controls.
Note: By the nature of mapped controls if you delete the content in one the content is deleted from all like controls.
![]() Note: This action affects all document mapped contents and is irrevocable (except for immediately closing a document without saving changes). Therefore we have added a confirmation step. When the command button is initially selected a confirmation notification is displayed and the command button caption is displayed in red lettering. Clicking the command button displaying a red letter caption executes the event without additional notification or warning.
Note: This action affects all document mapped contents and is irrevocable (except for immediately closing a document without saving changes). Therefore we have added a confirmation step. When the command button is initially selected a confirmation notification is displayed and the command button caption is displayed in red lettering. Clicking the command button displaying a red letter caption executes the event without additional notification or warning.
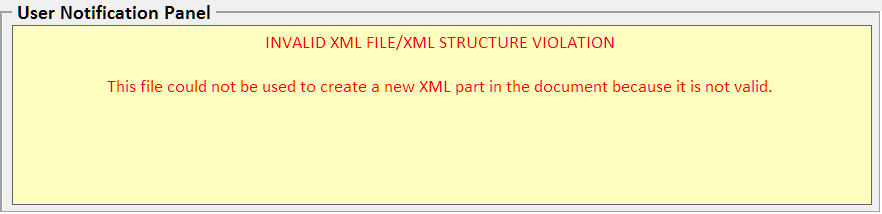
The "User Notification Panels" provide various alerts and notifications. The add-in alerts the user to restricted or invalid events using red alert text in the appropriate "User Notification Panel" and an audible default system "Beep." A typical alert notification is shown below:
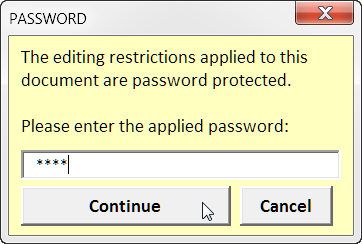
Several processes in the add-in require documents protected for forms to be temporarily unprotected to complete. When a password is required the user is presented with the following form:
![]() Note: These processes are performed automatically without any user interaction in unsecure (no password) protected forms.
Note: These processes are performed automatically without any user interaction in unsecure (no password) protected forms.
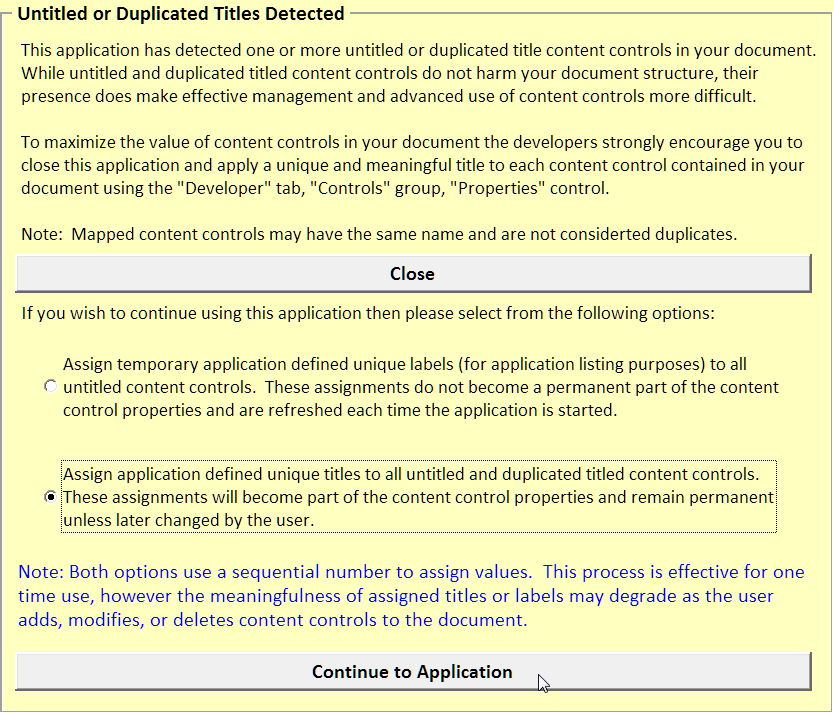
The add-in will parse the document for untitled and duplicate titled (non-mapped) content controls each time it is initiated. As content controls are listed by title they must have either a title property or a temporary label in lieu of a title property. Careful and thoughtful application of content control titles will eliminate this notification.
![]() Note: It is intuitive and expected that like mapped content controls will have the same title.
Note: It is intuitive and expected that like mapped content controls will have the same title.
This Word template add-in can be loaded manually from any template storage directory or automatically from your Word startup folder.
![]() For more on template add-ins and how to load them, see: Organizing Your Macros/Template Add-ins at: Installing Macros
For more on template add-ins and how to load them, see: Organizing Your Macros/Template Add-ins at: Installing Macros
That's it. I hope you find the add-in helpful and as much fun to use as it was to create!! Download version 4.6 here: CC/V/BM & Tools V4.
I can't stress enough the encouragement and cooperation by Graham Mayor or the technical contributions he made. Please visit Graham's web page for his slant on the add-in, its features and tips for installation at: Graham's Add-In Description.
The information, illustrations and code contained in my "Microsoft Word Tips" are provided free and without risk or obligation.
However, the work is mine. If you use it for commercial purposes or benefit from my efforts through income earned or time saved then a donation, however small, will help to ensure the continued availability of this resource.
If you would like to donate, please use the appropriate donate button to access PayPal. Thank you!
This page was last updated on
December 10, 2024
Website
Privacy Statement
Back to top ![]() Back to
Word Tips
Back to
Word Tips