The Anchorage
Personal website of Gregory K. Maxey, Commander USN (Retired)
The Anchorage
Personal website of Gregory K. Maxey, Commander USN (Retired)
The information, illustrations and code contained in my "Microsoft Word Tips" are provided free and without risk or obligation.

However, the work is mine. If you use it for commercial purposes or benefit from my efforts through income earned or time saved then a donation, however small, will help to ensure the continued availability of this resource.
If you would like to donate, please use the appropriate donate button to access PayPal. Thank you!
General Colin Powell had a wonderful way of saying much with few words. His “shock and awe” description of the opening days of Operation Desert Storm described in two words what the world was watching on television. Perhaps “Shock and dismay" is a phrase well suited to describe the reaction of many intermediate and advance Word users upon their introduction to the Ribbon user interface (UI) in Word 2007/2010.
Be that as it may, and despite the wailing and gnashing of many, I think that the Ribbon UI is here to stay and serious users should learn to get along with it.
This Microsoft Word Help & Microsoft Word Tips page presents my attempt to show you how you can customize the Ribbon UI without resorting to "commercial" third party add-ins (i.e., add-ins that you have to pay for).
Mastering the methods presented here, you can regain complete control of your Ribbon UI; both its look and its functionality. Given a chance you may one day come to appreciate the ribbon. Especially after you learn that it can be customized in ways far beyond the capabilities of the former command bar menus.
The ribbon is customized using an XML script. From here on I will try to refer to this script as RibbonXML. While you don't have to be a rocket scientist to customize the Ribbon UI, you do have to be willing roll up your sleeves and learn just a little about RibbonXML structure and some of the individual ribbon controls.
![]() Note: With the release of Word 2010, Microsoft has provided a means for performing basic ribbon customization of the Word 2010 ribbon using the built-in user interface. This tips page is focused on showing you how to use a RibbonXML script to perform ribbon customization and will not cover or further address the built-in tools in Word 2010.
Note: With the release of Word 2010, Microsoft has provided a means for performing basic ribbon customization of the Word 2010 ribbon using the built-in user interface. This tips page is focused on showing you how to use a RibbonXML script to perform ribbon customization and will not cover or further address the built-in tools in Word 2010.
An excellent resource to gain some technical background and information about Ribbon customization is available in a series of Microsoft articles:
In my opinion the real value of these articles, once you see how the ribbon is customized here, is as a reference for exploring additional ribbon controls and their methods, attributes and callbacks.
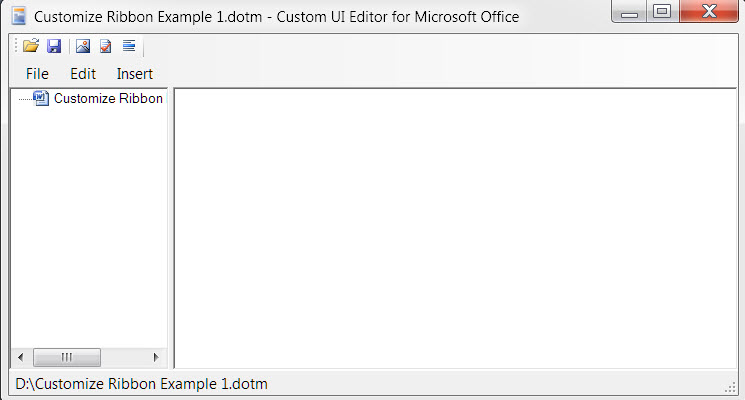
In the examples that follow, I perform the customization using the Office Custom UI Editor and Word template add-ins. I used this approach because ...
A new and improved Custom UI Editor is available free at GitHub. The original Office Custom UI Editor is available for free download from OpenXMLDeveloper.org: Custom UI Editor if that link is broken, you can download it from my site here: Download
Using the methods described here, ribbon customization can be applied to a single document, all documents based on a particular Word template, or globally using a Word template Add-In.
Enough background. Now on to the process of customizing the Ribbon UI.
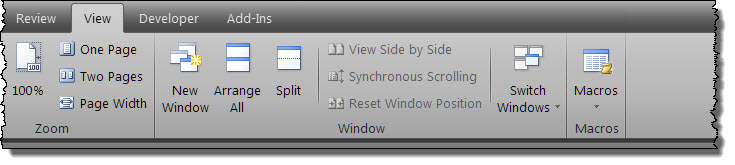
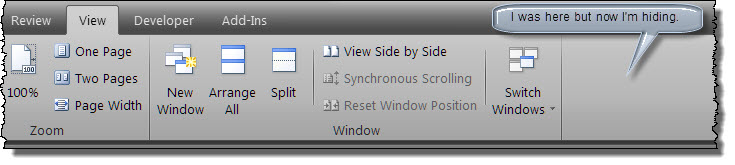
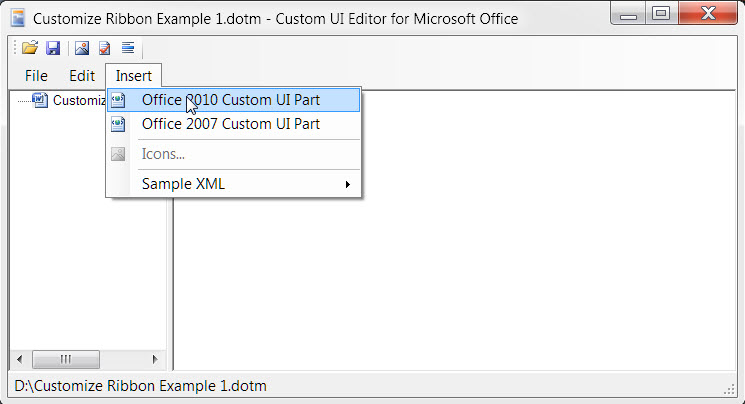
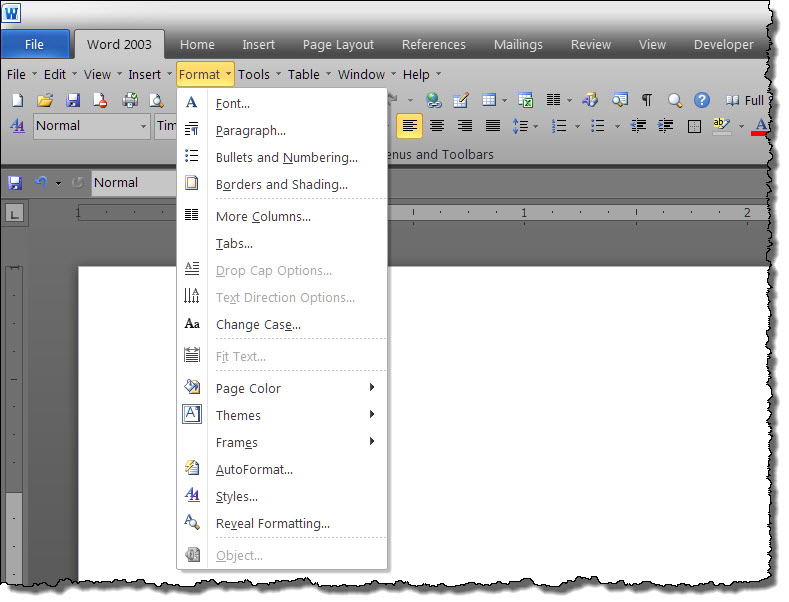
The first example is very basic. Here I will show you how to "hide" a single built-in control on the ribbon. Let's hide the "Macros" group from the "View" tab. You might want to do this to make room for a different control.
The steps for making this customization are outlined below:
![]() Notes:
Notes:
1.
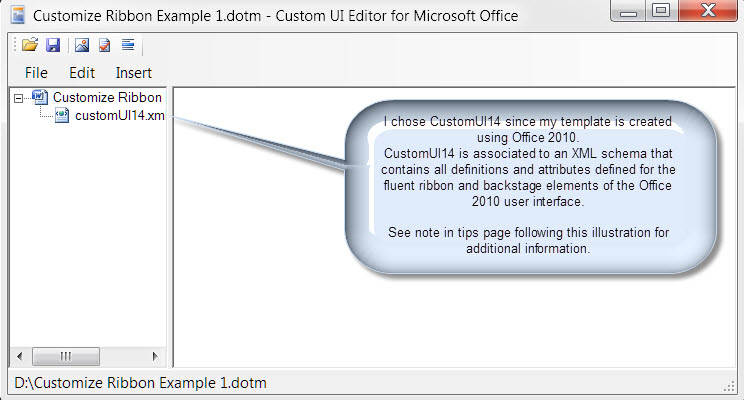
As the Custom UI Editor may be upgraded, illustrations depicting the editor on this page and other pages on this site may vary slightly from its actual appearance.
2. When
developing RibbonXML scripts you may elect to include dual scripts, one defined in CustomUI14 and one defined in CustomUI12. This enables you to define variations in how your custom UI is displayed when used in Word 2007 or Word 2010. Ron de Bruin provides an excellent example using Excel, which can be easily applied to Word, here:
Load different RibbonX when opening file in Excel 2007 or 2010.
<?xml version="1.0" encoding="UTF-8" standalone="yes"?>
<customUI xmlns="http://schemas.microsoft.com/office/2009/07/customui">
  <ribbon>
    <tabs>
      <tab idMso="TabView">
        <group idMso="GroupMacros" visible="false" />
      </tab>
    </tabs>
  </ribbon>
</customUI>
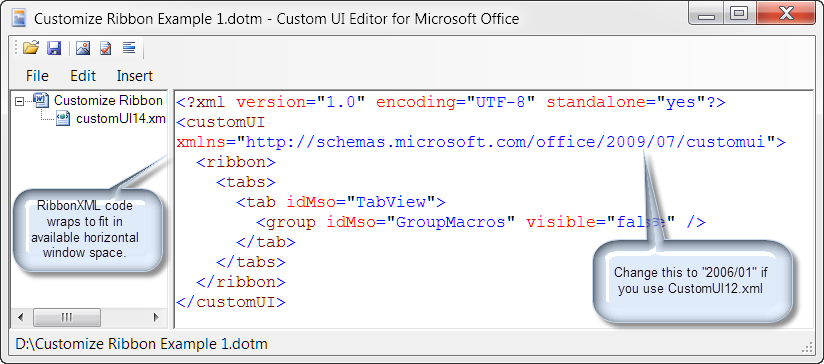
![]() Note: You can't physically remove the built-in controls on the ribbon. Instead you use the "visible" attribute of the control to determine if that control is shown on the ribbon.
Note: You can't physically remove the built-in controls on the ribbon. Instead you use the "visible" attribute of the control to determine if that control is shown on the ribbon.
![]() Bonus Tips:
Bonus Tips:
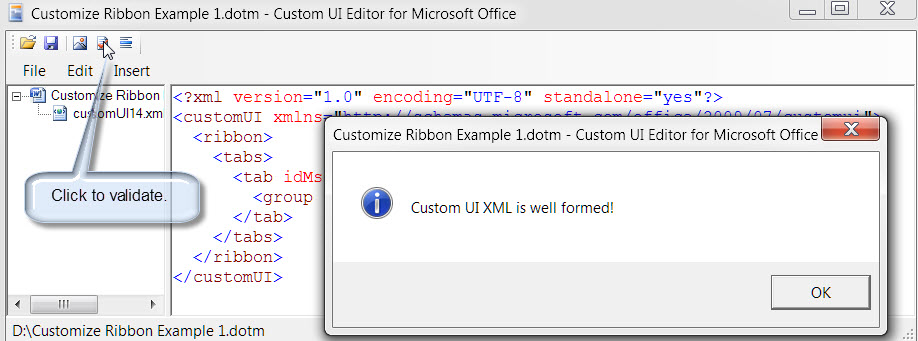
1. The RibbonXML script shown above is validated against the schema definition for ribbon extensibility. When you begin to create your own RibbonXML script with the Custom UI Editor it is a good practice to always validate your script against the schema definition before closing the editor.
On second thought, since finding errors when you make them can be frustrating it is not a bad idea to validate frequently. For a beginner, after every entry isn't a bad practice and save often. The schema definition provides the rules for creating valid hierarchical instructions for customizing the ribbon. You can download and review a copy of the schema definition from the MSDN website: Office2007XML Schema &
Office2010XML Schema
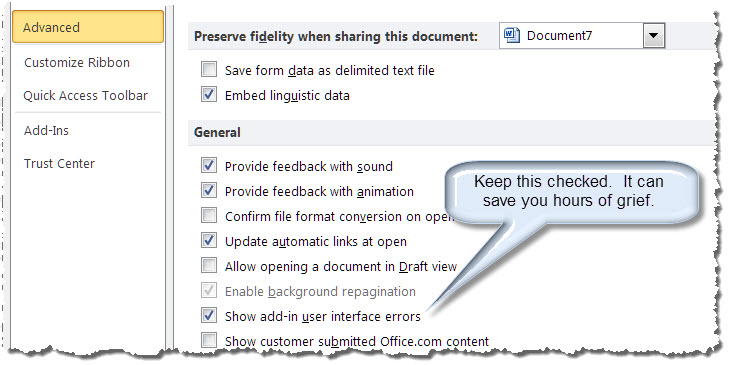
2. Even RibbonXML that is well formed can contain errors that prevent Word from interpreting your customization. Always set Word's option to detect user interface errors.
![]() For more on template add-ins and how to load them, see Organizing Your Macros/Template Add-ins at: Installing Macros
For more on template add-ins and how to load them, see Organizing Your Macros/Template Add-ins at: Installing Macros
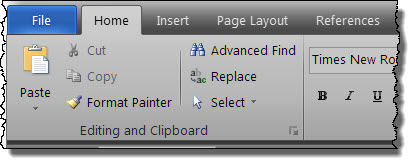
In this example we will expand on what you have seen above. Let's use the built-in Home tab and remove, rearrange and add controls. The Home tab contains a group labeled "Clipboard" on the left hand side and a group labeled "Editing" on the right hand side. I want to combine these groups into a single group labeled "Editing and Clipboard" located on the left side of the ribbon as shown in the illustration below.
Once again we follow a few simply steps:
<?xml version="1.0" encoding="UTF-8" standalone="yes"?>
<customUI xmlns="http://schemas.microsoft.com/office/2009/07/customui">
<ribbon>
<tabs>
<tab idMso="TabHome">
<group idMso="GroupEditing" visible="false" />
<group idMso="GroupClipboard" visible="false" />
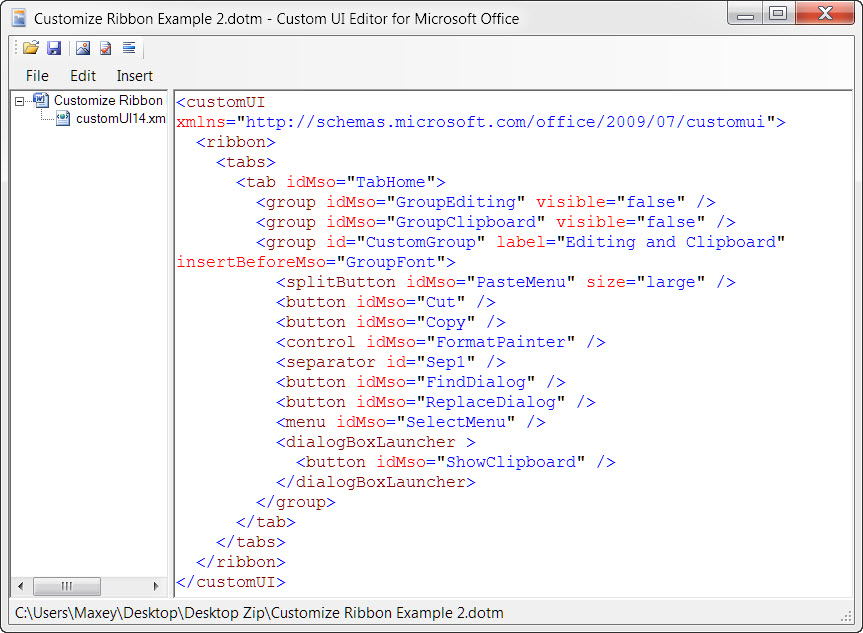
<group id="CustomGroup" label="Editing and Clipboard" insertBeforeMso="GroupFont">
<splitButton idMso="PasteMenu" size="large" />
<button idMso="Cut" />
<button idMso="Copy" />
<control idMso="FormatPainter" />
<separator id="Sep1" />
<button idMso="FindDialog" />
<button idMso="ReplaceDialog" />
<menu idMso="SelectMenu" />
<dialogBoxLauncher >
<button idMso="ShowClipboard" />
</dialogBoxLauncher>
</group>
</tab>
</tabs>
</ribbon>
</customUI>
![]() Reminder: You can't physically remove or edit built-in controls on the ribbon. Instead you use the "visible" attribute of the control to determine if that control is shown on the ribbon.
Reminder: You can't physically remove or edit built-in controls on the ribbon. Instead you use the "visible" attribute of the control to determine if that control is shown on the ribbon.
- Hides the built-in GroupClipboard and GroupEditing controls on the built-in Home tab.
- Creates a new custom group "Editing and Clipboard" positioned before the built-in GroupFont.
- Adds built-in buttons, a control, a menu, and a dialogBoxLauncer to the new custom group along with a custom separator.
![]() Notes:
Notes:
1. "idMso" is the fixed internal tag for built-in controls. The idMso must match a valid control name. You can determine the name of most of the built-in controls using the Word Options>Customize (or Word Options>Customize Ribbon) and scrolling your mouse over the built-in in command controls. The idMso appears in screen tip in parenthesis e.g., Popular Commands | File (FileSave). Additionally, a complete list of Ribbon UI control names and types can be downloaded from Microsoft: List of Control IDs (Office 2007) & List of Control IDs (Office 2010)
2. "id" is a arbitrary user defined unique tag for custom controls like the separator used in the example above. You can use practically anything you like but it must be unique for each control used. A best practice is to stay consistent and use some sort of numerical sequence.
The range of modification to the Ribbon UI using built-in controls and a few custom separators is practically endless. With a valid, and yes lengthy, XML script you can create a custom tab containing almost all the classic menus and toolbars! To download a template that contains this script, visit my Ribbon Menu Controls
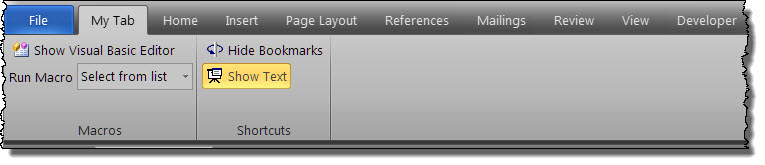
For the final example I will show you how to create and add custom controls to the ribbon. My most frequent customization of the menus and toolbars in the classic user interface was for docking macros or other shortcuts that a user could call from various add-ins that I have created.
Let’s create the custom tab "My Tab" shown below. It contains two custom groups "Macros" and "Shortcuts."
<?xml version="1.0" encoding="UTF-8" standalone="yes"?>
<customUI xmlns="http://schemas.microsoft.com/office/2009/07/customui" onLoad="RibbonControl.Onload">
  <ribbon>
    <tabs>
      <tab id="CustomTab1" label="My Tab">
        <group id="CustGrp1" label="Macros" >
            <button id="Btn1" label="Show Visual Basic Editor" imageMso="VisualBasic"
                    onAction="RibbonControl.MyBtnMacro" />
            <dropDown id="DD1" label="Run Macro"
                      getItemCount="RibbonControl.GetItemCount"
                      getItemLabel="RibbonControl.GetItemLabel"
                      getSelectedItemIndex="RibbonControl.GetSelectedItemIndex"
                      onAction="RibbonControl.MyDDMacro" />
        </group>
        <group id="CustGrp2" label="Shortcuts" >
          <toggleButton id="TB1" size="normal"
                        getImage="RibbonControl.getImage"
                        getLabel="RibbonControl.getLabel"
                        onAction="RibbonControl.ToggleonAction"
                        getPressed="RibbonControl.buttonPressed" />
          <toggleButton id="TB2" size="normal"
                        getImage="RibbonControl.getImage"
                        getLabel="RibbonControl.getLabel"
                        onAction="RibbonControl.ToggleonAction"
                        getPressed="RibbonControl.buttonPressed" />
        </group>
      </tab>
    </tabs>
  </ribbon>
</customUI>
![]() Notes:
Notes:
1. There are several unique differences between the RibbonXML script used in the first two example and that used here. Notice the complete absence of "idMso" and the exclusive use of "id" instead." Remember, idMso" is the fixed internal ID for built-in controls while "id" is a arbitrary user defined unique ID for custom controls.
2. Also note the addition of the "onLoad="RibbonControl.Onload" in line 2 and the the instructions that I have indexed under the "id" attribute of the controls. These are dynamic attributes or methods of the ribbon and its controls that use callbacks to interface and communicate with a VBA project in the template.
3. When Word executes this RibbonXML script, it really doesn't know (yet) how many items to put in the dropdown control or which label to apply. It also doesn't know which image or label to to associate with the toggle buttons. When the script is executed Word gets this information form data that you provide in a VBA project associated with the RibbonXML script through VBA callbacks.
![]() WARNING ** Save yourself lots of grief. Always save and close your template in the Custom UI Editor before opening your template in Word. Always save and close your template in Word before opening the template in the Custom UI Editor. Never, never ever attempt to work on a template in both applications at the same time. You can heed this advice or you can cry over lots of spilt milk. ** WARNING
WARNING ** Save yourself lots of grief. Always save and close your template in the Custom UI Editor before opening your template in Word. Always save and close your template in Word before opening the template in the Custom UI Editor. Never, never ever attempt to work on a template in both applications at the same time. You can heed this advice or you can cry over lots of spilt milk. ** WARNING
![]() Take Cover!! When you first open your template file in Word or click on your new "My Tab," you might think the world is coming to an end. There will be several errors generated and displayed. This is normal at this point because the RibbonXML script is looking for instructions from a VBA project doesn't exist yet.
Take Cover!! When you first open your template file in Word or click on your new "My Tab," you might think the world is coming to an end. There will be several errors generated and displayed. This is normal at this point because the RibbonXML script is looking for instructions from a VBA project doesn't exist yet.
![]() Note: The module names are arbitrary. RibbonControl is used to match the callbacks assigned in the RibbonXML script. The project name and name specified in the script could be anything you like.
Note: The module names are arbitrary. RibbonControl is used to match the callbacks assigned in the RibbonXML script. The project name and name specified in the script could be anything you like.
Option Explicit
Public myRibbon As IRibbonUI

Sub Onload(ribbon As IRibbonUI)
  'Creates a ribbon instance for use in this project
  Set myRibbon = ribbon
End Sub

'Callback for DropDown GetItemCount
Sub GetItemCount(ByVal control As IRibbonControl, ByRef count)
  'Tell the ribbon to show 4 items in the dropdown
  count = 4
End Sub

'Callback for DropDown GetItemLabel
Sub GetItemLabel(ByVal control As IRibbonControl, Index As Integer, ByRef label)
  'This procedure fires once for each item in the dropdown. Index is _
   received as 0, 1, 2, etc. and label is returned.
  label = Choose(Index + 1, "Select from list", "Macro 1", "Macro 2", "Macro 3")
End Sub

'Callback DropDown GetSelectedIndex
Sub GetSelectedItemIndex(ByVal control As IRibbonControl, ByRef Index)
  'This procedure is used to ensure the first item in the dropdown is selected _
   when the control is displayed
  Select Case control.id
    Case Is = "DD1"
      Index = 0
    Case Else
      'Do nothing
  End Select
End Sub

'Callback for DropDown onAction
Sub myDDMacro(ByVal control As IRibbonControl, selectedID As String, selectedIndex As Integer)
  Select Case selectedIndex
    Case 0
      'Do nothing
    Case 1
      Macros.Macro1
    Case 2
      Macros.Macro2
    Case 3
      Macros.Macro3
  End Select
  'Force the ribbon to restore the control to its original state
  myRibbon.InvalidateControl control.id
End Sub

'Callback for Button onAction
Sub MyBtnMacro(ByVal control As IRibbonControl)
  Select Case control.id
    Case Is = "Btn1"
      Macros.ShowEditor
    Case Else
      'Do nothing
  End Select
End Sub

'Callback for Toogle onAction
Sub ToggleonAction(control As IRibbonControl, pressed As Boolean)
  Select Case control.id
    Case Is = "TB1"
      ActiveWindow.View.ShowBookmarks = Not ActiveWindow.View.ShowBookmarks
    Case Is = "TB2"
      'Note: "pressed" represents the toggle state. So we could use this instead.
      If pressed Then
        ActiveWindow.View.ShowHiddenText = False
      Else
        ActiveWindow.View.ShowHiddenText = True
      End If
      If Not ActiveWindow.View.ShowHiddenText Then
        ActiveWindow.View.ShowAll = False
      End If
  End Select
  'Force the ribbon to redefine the control wiht correct image and label
  myRibbon.InvalidateControl control.id
End Sub

'Callback for togglebutton getLabel
Sub getLabel(control As IRibbonControl, ByRef returnedVal)
  Select Case control.id
    Case Is = "TB1"
      If Not ActiveWindow.View.ShowBookmarks Then
        returnedVal = "Show Bookmarks"
      Else
        returnedVal = "Hide Bookmarks"
      End If
    Case Is = "TB2"
      If Not ActiveWindow.View.ShowHiddenText Then
        returnedVal = "Show Text"
      Else
       returnedVal = "Hide Text"
      End If
  End Select
End Sub

'Callback for togglebutton getImage
Sub GetImage(control As IRibbonControl, ByRef returnedVal)
  Select Case control.id
    Case Is = "TB1"
      If ActiveWindow.View.ShowBookmarks Then
        returnedVal = "_3DTiltRightClassic" 'The idMso of a built-in control
      Else
        returnedVal = "_3DTiltLeftClassic" 'The idMso of a built-in control
      End If
    Case Is = "TB2"
      If ActiveWindow.View.ShowHiddenText Then
        returnedVal = "WebControlHidden" 'The idMso of a built-in control
      Else
        returnedVal = "SlideShowInAWindow" 'The idMso of a built-in control
     End If
  End Select
End Sub

'Callback for togglebutton getPressed
Sub buttonPressed(control As IRibbonControl, ByRef toggleState)
  'toggleState (i.e., true or false) determines how the 'toggle appears _
   on the ribbon (i.e., flusn or sunken).
  Select Case control.id
    Case Is = "TB1"
      If Not ActiveWindow.View.ShowBookmarks Then
        toggleState = True
      Else
        toggleState = False
      End If
    Case Is = "TB2"
      If Not ActiveWindow.View.ShowHiddenText Then
        toggleState = True
      Else
        toggleState = False
      End If
  End Select
End Sub
![]() Bonus Tip: Notice the Select Case statements in the callback procedures. Get used to using same callback procedures and appropriate Case statements to process multiple controls. It will save you countless lines of code in larger projects.
Bonus Tip: Notice the Select Case statements in the callback procedures. Get used to using same callback procedures and appropriate Case statements to process multiple controls. It will save you countless lines of code in larger projects.
Option Explicit

Sub ShowEditor()
ShowVisualBasicEditor = True
End Sub

Sub Macro1()
MsgBox "Macro 1 running" 'Replace this with whatever code you would wish to run.
End Sub

Sub Macro2()
MsgBox "Macro 2 running" 'Replace this with whatever code you would wish to run.
End Sub

Sub Macro3()
MsgBox "Macro 3 running" 'Replace this with whatever code you would wish to run.
End Sub
![]() Note: Several users have experienced problems getting these examples to work when they attempt to copy and paste some of the RibbonXML or VBA provided above. I believe these problems are due to some of the formatting I used in this web page. Therefore, I am providing copies of the working files that contain all of the RibbonXML and VBA code for you to down load (Files ending with "A" provide the CustomUI12 for Word 2007): Ribbon Customization Demo Templates
Note: Several users have experienced problems getting these examples to work when they attempt to copy and paste some of the RibbonXML or VBA provided above. I believe these problems are due to some of the formatting I used in this web page. Therefore, I am providing copies of the working files that contain all of the RibbonXML and VBA code for you to down load (Files ending with "A" provide the CustomUI12 for Word 2007): Ribbon Customization Demo Templates
I realize that for the beginner these methods may not be a walk in the sun. I also have stamped my foot and cried that I want my menus back. I think I can say that I fully understand the reluctance that many people will have at jumping in and learning to apply these methods. However, as you expand on the basics provided here, I think you will soon relize the teh incredible range of customization available with the Ribbon UI. This site provides several examples of advance customization. If you've not already done so then browse the other pages and you will fine several examples.
Just remember that ribbon customization doesn't take rocket science!!
That's it! I hope you have found this tips page useful and informative.
The information, illustrations and code contained in my "Microsoft Word Tips" are provided free and without risk or obligation.
However, the work is mine. If you use it for commercial purposes or benefit from my efforts through income earned or time saved then a donation, however small, will help to ensure the continued availability of this resource.
If you would like to donate, please use the appropriate donate button to access PayPal. Thank you!
This page was last updated on
March 27, 2021
Website
Privacy Statement
Back to top ![]() Back to
Word Tips
Back to
Word Tips