The Anchorage
Personal website of Gregory K. Maxey, Commander USN (Retired)
The Anchorage
Personal website of Gregory K. Maxey, Commander USN (Retired)
The information, illustrations and code contained in my "Microsoft Word Tips" are provided free and without risk or obligation.

However, the work is mine. If you use it for commercial purposes or benefit from my efforts through income earned or time saved then a donation, however small, will help to ensure the continued availability of this resource.
If you would like to donate, please use the appropriate donate button to access PayPal. Thank you!
This Microsoft Word Tips & Microsoft Word Help page offers several solutions to the question, "How do I enter data in one place in a document and have it automatically repeated in other places?" My intention is not to reinvent the wheel, so after a brief discussion I may simply send you on to an existing tips page or other web articles containing full explanations of some of the more comprehensive methods.
![]() Note: A lot of this material was prepared and posted before the release of Word 2007 and the introduction of Content Controls. Sections 1 through 6 address methods that can be used in all versions of Word (at least Word 2000 onwards). Some of the graphics and/or user interface controls I mention may be from Word 2003. Regardless, the methods are functionally the same.
Note: A lot of this material was prepared and posted before the release of Word 2007 and the introduction of Content Controls. Sections 1 through 6 address methods that can be used in all versions of Word (at least Word 2000 onwards). Some of the graphics and/or user interface controls I mention may be from Word 2003. Regardless, the methods are functionally the same.
See section 7, Content Controls, if you want to go directly to information about Content Controls introduced in Word 2007.
A Userform provides a graphical User Interface (UI) with a document template which you can use to prompt your document user to enter all pertinent data. User entered data is then populated in one or multiple locations in the document.
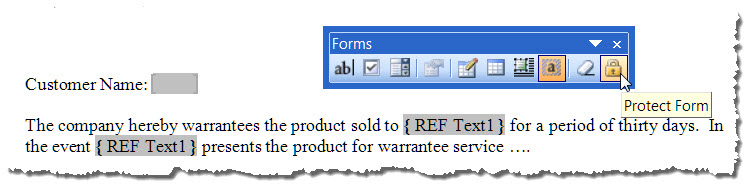
If you find a Userform daunting, or if you want to avoid VBA and macros, then you might try a Word on-line (protected) form.
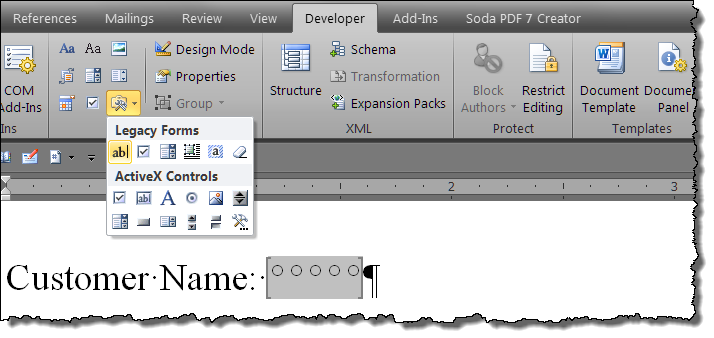
![]() Note: Long time Word users and particularly Word 2003 users are likely to think of this as simply a "protected" form using formfields. Users familiar with the Word 2007/2010/2013 interface will likely think of it as a "protected" form using "legacy" formfields.
Note: Long time Word users and particularly Word 2003 users are likely to think of this as simply a "protected" form using formfields. Users familiar with the Word 2007/2010/2013 interface will likely think of it as a "protected" form using "legacy" formfields.

![]() Note: If the Developer tab is not visible (default in Word 2007) you can show it using Word>Options>Popular>Show Developer tab in ribbon. For Word 2010/2013 use the Customize Ribbon options.
Note: If the Developer tab is not visible (default in Word 2007) you can show it using Word>Options>Popular>Show Developer tab in ribbon. For Word 2010/2013 use the Customize Ribbon options.
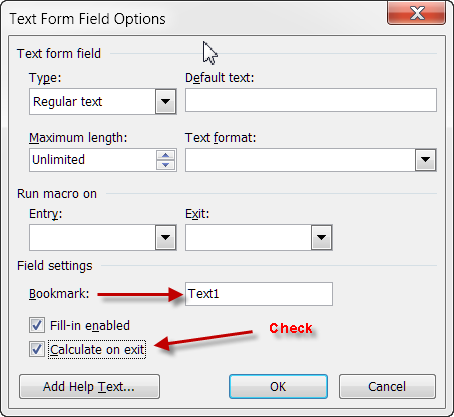
![]() Notes:
Notes:
Text1 is the default name for the first text form field inserted in the document. You can change this name to practically whatever you want and you should change it to better suit your application.
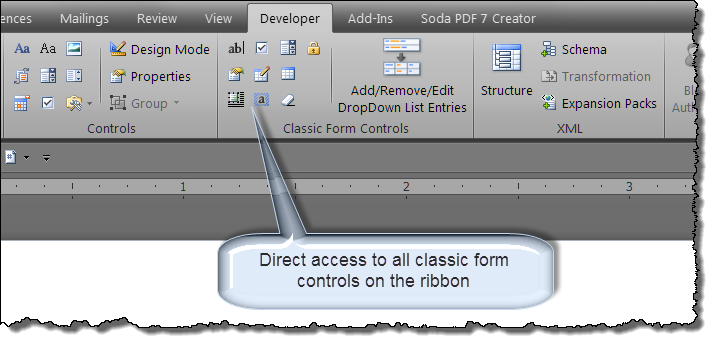
If you plan to use On-line (protected) forms in Word 2007/2010/2013 see my: Classic Form Controls. With the Classic Form Controls Add-In, you have direct ribbon access to all the old Word 2003 Forms Toolbar controls.
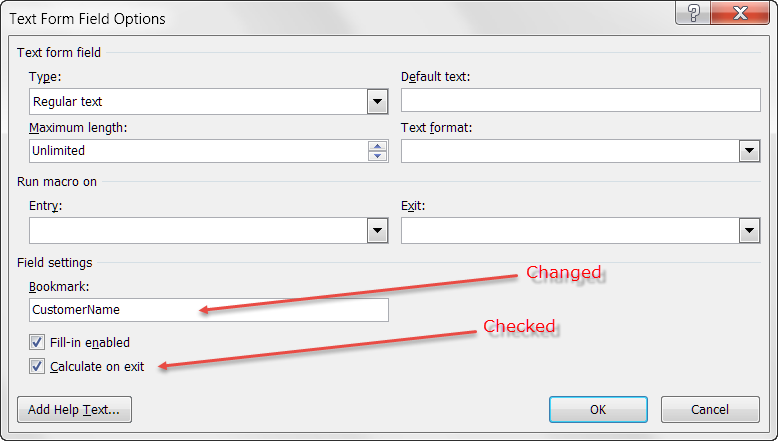
![]() Note: When adding your REF fields remember they must point to the correct target. If you renamed your form field's bookmark name (e.g., from Text1 to CustomerName) then your REF field must point to CustomerName e.g., {REF CustomerName }.
Note: When adding your REF fields remember they must point to the correct target. If you renamed your form field's bookmark name (e.g., from Text1 to CustomerName) then your REF field must point to CustomerName e.g., {REF CustomerName }.
![]() Bonus Tip: You can quickly enter REF fields by typing and selecting "REF Text1" or "REF CustomerName" (excluding the quotes) and then pressing CTRL+F9.
Bonus Tip: You can quickly enter REF fields by typing and selecting "REF Text1" or "REF CustomerName" (excluding the quotes) and then pressing CTRL+F9.
1. In the introduction to this section I stated that Word will fill in or populate "most" other designated "like" fields automatically. REF fields that are located outside the main text range of the document (e.g., headers, footers, text boxes, etc.) will not automatically update on exit from the field. However, there are some well suited work a rounds. You can use a STYLEREF field as described in MVP Suzanne Barnhill's presentation on STYLEREF fields, or you can run a macro on exit from the field that will update all of the fields, including REF Fields, anywhere in a document. For more on macros for working with the field collection in Word, see: Field Macros.
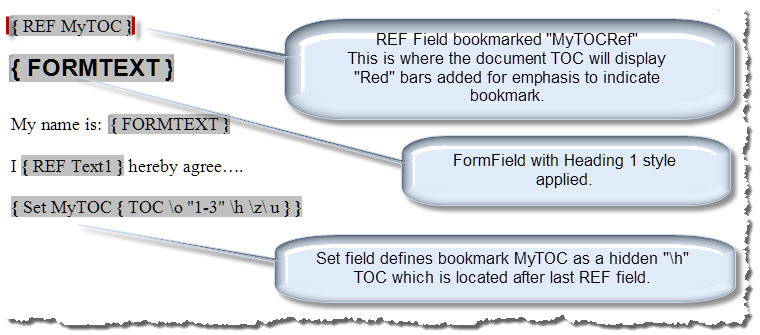
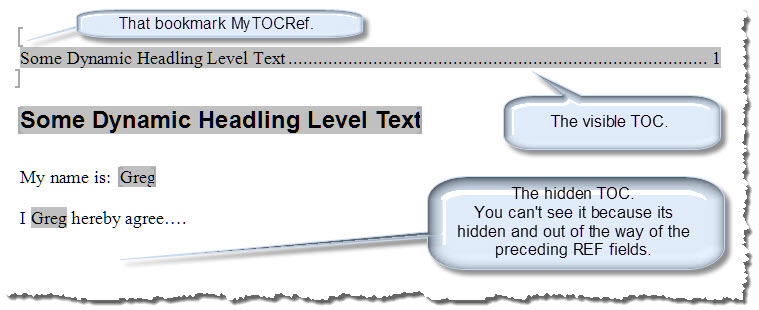
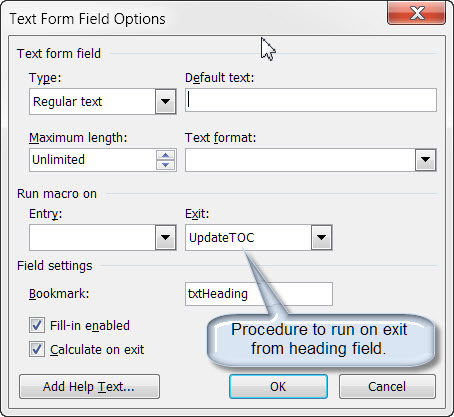
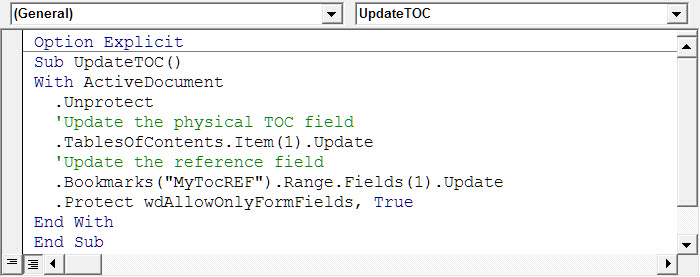
2. For reasons too complicated to go into here, REF and other field codes will not be updated using "calculate on exit" if the REF field follows a TOC field in the document. Provided that you don't need the TOC to update after protecting the document, you can simply lock the TOC field (select it and press CTRL+F11) before protecting the document. When you need to update the TOC you can unprotect the form and unlock the TOC with CTRL+SHIFT+F11. If it is essential that the TOC itself be "dynamic" and updated based on real time formfield text changes then you can use the method illustrated below.
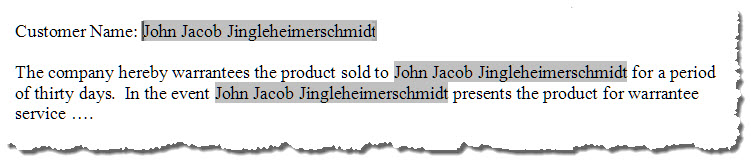
Probably the easiest method is to simply select and bookmark the text you want repeated and use REF fields as described above.
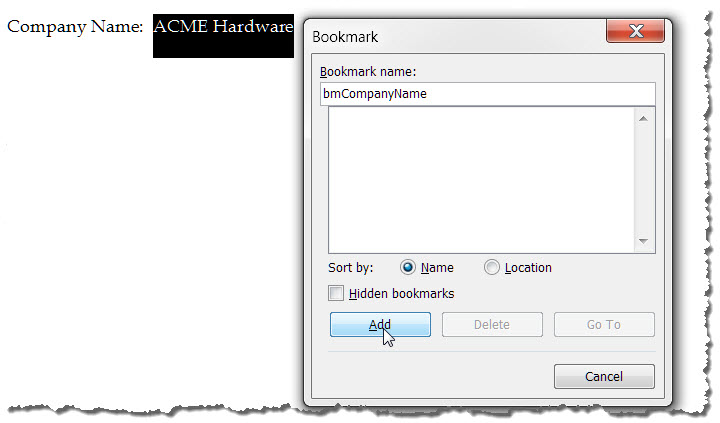
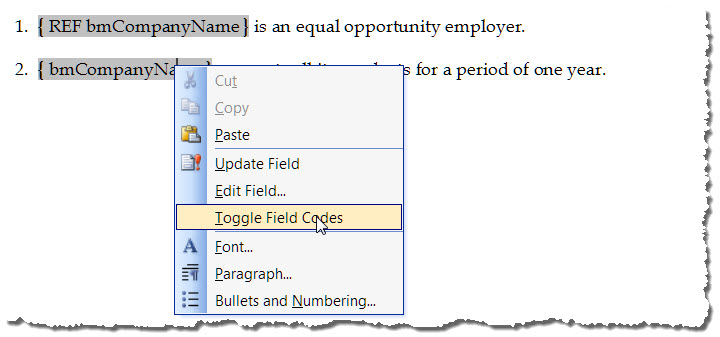
![]() Bonus Tip: Use of the field name REF is optional in cross references to bookmark names (i.e., you can use { REF bmCompanyName } or simply {bmCompanyName} as I have done in this example).
Bonus Tip: Use of the field name REF is optional in cross references to bookmark names (i.e., you can use { REF bmCompanyName } or simply {bmCompanyName} as I have done in this example).
![]() Bonus Tip: If you change the bookmark value, simply press CTRL+a to select all fields and press F9 to update.
Bonus Tip: If you change the bookmark value, simply press CTRL+a to select all fields and press F9 to update.
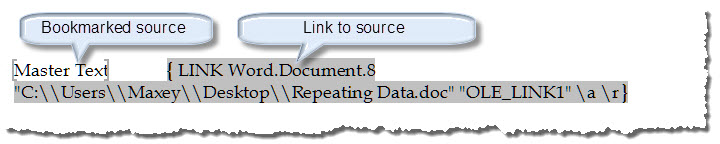
Simply copy the text you want repeated and paste it in the repeated location use menu sequence Edit>Paste Special. Paste as Formatted or Unformatted text and select the radio button "Paste link." This automatically creates a bookmark at the source location and creates a Link field at the destination locations.

Nearly all of the methods described above apply a cross reference to bookmarked text. Each has its advantages and disadvantages.
A DocProperty is simple to use and much less prone to be accidentally altered or deleted. There are two types of DocProperties, built-in and custom. To view and apply DocProperties, click File>Properties. The Summary tab lists built in DocProperty names, the Custom tab list a dozen or so pre-named properties. Both tabs provide the user interface for storing document information as properties.
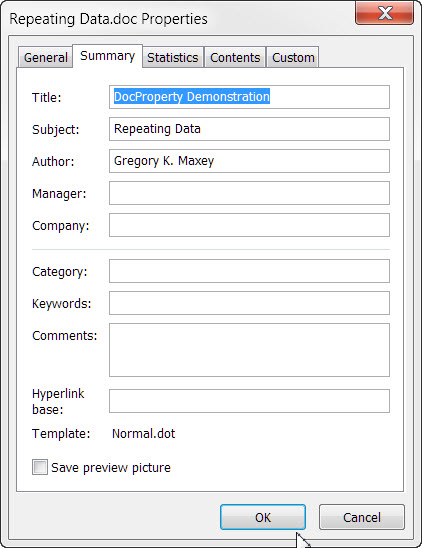
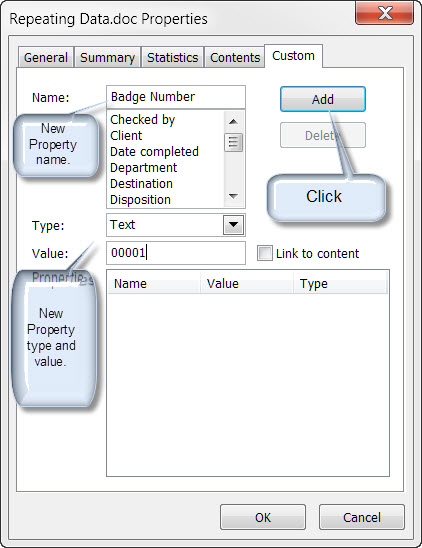
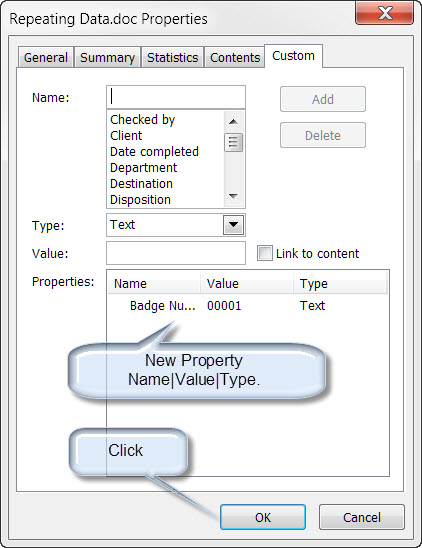
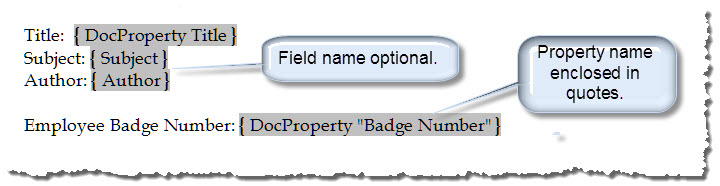
![]() Note: Use of the field name "DocProperty" is optional with built-in DocProperties. Field name required with custom document properties and property name must be enclosed in quotes.
Note: Use of the field name "DocProperty" is optional with built-in DocProperties. Field name required with custom document properties and property name must be enclosed in quotes.
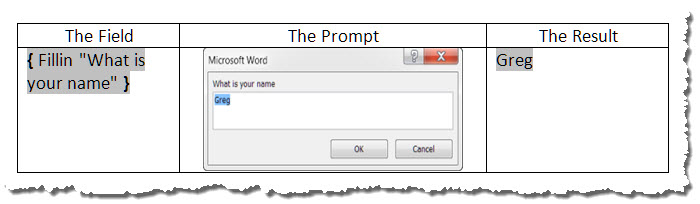
Many people ask "How can I set up my document or template so that I am prompted to enter information when I open the document or create a new document." The best answer to this question is to send you back to the Userform. It is the Cadillac interface between the human user and the Word form. Still there are alternatives. Each with its advantages and disadvantages. All are best employed using a template vice individual documents.
![]() Bonus Tip: You can of course nest a FILLIN field in a Set field to create a bookmark and use REF fields as described in the bookmark method above or ASK method below (e.g., { SET Name{FILLIN "What is your name?"}{REF Name}).
Bonus Tip: You can of course nest a FILLIN field in a Set field to create a bookmark and use REF fields as described in the bookmark method above or ASK method below (e.g., { SET Name{FILLIN "What is your name?"}{REF Name}).

![]() Bonus Tip: The following single line of VBA code in a template AUTONEW or AUTOOPEN macro can be used to auto fire the template ASK field: "ActiveDocument.Fields.Update
Bonus Tip: The following single line of VBA code in a template AUTONEW or AUTOOPEN macro can be used to auto fire the template ASK field: "ActiveDocument.Fields.Update


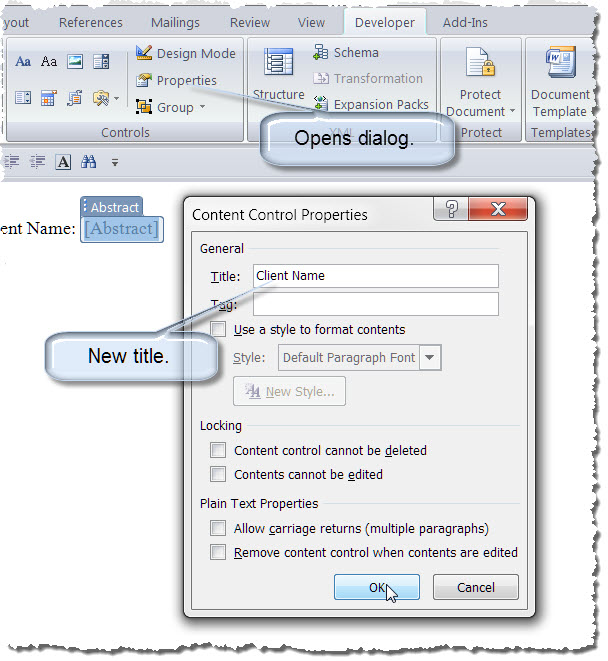
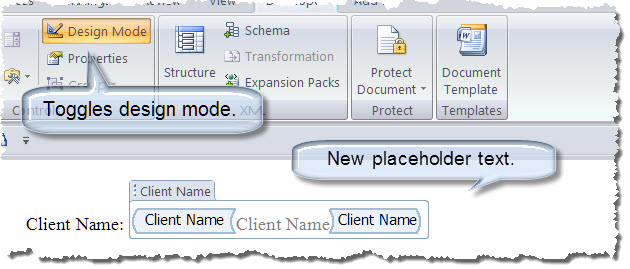
Content Controls (CCs) are a feature introduced with Word 2007. While they have some room to grow, they are already incredibly versatile and will most likely meet or exceed your needs for repeating data in a document.
The real power of content controls lies in their ability to be bound (or mapped) to a custom XML data node contained in the new OfficeOpenXML file format. Through this binding:
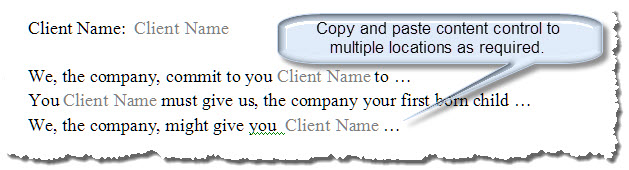
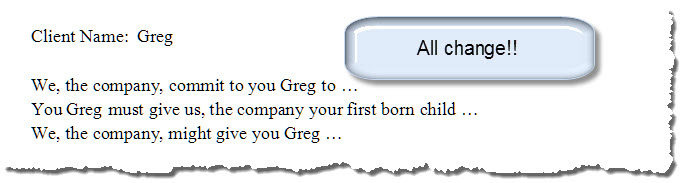
Do you see the huge impact and advantage? This means that "any and all" of your repeated data fields can serve as a master data field. For example, if you are at the end of a long document and notice a misspelling in a client name you can change it then and there and all previous mapped CCs will update!! You don't have to plow back to the beginning of your document, reopen a form or property dialog, to update data.
![]() Note: These controls are actually mapped to the 15 like named built-in core, extended or cover page properties and they can provide an effective way to manage those properties. If you insert one and enter a value and then go look at the document properties dialog it should come as no surprise to see the data reflected there.
Note: These controls are actually mapped to the 15 like named built-in core, extended or cover page properties and they can provide an effective way to manage those properties. If you insert one and enter a value and then go look at the document properties dialog it should come as no surprise to see the data reflected there.
![]() Notes:
Notes:
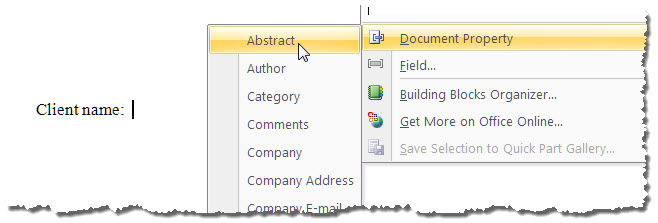
1. Remember the method discussed above employs the content control designed for the built-in cover page property "abstract." While we have renamed it "Client Name," it still manages the cover page "Abstract."
2. Several of the extended and cover page properties are not "pure" document properties in a sense. For example, if you attempted to use a { DocProperty "Abstract" } field in your document your field result returns an error.
While not actually mapped, the following quick and simple method was suggested by Aaron Marin via user feedback on this page:
![]() Note: Unfortunately the simply linked controls are very fragile not really practical in most situations. If you save the file with a new name, the link between the controls is broken. I've left left the method posted here for informational purposes.
Note: Unfortunately the simply linked controls are very fragile not really practical in most situations. If you save the file with a new name, the link between the controls is broken. I've left left the method posted here for informational purposes.
A full blown discussion of the VBA and "under the hood" workings of the XML data store are beyond the scope of this tips page. A good understanding of both are required should you decide to roll up your sleeves and create your own detailed custom content control data store. However, just for for the sake of completeness, the following VBA script will allow you to create multiple content controls mapped to a single data node:
Sub AddContentControlAndMap()
Dim oCC As Word.ContentControl
Dim oCustomPart As Office.CustomXMLPart
'All new documents already have 3 reserved customXMLParts built-in. We create\use the 4th one.
'If it doesn't exist (and it wont' the first time this code is run _
 then we will throw an error and use that error to create it.
On Error GoTo Err_NoXMLPart
Set oCustomPart = ActiveDocument.CustomXMLParts(4)
Err_ReEntry:
'Create the CC at the selection.
Set oCC = ActiveDocument.ContentControls.Add(wdContentControlText)
With oCC
  'Give it at title
  .Title = "My Mapped CC"
  'Map the CC to the customXMLPart data node.
  .XMLMapping.SetMapping "/ccMap/ccData[1]"
End With
Exit Sub
Err_NoXMLPart:
'Define the customXMLPart and data node.
Set oCustomPart = ActiveDocument.CustomXMLParts.Add("<ccMap><ccData></ccData></ccMap>")
Resume Err_ReEntry
End Sub
![]() See: Installing Macros for instructions on how to set up and use the macros in this tips page.
See: Installing Macros for instructions on how to set up and use the macros in this tips page.
By adding additional child nodes to the basic XML and judicious management of the mapping, you could dozens or hundreds of content controls linked to dozens or hundreds of unique data nodes.
For your convenience I have included tools for simplifying content control mapping in a Word Template add-in: Content Control Tools.


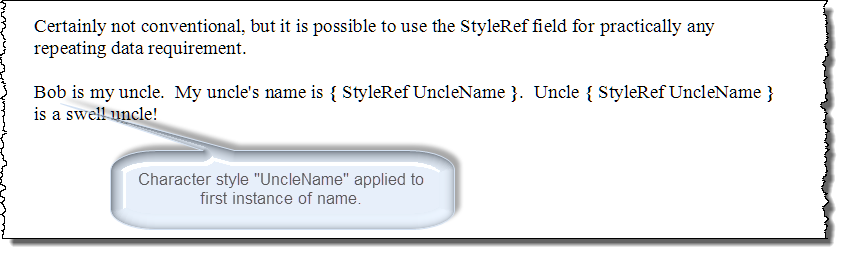
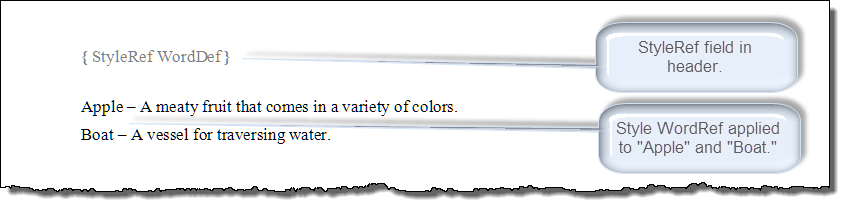
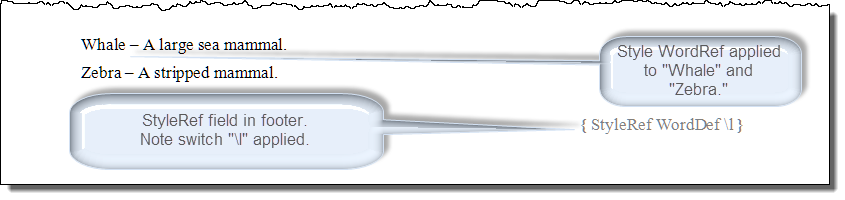
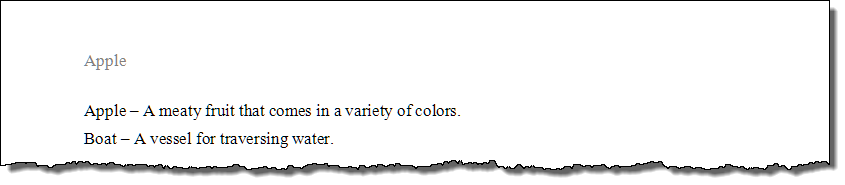
The text returned by a StyleRef is defined by several factors 1) the style name 2) applied switches, and 3) field location in the document. In the following example I have created a character style named WordDef and applied it to first word in each listed definition:
When the fields result is displayed the resulting text is evaluated according to the following rules:

![]() Note: The style referenced must be applied to text in the main body of the document. Otherwise the field will return "Error - No text of specified style found in document."
Note: The style referenced must be applied to text in the main body of the document. Otherwise the field will return "Error - No text of specified style found in document."
For a full list of StyleRef field switch and position behavior, see: StyleRef Field
Lastly, the "Hidden Gems" in Word, Document Variables. Created, edited and destroyed only with VBA, Document Variables provide a robust method for storing information. This stored information remains part of the document and is ready for repeated using even if a document is closed and then reopened. This information is easily retrieved and displayed in your document using the DocVariable field. The following template contains examples of the document variable and DocVariable fields used to create a simple form. The template also provides examples of setting document properties using VBA: VBA Template.
![]() Note: For more on document variables, see my: Create and Employ a Userform.
Note: For more on document variables, see my: Create and Employ a Userform.
That's it! I hope you have found this tips page useful and informative.
The information, illustrations and code contained in my "Microsoft Word Tips" are provided free and without risk or obligation.
However, the work is mine. If you use it for commercial purposes or benefit from my efforts through income earned or time saved then a donation, however small, will help to ensure the continued availability of this resource.
If you would like to donate, please use the appropriate donate button to access PayPal. Thank you!
This page was last updated on
March 09, 2021
Website
Privacy Statement
Back to top ![]() Back to
Word Tips
Back to
Word Tips