The Anchorage
Personal website of Gregory K. Maxey, Commander USN (Retired)
The Anchorage
Personal website of Gregory K. Maxey, Commander USN (Retired)
The information, illustrations and code contained in my "Microsoft Word Tips" are provided free and without risk or obligation.

However, the work is mine. If you use it for commercial purposes or benefit from my efforts through income earned or time saved then a donation, however small, will help to ensure the continued availability of this resource.
If you would like to donate, please use the appropriate donate button to access PayPal. Thank you!
The purpose of this Microsoft Word Tips & Microsoft Word Help page is provide and demonstrate a technique for creating interactive userform/document checkboxes.
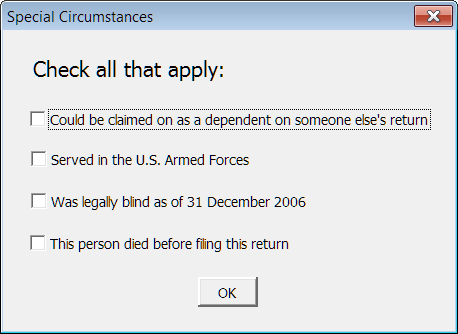
The first method employs a userform with standard checkbox controls and a document using Toggle Object© checkboxes. This method is best suited for Word 2003 and Word 2007 documents.
![]() Note: In this tips page I have assumed that you are familiar with the Visual Basic Editor (VBE) and that you are familiar with creating and employing a userform. If you need more information see: Install/Employ VBA Procedures and Create & Employ a Userform
Note: In this tips page I have assumed that you are familiar with the Visual Basic Editor (VBE) and that you are familiar with creating and employing a userform. If you need more information see: Install/Employ VBA Procedures and Create & Employ a Userform
This method takes a bit of work but I think it is worth it.
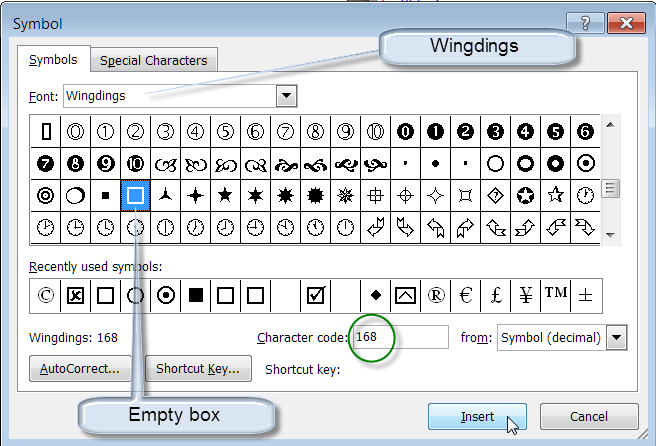


![]() Note: Show "Symbol" dialog using Insert tab>Symbols>Symbol>More Symbols.
Note: Show "Symbol" dialog using Insert tab>Symbols>Symbol>More Symbols.
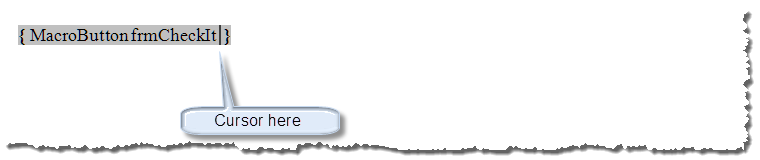
Option Explicit

Sub frmCheckit()
  ToggleIt
lbl_Exit:
  Exit Sub
End Sub

Sub ToggleIt()
Dim oFld As Word.Field
Dim oRngTarget As Word.Range
Dim i As Long
Dim strCharNum As Long
  'The target field (symbol you clicked)
  Set oFld = Selection.Fields(1)
  i = Determine_i(oFld)
  'Define target (or where symbol goes)
  Set oRngTarget = oFld.Code.Characters(i)
  'What is displayed now?
  strCharNum = AscW(oRngTarget.Text)
  'Toggle it
  If strCharNum = 168 Then
    oRngTarget.Font.Name = "Wingdings"
    oRngTarget.Text = ChrW(254)
  Else
    oRngTarget.Font.Name = "Wingdings"
    oRngTarget.Text = ChrW(168)
  End If
  'Clear variables
  Set oRngTarget = Nothing
  Set oFld = Nothing
lbl_Exit:
  Exit Sub
End Sub

Function Determine_i(ByRef oFld As Word.Field) As Long
Dim oRngTarget As Word.Range
Dim i As Long
Dim StrFont As String
Dim strCharNum As Long
  Determine_i = 0
  If oFld.Type <> wdFieldMacroButton Then
    MsgBox "This is not a valid field to test"
    Exit Function
  End If
  'Count number of characters in field's code
  i = oFld.Code.Characters.Count
  'Define target (or where symbol goes)
  Set oRngTarget = oFld.Code.Characters(i)
  'Does a space or spaces follow the symbol in the field code?
  Do While AscW(oRngTarget.Text) = 32
    'Move target until clear of spaces
    i = i - 1
    Set oRngTarget = oFld.Code.Characters(i)
  Loop
  'Since the symbol should be the last non-space character in the field:
  Determine_i = i
  'Clear variables
  Set oRngTarget = Nothing
lbl_Exit:
  Exit Function
End Function

'***** OPTIONAL *****
Sub AutoNew()
  'Enable single mouse click toggle.
  Options.ButtonFieldClicks = 1
lbl_Exit:
  Exit Sub
End Sub
Sub AutoClose()
  Options.ButtonFieldClicks = 2
lbl_Exit:
  Exit Sub
End Sub
'***** OPTIONAL *****
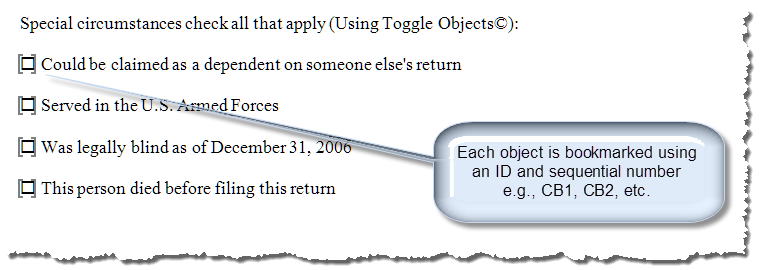
![]() Note: As fields don't present a defined range object, the bookmarks are necessary to define and identify the fields for processing.
Note: As fields don't present a defined range object, the bookmarks are necessary to define and identify the fields for processing.
Option Explicit
Private i As Long
Private oDoc As Word.Document
Private lngChar As Long

Private Sub UserForm_Initialize()
Dim oBM As Bookmarks
Set oDoc = ActiveDocument
Set oBM = oDoc.Bookmarks
  For i = 1 To 4
    lngChar = Determine_i(oBM("CB" & i).Range.Fields(1))
    If AscW(oBM("CB" & i).Range.Fields(1).Code.Characters(lngChar)) = 254 Then
      Me.Controls("CheckBox" & i).Value = True
    Else
      Me.Controls("CheckBox" & i).Value = False
    End If
  Next i
  Set oDoc = Nothing
  Set oBM = Nothing
lbl_Exit:
  Exit Sub
End Sub

Private Sub CommandButton1_Click()
Dim oRng As Word.Range
  Set oDoc = ActiveDocument
  For i = 1 To 4
    Set oRng = oDoc.Bookmarks("CB" & i).Range
    lngChar = Determine_i(oRng.Fields(1))
    If Me.Controls("Checkbox" & i).Value = True Then
      SetIt oRng.Fields(1), lngChar, True
    Else
      SetIt oRng.Fields(1), lngChar, False
    End If
    oDoc.Bookmarks.Add "CB" & i, oRng
  Next i
  Me.Hide
  Set oDoc = Nothing
  Set oRng = Nothing
lbl_Exit:
  Exit Sub
End Sub
Sub SetIt(ByRef oFld As Word.Field, lngTarget As Long, bChecked As Boolean)
Dim oRngTarget As Word.Range
  Set oRngTarget = oFld.Code.Characters(lngTarget)
  If bChecked Then
    oRngTarget.Font.Name = "Wingdings"
    oRngTarget.Text = ChrW(254)
  Else
    oRngTarget.Font.Name = "Wingdings"
    oRngTarget.Text = ChrW(168)
  End If
 'Clear variables
  Set oRngTarget = Nothing
  Set oFld = Nothing
lbl_Exit:
  Exit Sub
End Sub
Word 2003/20072010 all include legacy form field interactive checkboxes. While probably redundant to have a userform linked to a online (protected) form, it can certainly be done. I've included an example of using legacy form field checkboxes linked with a userform in the demonstration template.
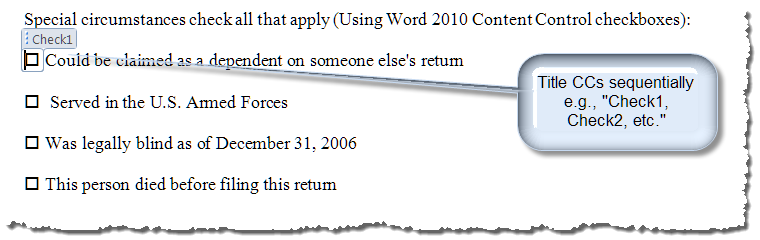
Word 2010 introduced interactive checkboxes to the content control collection. These are ideal objects for linking with a userform and the process practical defines simple!!

Option Explicit
Private i As Long
Private oCC As ContentControl
Private Sub UserForm_Initialize()
  For i = 1 To 4
    Set oCC = ActiveDocument.SelectContentControlsByTitle("Check" & i).Item(1)
    Me.Controls("CheckBox" & i).Value = oCC.Checked
  Next i
  Set oCC = Nothing
lbl_Exit:
  Exit Sub
End Sub
Private Sub CommandButton1_Click()
  For i = 1 To 4
    Set oCC = ActiveDocument.SelectContentControlsByTitle("Check" & i).Item(1)
    oCC.Checked = Me.Controls("Checkbox" & i).Value
  Next i
  Set oCC = Nothing
  Me.Hide
lbl_Exit:
  Exit Sub
End Sub
You can download a demonstration template containing the document fields, content controls, userforms and VBA code used to create the examples presented in this tips page here: Interactive Userform Checkboxes
That's it! I hope you have found this tips page useful and informative.
The information, illustrations and code contained in my "Microsoft Word Tips" are provided free and without risk or obligation.
However, the work is mine. If you use it for commercial purposes or benefit from my efforts through income earned or time saved then a donation, however small, will help to ensure the continued availability of this resource.
If you would like to donate, please use the appropriate donate button to access PayPal. Thank you!
This page was last updated on
March 09, 2021
Website
Privacy Statement
Back to top ![]() Back to
Word Tips
Back to
Word Tips