The Anchorage
Personal website of Gregory K. Maxey, Commander USN (Retired)
The Anchorage
Personal website of Gregory K. Maxey, Commander USN (Retired)
The information, illustrations and code contained in my "Microsoft Word Tips" are provided free and without risk or obligation.

However, the work is mine. If you use it for commercial purposes or benefit from my efforts through income earned or time saved then a donation, however small, will help to ensure the continued availability of this resource.
If you would like to donate, please use the appropriate donate button to access PayPal. Thank you!
The purpose of this Microsoft Word Tips & Microsoft Word Help page is to show you how you can display the active document file name and path on the application title bar.
This tips page was excluded when I redesigned the website in January 2012, but has been resurrected from the dust bin following a question in a popular Word support forum.
When you create a new document in Word, the title bar displays the default document name.

When you save the new file, you are prompted to provide a path (where you save it) and a file name. In this demonstration, I have saved the demonstration file as Exercise One.doc in my D:\My Documents\Word Documents folder.
The title bar now displays the file name that I used above. It does not display the path.

With a few simple macros you can customize your Word installation to display the full document path in the title bar.
The first is an AutoOpen macro that runs each time a document is opened. The AutoOpen macro can be stored in a macro project in your Normal.dot template.
 Sub AutoOpen()
  ActiveWindow.Caption = ActiveDocument.FullName
lbl_Exit:
  Exit Sub
End Sub
![]() See: Installing Macros for instructions on how to set up and use the macros provided in this Microsoft Word Help & Microsoft Word Tips page.
See: Installing Macros for instructions on how to set up and use the macros provided in this Microsoft Word Help & Microsoft Word Tips page.
With the macro installed, if you close and then reopen the document, the title bar displays the document full name and path.

There's a hiccup. Save the file with a new name, let's use Exercise Two.
As you see in the illustration below, Word has taken its ball and gone home. We have lost the path.

OK, Close Exercise Two and open it again. The recently installed AutoOpen macro will have Word back in the game.
Ninety-nine out of a hundred people can probably live with this inconvenience. If however, you are a perfectionist there is a way to make Word play the first time.
Here is another macro that stands in for the the built-in Word SaveAs command. You install the macro in the same manner as the AutoOpen macro described above:
Sub FileSaveAs()
  If Dialogs(wdDialogFileSaveAs).Show = 0 Then Exit Sub
  System.Cursor = wdCursorNormal
  ActiveWindow.Caption = ActiveDocument.FullName
lbl_Exit:
  Exit Sub
End Sub
After you have installed the macro, use File>Save As and save Exercise Two as Exercise Three. Bingo!! The title bar displays:

Do you want the file name or file name and path displayed in your document and printed?
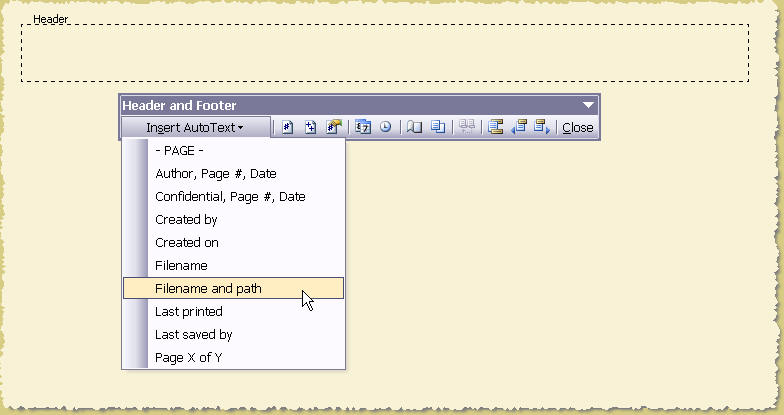
Word's built-in AutoText entries makes this a simple process. Most people want the file information to show in the header or footer on each page. For this reason the AutoText entries are stored in the Header and Footer category. Select View>Header and Footer and place your cursor in the header where you want the information displayed. Then click Insert AutoText>Filename and path.
![]() Note: For whatever reason, the Word developer's omitted the "Filename" and "Filename and path" building blocks from Word 2007. You can easily create your own "Filename" and "Filename and path" fields in your document and save them for future use as a building blocks. Simply position your cursor, press CTRL+F9 to enter a pair of field braces, type the field code inside the braces, and toggle the field display.
Note: For whatever reason, the Word developer's omitted the "Filename" and "Filename and path" building blocks from Word 2007. You can easily create your own "Filename" and "Filename and path" fields in your document and save them for future use as a building blocks. Simply position your cursor, press CTRL+F9 to enter a pair of field braces, type the field code inside the braces, and toggle the field display.
For more on building blocks see: Building Blocks

After adding the field, the header now displays:

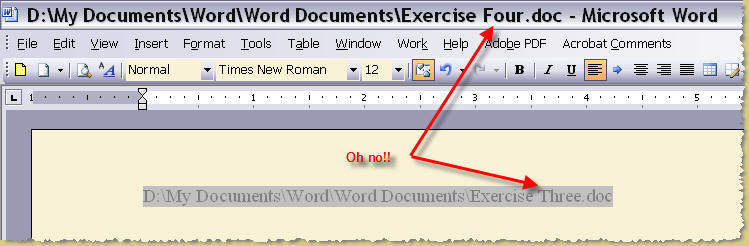
There is another hiccup. Use File>Save As and save Exercise Three as Exercise Four.
Word is having another tantrum. The title bar looks fine, but the document information is incorrect (see graphic below).
As you've already seen, the document information is constructed using a Word field. In most cases Word fields are not updated automatically.
![]() Note: Unless you have changed default Word settings, most Word fields are updated when the file is printed. You can update the field and correct this situation by toggling in and out of Print Preview.
Note: Unless you have changed default Word settings, most Word fields are updated when the file is printed. You can update the field and correct this situation by toggling in and out of Print Preview.
Perfectionist don't fear. If you can't live with that minor inconvenience of using Print Preview, then more macro code will come to your rescue. All we need to do is modify the SaveAs macro to include instructions for updating fields.
Sub FileSaveAs()
Dim oRange As Word.Range
Dim oFld As Field
  On Error GoTo Handler
  Retry:
  With Dialogs(wdDialogFileSaveAs)
      If .Show = 0 Then Exit Sub
  End With
  System.Cursor = wdCursorNormal
  ActiveWindow.Caption = ActiveDocument.FullName
  For Each oRange In ActiveDocument.StoryRanges
    Do
      For Each oFld In oRange.Fields
        If oFld.Type = wdFieldFileName Then
          oFld.Update
        End If
      Next oFld
      Set oRange = oRange.NextStoryRange
    Loop Until oRange Is Nothing
  Next
  ActiveDocument.Save
lbl_Exit:
  Exit Sub
Exit Sub
Handler:
If Err.Number = 5155 Or Err.Number = 5153 Then
MsgBox Err.Decription, vbOKOnly
Resume Retry
End If
End Sub
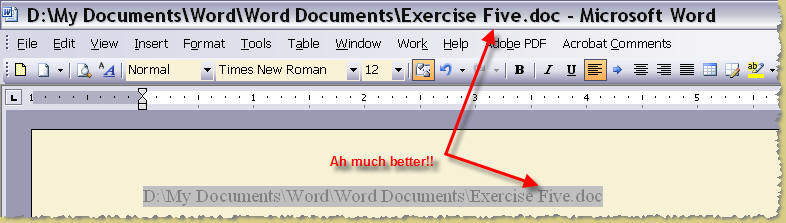
Let's save our document once again as Exercise Five.
![]() Note: This tips page, illustrations and examples were developed using Word 2003. It is wholly functional with Word 2007 and 2010.
Note: This tips page, illustrations and examples were developed using Word 2003. It is wholly functional with Word 2007 and 2010.
That's it! I hope you have found this tips page useful and informative.
The information, illustrations and code contained in my "Microsoft Word Tips" are provided free and without risk or obligation.
However, the work is mine. If you use it for commercial purposes or benefit from my efforts through income earned or time saved then a donation, however small, will help to ensure the continued availability of this resource.
If you would like to donate, please use the appropriate donate button to access PayPal. Thank you!
This page was last updated on
March 09, 2021
Website
Privacy Statement
Back to top ![]() Back to
Word Tips
Back to
Word Tips