
The Anchorage
Personal website of Gregory K. Maxey, Commander USN (Retired)
The Anchorage
Personal website of Gregory K. Maxey, Commander USN (Retired)
The information, illustrations and code contained in my "Microsoft Word Tips" are provided free and without risk or obligation.

However, the work is mine. If you use it for commercial purposes or benefit from my efforts through income earned or time saved then a donation, however small, will help to ensure the continued availability of this resource.
If you would like to donate, please use the appropriate donate button to access PayPal. Thank you!
This Microsoft Word Tips & Microsoft Word Help page provides my "Extract Data from Outlook E-mail Messages" Word template add-in.
The development of this add-in resulted from repeated questions in Outlook user support forums seeking a method to extract parts a message body as named data fields and variable data elements to a structured data file.
It is a collaborative effort with Word MVP and my long time Englishman friend Graham Mayor.
In each case the answer to the question asked required a custom VBA solution. Graham and I have endeavored to create a single solution that will work with several message formats:
A best practice is to design your message format to work with the add-in rather that rely on the add-in to work with your format.
The extracted data can be stored and viewed:
You might think that Word is a curious vehicle to use for extracting e-mail data to Excel, Access or a Word table from Outlook. Curious maybe, but it has a few advantages for a Word programmer like myself. Foremost of which is the ease of distribution, given that all versions of Office that include Outlook and Excel will also include Word.
So I present an add-in applicable to Word versions 2007/2010/2013 which is interoperable with Access, Excel and Outlook.
As with the other add-ins available from this site, it is presented as a Word template and is supplied in zipped format. You can download the template using the link at the end of this tips page.
When installed, the add-in displays a control group and controls on the Word Ribbon Add-Ins tab as shown below:

As mentioned in the summary, the data in the Outlook message body can be presented in several different formats. The following illustrations depict the formats supported by the add-in

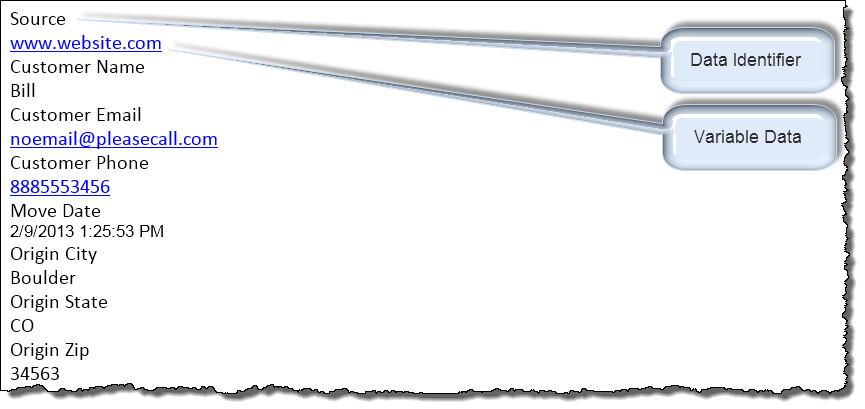
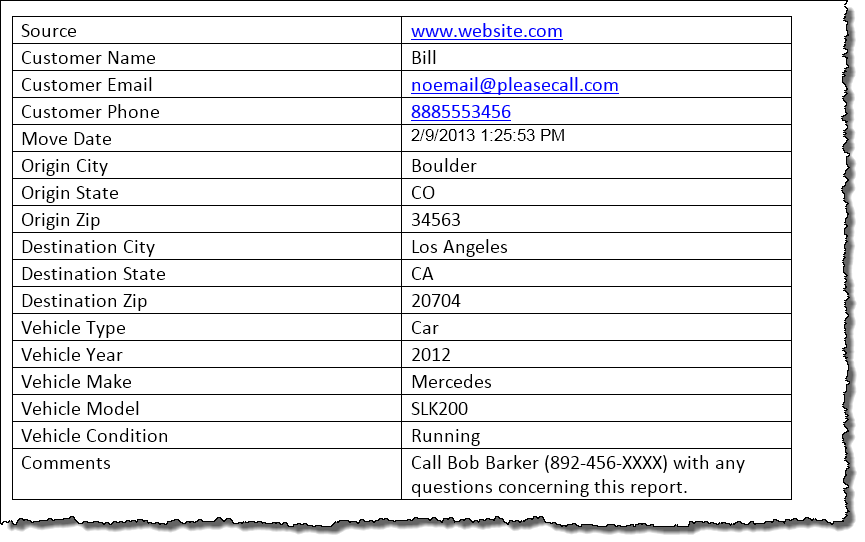
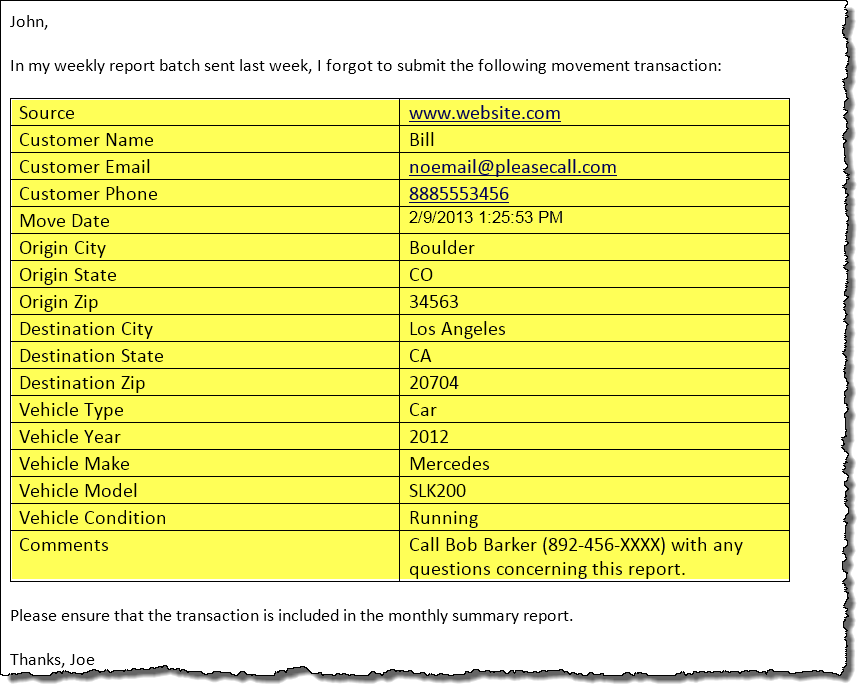
![]() Note: The highlighted area in the illustration above depicts data the user will define for extraction. The remaining data is ignored by the add-in as superfluous chaff. Range extraction can be used with all three simple data formats.
Note: The highlighted area in the illustration above depicts data the user will define for extraction. The remaining data is ignored by the add-in as superfluous chaff. Range extraction can be used with all three simple data formats.
When using the add-in to extract data, "ALL" messages in the Outlook Message Source folder must be in the same format and contain the same data identifiers for a given extraction session.
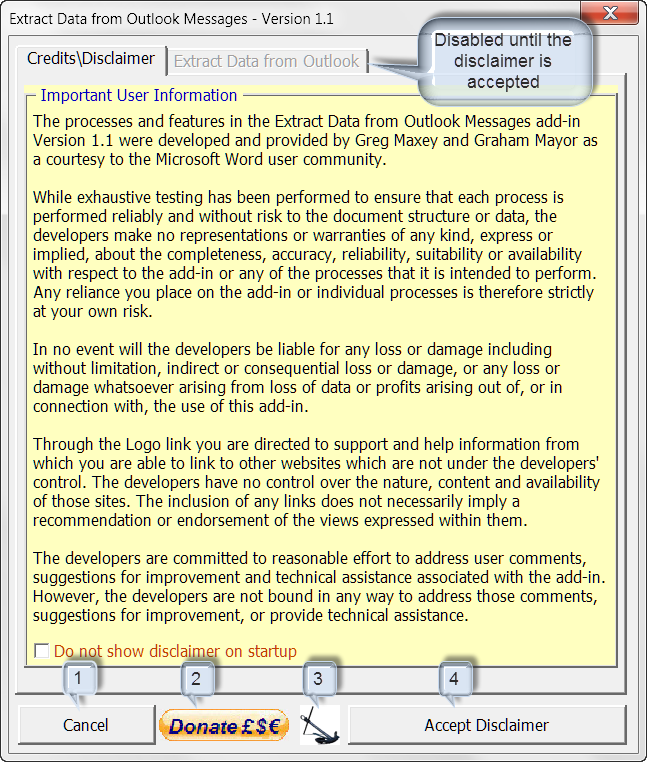
The first time you click the add-in "Extract Message Data" control, the main userform interface dialog displays a disclaimer notice. Before you can use the add-in to extract data you must accept the terms of the disclaimer.
The add-in main dialog contains four common controls illustrated above.
After accepting the disclaimer, the "Extract Data from Outlook" page is displayed. Using the controls on this page you set:
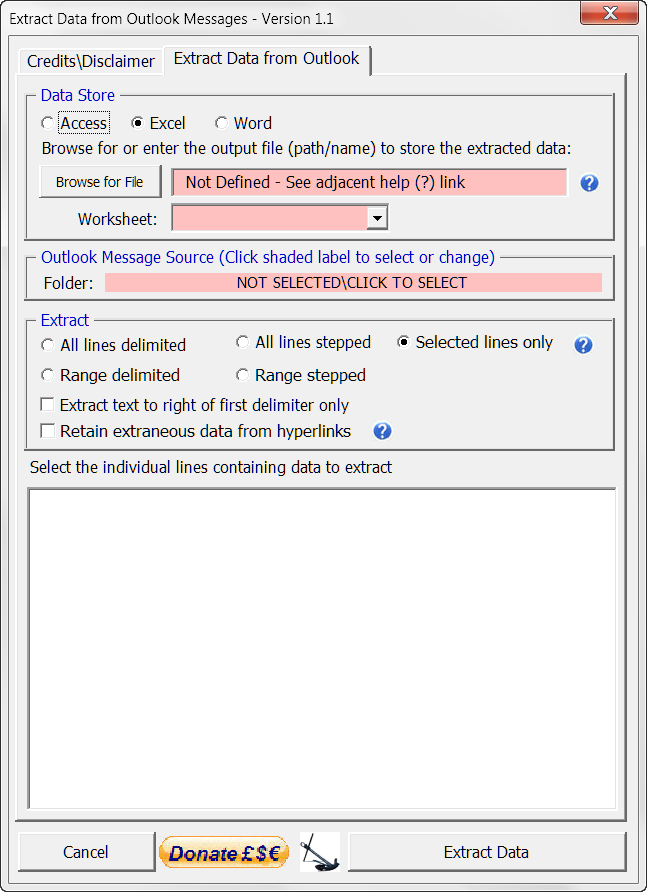
Use the controls in this section to define the data store for the extracted data.
The add-in will extract data from OUTLOOK mail message items to an Access table, Excel spreadsheet or Word table.
Prior to extracting data, you must create and save a properly formatted Access, Excel, or Word file to use as the output target file.
Excel is the simplest file type to employ. To use Excel, you simply create and save a new Excel file. Select the Excel data store, browse to and select the Excel file, then select the output worksheet.
To use Word, you must create and save a Word file containing a single table with one (1) row and "X" columns, where "X" represents the number of variable data fields you are extracting. Select the Word data store, browse to and select the Word file.
To use Access, you must create and save a Access file and table with "X" columns, where "X" represents the number of data fields you are extracting. Select the Access data store, browse to and select the Access file, then select the output database table.
You may add column names to your output files at your discretion.
Use the controls in this section to define the Outlook mail item folder containing the message or messages you want to process.
For best results, you should create and define a dedicated Outlook mail item folder to hold the messages you want to process. When messages are received in your inbox you can manually move them to the defined folder or create an Outlook rule to move them automatically as they are received. See: Managing E-mail Messages Using Rules.
The following illustrates a dedicated mail item folder I've created for demonstration purposes. It consists of a sub-folder of my inbox folder and contains a single message to process.
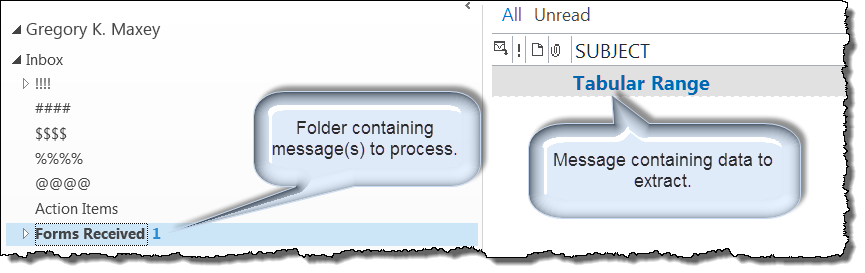
![]() Note: I've used symbols (e.g., ####) to mask other personal sub-folders contained in my inbox.
Note: I've used symbols (e.g., ####) to mask other personal sub-folders contained in my inbox.
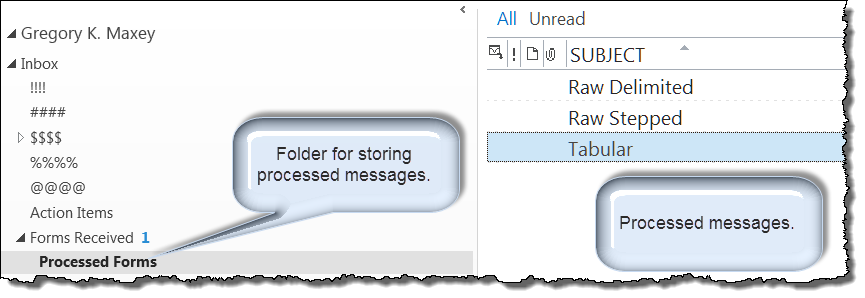
After processing, the add-in automatically tags each message in the source folder as Processed which prevents messages left in the source folder from being processed repeatedly each time the process is run. A best practice is to move the processed messages to a different folder after processing. Here I have created a new folder "Processed Forms" and move processed messages into it.
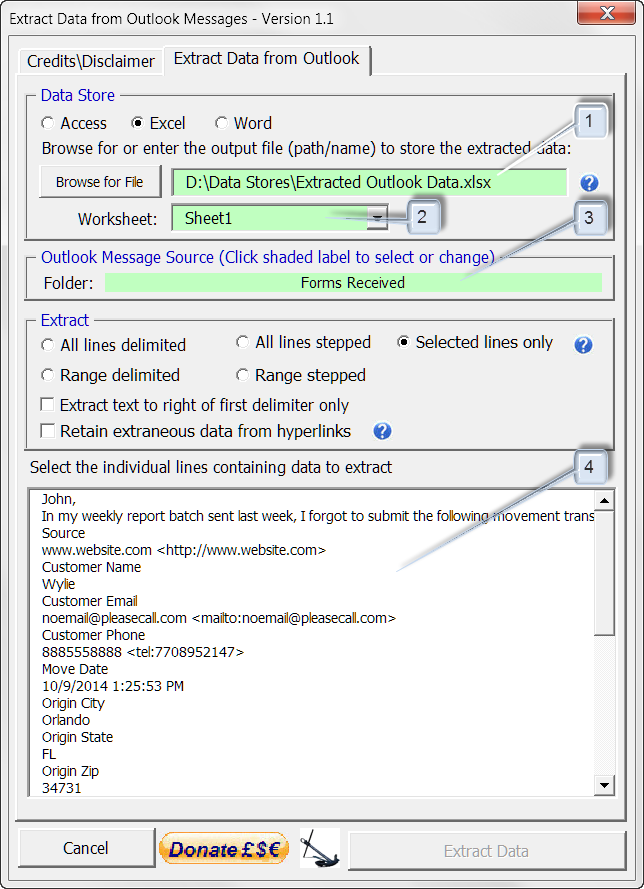
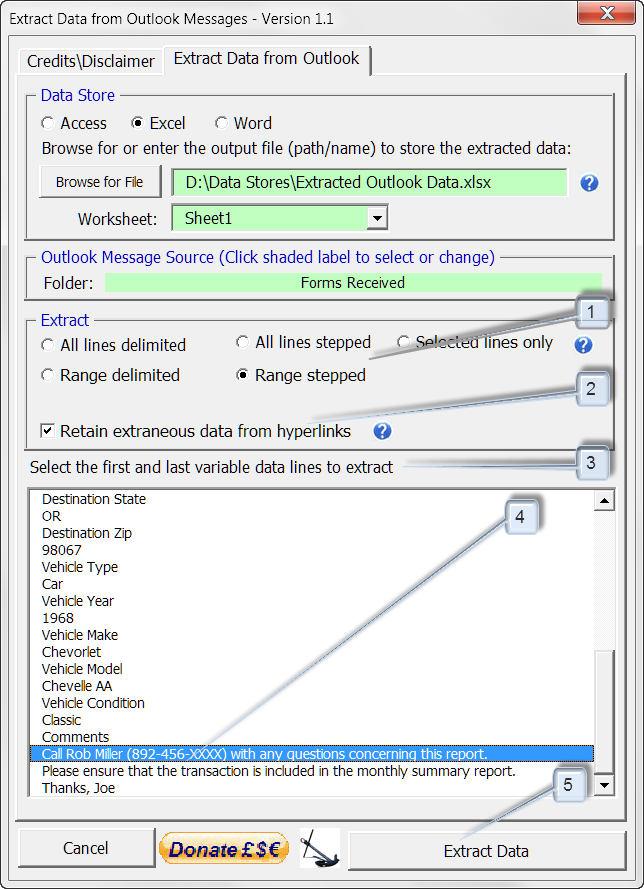
When the data store and Outlook Source Folder are defined, you are ready to being data extraction. The following depicts the selections I've made for this demonstration:
![]() Note: The "Extract Data" command button on the dialog is disabled. At this point it is up to the add-in user to determine the type of extraction to perform.
Note: The "Extract Data" command button on the dialog is disabled. At this point it is up to the add-in user to determine the type of extraction to perform.
On reviewing the representative data, I can readily determine that the message format contains superfluous data (chaff) e.g., "John, In my weekly ..." that I do not want to extract and the data identifiers and variable data are stepped i.e., data variable follows data identifier on a new line.
At this point, as the add-in user, I must select the extraction method Range Stepped and identify the first and last data variable in the extraction range.
I also note that the representative data contains hyperlinks. I want to retrain extraneous hyperlink data so I've check the option to to so.
![]() Note: Both tabular and stepped message formats will appear as stepped data in the dialog listbox.
Note: Both tabular and stepped message formats will appear as stepped data in the dialog listbox.
The help "?" icons on the dialog can be used to display amplifying information on setup.
The add-in displays a progress bar during processing and when processing is complete.
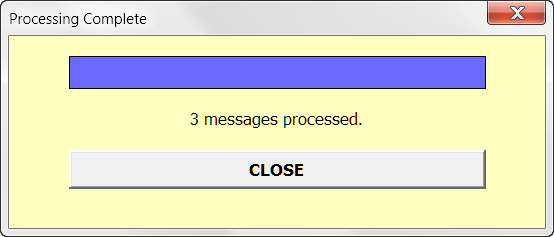
![]() Note: Processing occurs rapidly and the progress bar may simply appear as Processing Complete as shown above.
Note: Processing occurs rapidly and the progress bar may simply appear as Processing Complete as shown above.
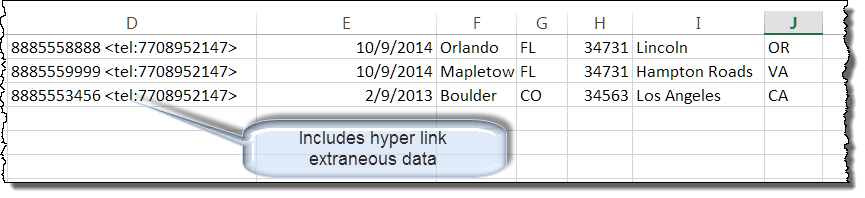
When processing is complete, you can open and few the extracted data in the data store you defined. The following illustrates data extracted to an Excel file.
![]() Notes:
Notes:
1. You can customize your data file by defining column headings and adjusting column widths to suit your data requirements.
2. Due to page size attributes in Word, Word may not be a suitable format for extracting a large number of variable data elements.
You can download the template add-in here: Extract Outlook Data. For installation instructions, see: Organizing your Macros\Template Add-Ins.
Graham and I can never agree 100% on style and format. To review Graham's functionally similar add-in and tips page see: Graham's version.
That's it! I hope you have found this tips page useful and informative.
The information, illustrations and code contained in my "Microsoft Word Tips" are provided free and without risk or obligation.
However, the work is mine. If you use it for commercial purposes or benefit from my efforts through income earned or time saved then a donation, however small, will help to ensure the continued availability of this resource.
If you would like to donate, please use the appropriate donate button to access PayPal. Thank you!
This page was last updated on
March 09, 2021
Website
Privacy Statement
Back to top ![]() Back to
Word Tips
Back to
Word Tips