The Anchorage
Personal website of Gregory K. Maxey, Commander USN (Retired)
The Anchorage
Personal website of Gregory K. Maxey, Commander USN (Retired)
The information, illustrations and code contained in my "Microsoft Word Tips" are provided free and without risk or obligation.

However, the work is mine. If you use it for commercial purposes or benefit from my efforts through income earned or time saved then a donation, however small, will help to ensure the continued availability of this resource.
If you would like to donate, please use the appropriate donate button to access PayPal. Thank you!
This Microsoft Word Tips & Microsoft Word Help page supplements several other content control tips pages. This page focuses on grouping controls so that users are restricted to editing only the content control content and tips for navigating between the controls in a document. See my Content Controls introduction/summary page for a list of links to all content control related pages on this website
Content controls are managed from the "Controls" group in the ribbon "Developer" tab. This group contains command controls for inserting each of the Content Controls types in the document, controls for opening the control design and properties dialogs, and a control for grouping or ungrouping a collection of content controls.
![]() Note: Developer tab display is optional and hidden by default in Word 2007. If not displayed check Word Options>Popular>Show developer tab in the Ribbon (Word 2007)/Options>Customize the Ribbon>check Developer tab in right hand column (Word 2010)
Note: Developer tab display is optional and hidden by default in Word 2007. If not displayed check Word Options>Popular>Show developer tab in the Ribbon (Word 2007)/Options>Customize the Ribbon>check Developer tab in right hand column (Word 2010)
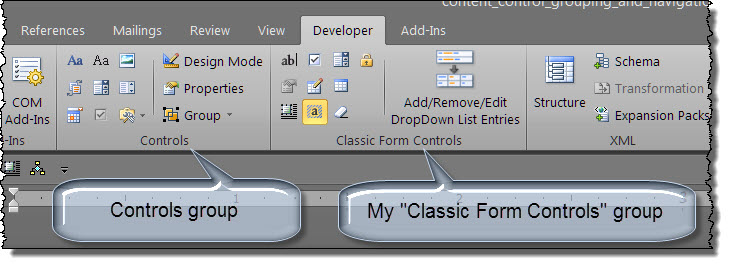
![]() Bonus Tip: Classic Form Controls is a simple Word template add-in to restore the classic form field controls to the ribbon.
Bonus Tip: Classic Form Controls is a simple Word template add-in to restore the classic form field controls to the ribbon.
The illustration below shows three plain text content controls arranged with free text in a document. The first control is shown selected. As shown, the text is unrestricted. The user could select and freely edit any portion of the example text.

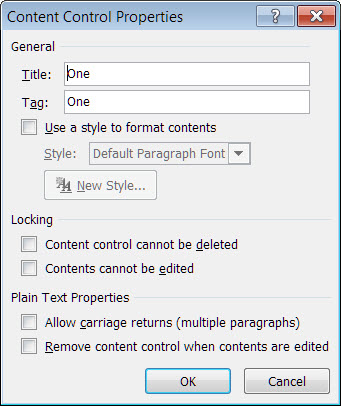
The "Properties" dialog is used to assign properties (e.g., name, tag, etc.) to individual controls. The following illustrates the properties set for the content control selected above. Note there are no locking properties set. Users can freely edit the content controls and surrounding text.
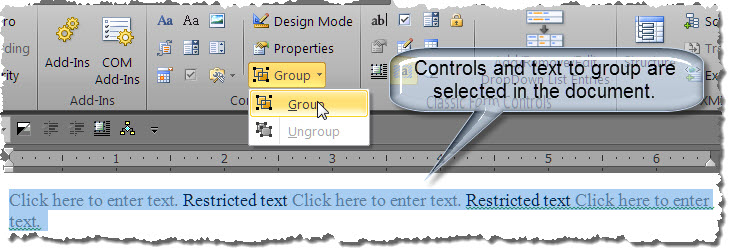
By grouping a collection of content controls the user has access to enter information in the controls but editing other text is restricted. There are two ways that you can group controls:
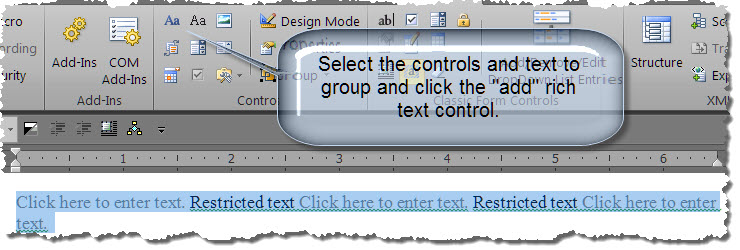
After adding the rich text control as shown above, you set its properties to restrict editing content.
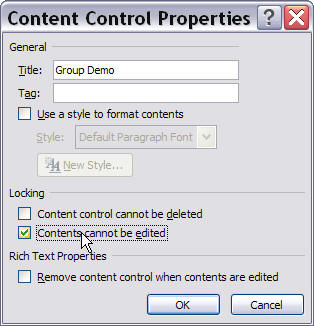
![]() Note: The rich text "Contents cannot be edited" property does not affect or restrict editing in other content controls grouped or (nested) within the rich text control.
Note: The rich text "Contents cannot be edited" property does not affect or restrict editing in other content controls grouped or (nested) within the rich text control.
Groups appear similar within the document using both methods and work equally well. However, I prefer to use the rich text control method as the control can be assigned a unique group name using the properties dialog and when the control is physically active in the document the group name and boundaries are displayed.

Navigation between individual or grouped plain text, drop-down list, combo box, or date picker controls is accomplished by simply depressing the Tab key. Unlike with legacy form fields, when you tab in the last content control in a sequence the focus is not returned to the first control in the sequence.
![]() Note: To create a tab in a plain text control use CTRL+Tab.
Note: To create a tab in a plain text control use CTRL+Tab.
You can overcome this nuisance by assigning a unique "tag" property to the first and last content control in your sequence and adding the following code to the Document_ContentControlOnExit event procedure:
Private Sub Document_ContentControlOnExit(ByVal ContentControl As ContentControl, Cancel As Boolean)
  Select Case ContentControl.Tag
    '"Last" = tag property applied to the last control.
    Case "Last"
       '"First" = tag property applied to the first control.
       ActiveDocument.SelectContentControlsByTag("First").Item(1).Range.Select
  End Select
lbl_Exit:
  Exit Sub
End Sub
Then when you finish in the last content control simply click anywhere in the document and the to exit the content control and the focus will be returned to the content control tagged "First."
![]() Note: If there are one or more content controls in the document after your assigned "Last" content control then the focus will be set automatically to the content control tagged "First" when you tab out of the "Last" control.
Note: If there are one or more content controls in the document after your assigned "Last" content control then the focus will be set automatically to the content control tagged "First" when you tab out of the "Last" control.
Unfortunately navigating between content controls in documents containing rich text or picture content controls is more problematic.
First let's look at problems associated with rich text controls. The following example shows three rich text content controls grouped (nested) in a restricted content rich text control container.
Using the tab key in one of these controls enters a physical tab in the control as expected. The focus does not advance to the next control.


To the dismay of many, there is no apparent key stroke that will navigate to the next rich text content control in a document.
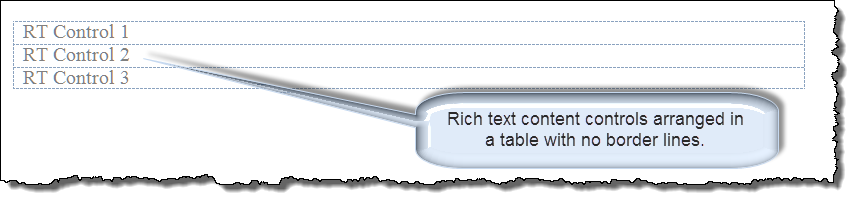
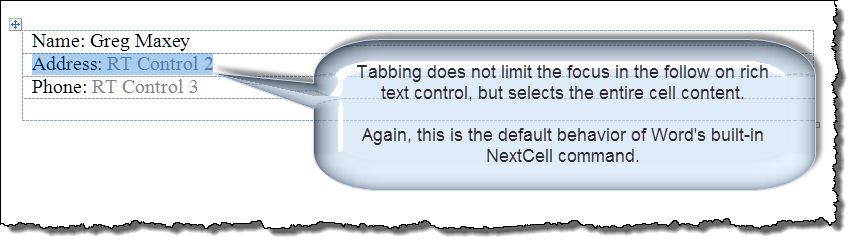
Fortunately there is a limited work around. If you can use a table in your document layout with one rich text control per cell then you can take advantage of Word's built-in overriding "NextCell" command to move from one cell to another and by extension, one rich text content control to another.
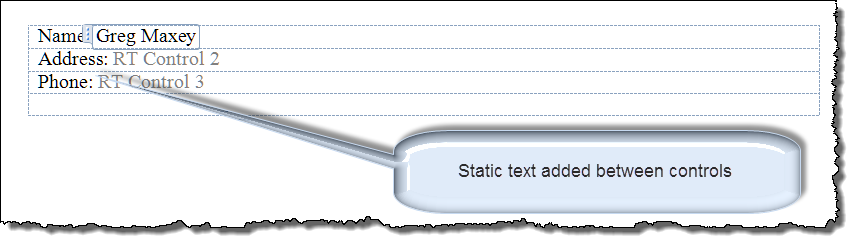
The following example shows three rich text content controls arranged in a borderless table. When working in a table, Words built-in "NextCell" command overrides the tab key to move to the next cell in the table.
![]() Note: Using the method above users would create a physical tab in the control using CTRL+Tab.
Note: Using the method above users would create a physical tab in the control using CTRL+Tab.
On the surface this "limited" workaround is practically useless as it introduces other problems. For example, consider the situation when a follow on control is located in the document after the table

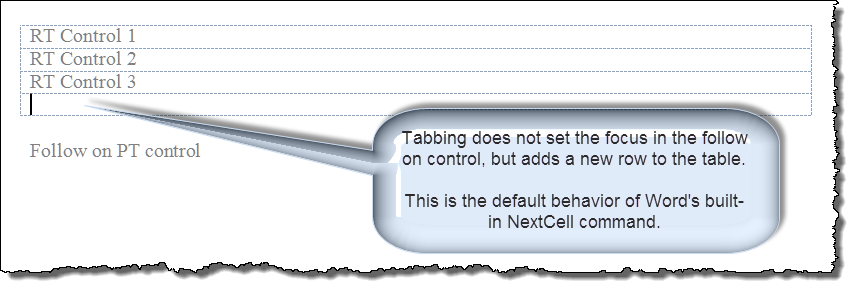
... or when static text may be needed between controls.
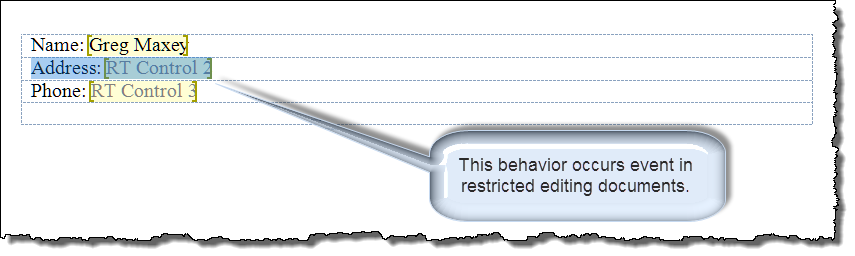
![]() For more on using content controls in restricted documents, see my Create Forms with Content Controls.
For more on using content controls in restricted documents, see my Create Forms with Content Controls.
If you have ever used rich text controls with a mix of other content control types in a table then I'm sure the experience was exasperating!
The reason is tabbing from a rich text control in a table executes Word's built-in NextCell command while tabbing from any other type content control does not!
The following illustrates the seemingly chaos a user would see if tabbing from control to control:
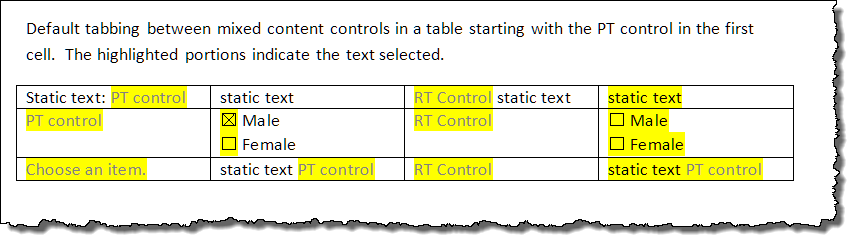
Madness indeed and fortunately by intercepting Word's built-in NextCell command, we can restore some sanity to the situation.
Copy and paste the following VBA code to a standard module in the document VB project:
Sub NextCell()
Dim oCell As Word.Cell
Dim oRng As Word.Range
  Set oCell = Selection.Cells(1)
  If Selection.Tables(1).Range.ContentControls.Count > 0 Then
    On Error GoTo Err_Handler
    If oCell.Next.Range.ContentControls.Count > 0 Then
      oCell.Next.Range.ContentControls(1).Range.Select
    Else
      oCell.Next.Select
    End If
    Do Until Selection.Cells(1).Range.ContentControls.Count > 0
      NextCell
    Loop
  Else
    On Error GoTo Err_Handler2
    oCell.Next.Select
  End If
lbl_Exit:
  End
Err_Handler:
  If MsgBox("Do you want to loop to the first control?", vbQuestion + vbYesNo, "Router") = vbYes Then
    For Each oCell In Selection.Tables(1).Range.Cells
      If oCell.Range.ContentControls.Count > 0 Then
        oCell.Range.ContentControls(1).Range.Select
        Exit For
      End If
    Next
    Resume lbl_Exit
  Else
    Set oRng = ActiveDocument.Range
    oRng.Start = Selection.Tables(1).Range.End
    If oRng.ContentControls.Count > 0 Then
      oRng.ContentControls(1).Range.Select
    End If
    Resume lbl_Exit
  End If
Err_Handler2:
  Selection.Tables(1).Rows.Add
  Resume
End Sub
![]() See: Install/Employ VBA Procedures (Macros)
for instructions to employ the VBA code provided above.
See: Install/Employ VBA Procedures (Macros)
for instructions to employ the VBA code provided above.
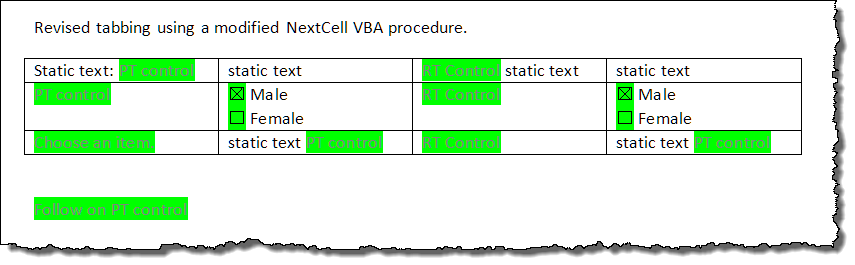
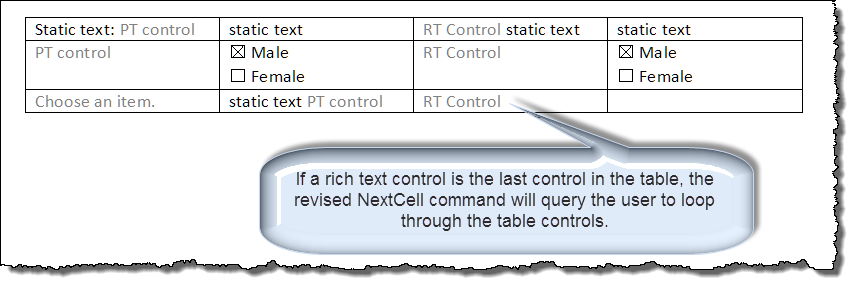
By intercepting the NextCell command the behavior of the tab key is as shown below:
The problem associated with picture controls is the most complex and I have not been able to find a reliable work around.
When a user tabs into a picture content control the selection is focused on a drawing object. In Word, when a drawing object is selected the tab key functions to select the next drawing object (not the next content control).
I am not aware of a built-in "NextDrawingObject" command or how to intercept this built-in behavior to tab to the next content control.
We should be able to use the ContentControlOnExit Event and add appropriate action and target tags as shown below. In this example the picture control is tagged "Pic1" and the following control tagged "NCAP1" (for Next control after Pic 1). The OnExit Event code is:
Select Case ContentControl.Tag
  Case "Pic1"
    ActiveDocument.SelectContentControlsByTag("NCAP1").Item(1).Range.Select
End Select
This method works, but works intermittently. In the majority of trials the next tagged and targeted control is selected, however sometimes the event doesn't fire and the next drawing object is selected instead.

![]() Note: The method described above seems to be more reliable in Word 2010.
Note: The method described above seems to be more reliable in Word 2010.
That's it! I hope you have found this tips page useful and informative.
The information, illustrations and code contained in my "Microsoft Word Tips" are provided free and without risk or obligation.
However, the work is mine. If you use it for commercial purposes or benefit from my efforts through income earned or time saved then a donation, however small, will help to ensure the continued availability of this resource.
If you would like to donate, please use the appropriate donate button to access PayPal. Thank you!
This page was last updated on
March 09, 2021
Website
Privacy Statement
Back to top ![]() Back to
Word Tips
Back to
Word Tips