
The Anchorage
Personal website of Gregory K. Maxey, Commander USN (Retired)
The Anchorage
Personal website of Gregory K. Maxey, Commander USN (Retired)
The information, illustrations and code contained in my "Microsoft Word Tips" are provided free and without risk or obligation.

However, the work is mine. If you use it for commercial purposes or benefit from my efforts through income earned or time saved then a donation, however small, will help to ensure the continued availability of this resource.
If you would like to donate, please use the appropriate donate button to access PayPal. Thank you!
The purpose of this Microsoft Word Tips & Microsoft Word Help page is to address the frequently asked question: "How do I calculate and insert a future or past date in a document."
For example, the document author may wish to calculate and include a date 30, 60, or 90 days advanced from a date of sale.
Several Word MVPs colleagues have addressed this topic in newsgroups responses or through their personal websites. Friend and MVP Graham Mayor explains in his website why adding a number to a date value in a simple calculation field provides disappointing results. He also introduces his visitors (via link and examples) to a brilliant collection of methods for performing calculations, including date calculations. These calculations are performed using Word fields that were perfected and made available to the general public by MVP Paul Edstein, aka "Macropod," a long time contributor in Word support forums.
This tips page, in contrast, provides various macro solutions using VBA or a combination of VBA and fields.
![]() If you are interested in the pure field methods that work brilliantly, then visit Graham Mayor's Insert a Future (or Past) Date in Word Documents. Be sure to download DateCal.zip from Graham's site, which contains Paul's work.
If you are interested in the pure field methods that work brilliantly, then visit Graham Mayor's Insert a Future (or Past) Date in Word Documents. Be sure to download DateCal.zip from Graham's site, which contains Paul's work.
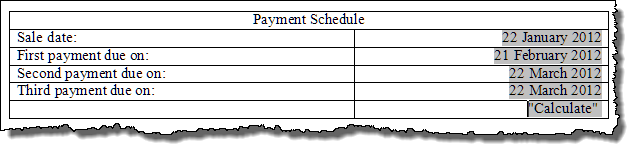
Let's start with the example given above. You have a simple Word table where a sale date is generated by a CREATEDATE field. You want to calculate and enter 30-, 60-, and 90-day payment due dates.
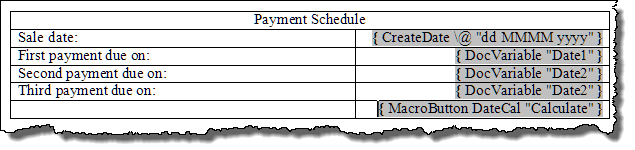
First, the fields. In the first illustration below, the shaded areas are text-generated, using Word fields. The second illustration is the same sample text with the field codes displayed.
![]() Bonus Tip: ALT+F9 toggles field code display. For more on creating and using fields in your Word documents see: Word Fields
Bonus Tip: ALT+F9 toggles field code display. For more on creating and using fields in your Word documents see: Word Fields
The DocVariables "Date1, Date2, and Date3" used in the above fields are values created and stored in the document using the following VBA procedure:
Sub DateAdd()
Dim myDate As Date
Dim myRng As Range
  'Set the starting date with the value of a field
  Set myRng = ActiveDocument.Fields(1).Result
  myDate = myRng
  'Tip - Here the field index is one because it is the first field in the document.
  'If you don't know the field index number? Just select the field and run the following line of code:
  'MsgBox Selection.Fields(1).Index
  With ActiveDocument.Variables
    .Item("Date1").Value = Format(myDate + 30, "dd MMMM yyyy")
    .Item("Date2").Value = Format(myDate + 60, "dd MMMM yyyy")
    .Item("Date3").Value = Format(myDate + 90, "dd MMMM yyyy")
  End With
  ActiveDocument.Fields.Update
lbl_Exit:
Exit Sub
End Sub
The MacroButton field inserted in the last row of the table is used to fire the macro code (double-click it).
![]() See: Installing Macros for instructions on how to set up and use the macros provided in this Microsoft Word Help & Microsoft Word Tips page.
See: Installing Macros for instructions on how to set up and use the macros provided in this Microsoft Word Help & Microsoft Word Tips page.
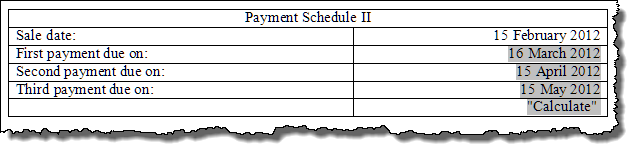
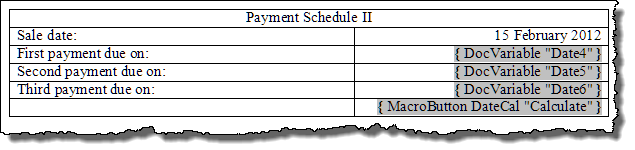
As an alternative, you could eliminate the CREATEDATE field and use any manually entered date in the top cell as shown in the following illustration and VBA code:
Sub DateAdd()
Dim myDate As Date
Dim myRng As Range
  'Set the starting date with the content of a table cell
  On Error GoTo lbl_Err
  Set myRng = ActiveDocument.Tables(2).Cell(2, 2).Range
  myDate = Left(myRng, Len(myRng) - 2)
  With ActiveDocument.Variables
    .Item("Date4").Value = Format(myDate + 30, "dd MMMM yyyy")
    .Item("Date5").Value = Format(myDate + 60, "dd MMMM yyyy")
    .Item("Date6").Value = Format(myDate + 90, "dd MMMM yyyy")
  End With
  ActiveDocument.Fields.Update
Exit Sub
  lbl_Err:
  MsgBox "You did not enter a valid date or the cell range does not exist!"
End Sub
Or, you could use the text of a named bookmark as shown in the following illustration and VBA Code:

Sub DateAdd()
Dim myDate As Date
Dim myRng As Range
  'Set the start date with bookmarked text
  On Error GoTo lbl_Err
  Set myRng = ActiveDocument.Bookmarks("checkOutDate").Range
  myDate = myRng
  With ActiveDocument
    .Variables("Date7").Value = Format(myDate + 10, "mm/dd")
    .Fields.Update
  End With
  Exit Sub
lbl_Err:
  MsgBox "You did not enter a valid date or the bookmark has been deleted!"
End Sub
You may simply want to enter a date offset (past or future) from the current date at the insertion point. The following macro enters the required date as plain text:
Sub OffsetDate()
Dim pOffset As String
  On Error GoTo lbl_Err
  pOffset = InputBox("Enter direction and amount of offset" _
    & vbCr & "(e.g., -7 to roll back 7 days or perhaps" _
    & vbCr & "+10 to roll forward 10 days).", "Offset")
  Selection.InsertBefore Format(Date + pOffset, "dd MMMM yyyy")
  Exit Sub
lbl_Err:
  MsgBox "You did not enter a valid roll back\roll forward value!"
End Sub
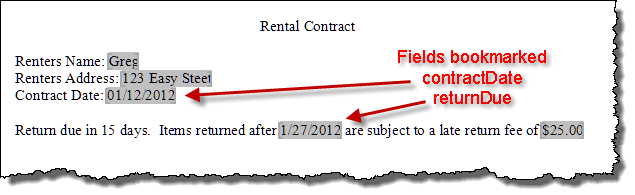
You can also use a Word "protected" or "on-line" form. The following illustration gives an example of a protected form using a contractDate field and a returnDue field. The returnDue field value is generated by an on exit macro set to run when the user exits the contractDate field.
Sub returnDue()
Dim myDate As Date
  On Error GoTo lbl_Err
  myDate = ActiveDocument.FormFields("contractDate").Result
  ActiveDocument.FormFields("returnDue").Result = myDate + 15
  Exit Sub
lbl_Err:
  MsgBox "You did not enter a valid contract date"
  Selection.GoTo What:=wdGoToBookmark, Name:="contractDate"
End Sub
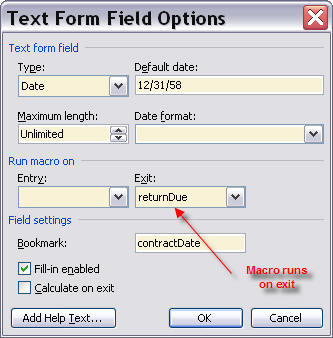
Set the form field options as follows, then protect the document.
Of course, the above examples are just a few of the methods you can use. You can download a document file containing the examples used to create this Microsoft Word Help page here: CalcDates. If you are interested in exploring other interesting uses of VBA for generating dates and calculating time then check out my "Date Sequencer" template add-in: Date Sequencer
![]() Note: This tips page, illustrations and examples were developed using Word 2003. It is wholly functional with Word 2007 and 2010.
Note: This tips page, illustrations and examples were developed using Word 2003. It is wholly functional with Word 2007 and 2010.
That's it! I hope you have found this tips page useful and informative.
The information, illustrations and code contained in my "Microsoft Word Tips" are provided free and without risk or obligation.
However, the work is mine. If you use it for commercial purposes or benefit from my efforts through income earned or time saved then a donation, however small, will help to ensure the continued availability of this resource.
If you would like to donate, please use the appropriate donate button to access PayPal. Thank you!
This page was last updated on
March 09, 2021
Website
Privacy Statement
Back to top ![]() Back to
Word Tips
Back to
Word Tips