The Anchorage
Personal website of Gregory K. Maxey, Commander USN (Retired)
The Anchorage
Personal website of Gregory K. Maxey, Commander USN (Retired)
The information, illustrations and code contained in my "Microsoft Word Tips" are provided free and without risk or obligation.

However, the work is mine. If you use it for commercial purposes or benefit from my efforts through income earned or time saved then a donation, however small, will help to ensure the continued availability of this resource.
If you would like to donate, please use the appropriate donate button to access PayPal. Thank you!
This Microsoft Word Tips & Microsoft Word Help page is the second in a series of tips pages written to show how to apply and use the ribbon control attributes to define, modify and display control images and labels. See the Word Help & Tips Index for links to the other pages in this series.
In the first tip page I gave examples of managing images and labels with office built-in controls. You saw use of the attributes imageMso, label, showLabel, showImage, and size.
Moving on to custom controls in this tips page we will look at some of these same attributes plus the static attribute image, and a "limited exposure" to the dynamic attributes getLabel and getImage.
The illustration below shows a custom ribbon tab that I created for this tips page. All of the controls perform some action. For the sake of brevity the actions may seem trivial. Remember these simple actions can be replaced with complex code enabling you to do most any Word process using custom controls. You can download the demonstration document used to create this pages which contains the associated ribbon, custom XML and VBA callbacks using this link: Ribbon Images & Labels Part II

Group 1 contains four custom button controls and illustrates that you can apply any office built-in control imageMso to a custom image using the static attribute imageMso or using the dynamic attribute getImage and a VBA callback. It also illustrates use of the getLabel attribute and VBA callback.
![]() The XML and VBA callbacks become lengthy as this series progresses and it is unnecessary to show them here. Remember, all XML and VBA callbacks in this series are available by downloading the demo documents using the links provided.
The XML and VBA callbacks become lengthy as this series progresses and it is unnecessary to show them here. Remember, all XML and VBA callbacks in this series are available by downloading the demo documents using the links provided.
Next let's look at applying a custom image using the static attribute "image."
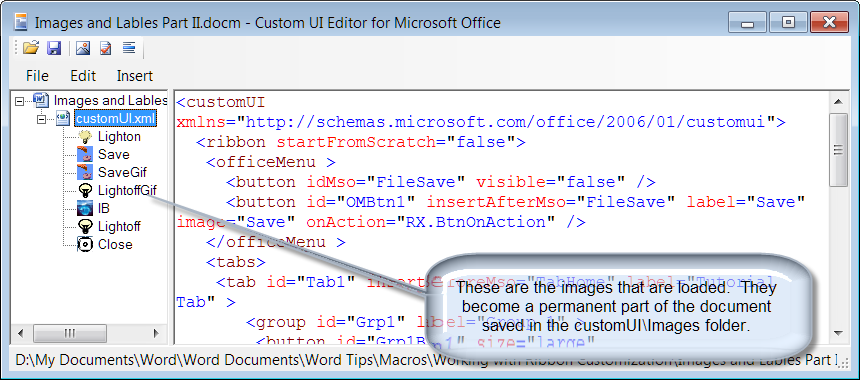
The image attribute points and looks to the document's Office OpenXML Format file data store for image files to apply to custom controls. In the data store, image files are stored in a folder named customUI\images.
There are several graphic file types that can be applied as images to custom controls. The type recommended is Portable Network Graphic (PNG). For a more complete discussion on image types supported and the basis of the recommendation, see: Jensen Harris' RibbonX Image FAQ.
The Office Custom UI Editor can be used to place image files in the data store. For this article I loaded an assortment of image files of different types that I have stored on my hard drive. To load images in the data store follow these simple steps:
When images are loaded into the data store the Custom UI Editor displays pane like shown below indicating the images that are loaded.
![]() Note: Sometimes the Custom UI Editor will rename the image ID when storing your images. For example, when I stored my "Lightoff.gif" file it was stored with the ID "rld." I am not sure why this happens, but using these IDs can cause errors if you attempt to use them in your XML. If this happens you can usually right click the image in the editor and change the ID. In this case I changed the ID to LightoffGif.
Note: Sometimes the Custom UI Editor will rename the image ID when storing your images. For example, when I stored my "Lightoff.gif" file it was stored with the ID "rld." I am not sure why this happens, but using these IDs can cause errors if you attempt to use them in your XML. If this happens you can usually right click the image in the editor and change the ID. In this case I changed the ID to LightoffGif.
Group 2 contains two custom button controls with custom images applied using the image attribute. With the imageMso and image attributes you can apply virtually any image to a ribbon control. The images in the data store are part of the document so your static images are transportable with your document.
In the first tips page in this series you saw that you cannot apply a custom image to a built in control. That remains true, but you can create a custom control with a custom image that mimics a built-in control. The illustration below depicts a customized Word 2007 Office Menu with a custom control that mimics the "FileSave" control.
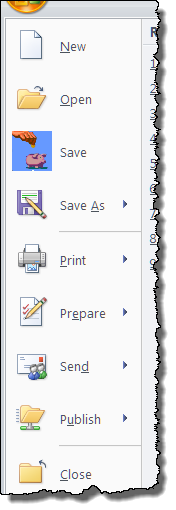
ere we used the "visible" attribute to hide the built-in "FileSave" and added a new custom control with a custom image immediately after the hidden control using the insertAfterMso attribute. The VBA callback executes "FileSave."
This concludes this tips page. In the next tips page in this series, Ribbon Images & Labels Part III, I'll take the application and use of the attribute getImage a bit further.
The information, illustrations and code contained in my "Microsoft Word Tips" are provided free and without risk or obligation.
However, the work is mine. If you use it for commercial purposes or benefit from my efforts through income earned or time saved then a donation, however small, will help to ensure the continued availability of this resource.
If you would like to donate, please use the appropriate donate button to access PayPal. Thank you!
This page was last updated on
March 09, 2021
Website
Privacy Statement
Back to top ![]() Back to
Word Tips
Back to
Word Tips