The Anchorage
Personal website of Gregory K. Maxey, Commander USN (Retired)
The Anchorage
Personal website of Gregory K. Maxey, Commander USN (Retired)
The information, illustrations and code contained in my "Microsoft Word Tips" are provided free and without risk or obligation.

However, the work is mine. If you use it for commercial purposes or benefit from my efforts through income earned or time saved then a donation, however small, will help to ensure the continued availability of this resource.
If you would like to donate, please use the appropriate donate button to access PayPal. Thank you!
This Microsoft Word Tips & Microsoft Word Help page is the first in a series of tips pages written to show how to apply and use ribbon control attributes to define, modify and display control images and labels. See the Word Help & Tips Index for links to the other pages in this series
If you are unfamiliar with ribbon customization I recommend that you review my Customize the Ribbon before reading further.
I felt that I needed to break this subject into parts as the topic is broad and while the methods presented in this tips page are simple and straight forward, they become seemingly quite complex as the series progresses.
The tips and methods presented in these pages are a culmination of many months of frustration and web searching looking for a way to "bend" the ribbon to my will and in particular, apply dynamic custom images to my ribbon controls. I might still be searching if not for the outstanding contributions of two Microsoft Excel programming masters Bob Phillips and Ron de Bruin; and suggestions by Word MVP Jonathan West.
I'll start with the static images and labels applied to the built-in office controls.
I use the term static to indicate images and labels that are created at design time when the ribbon loads and remain constant. The illustration below shows a custom ribbon tab that I created for this tips page. All of the controls are fully functional. You can download the demonstration document used to create this pages which contains the associated ribbon, custom XML and VBA callbacks using this link: Ribbon Images & Labels Part I
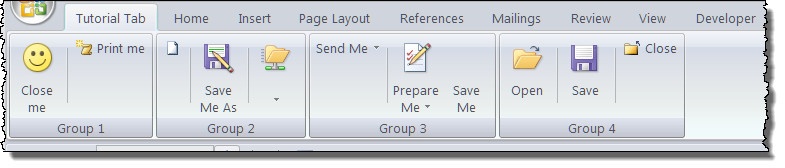
Group 1 contains the built-in controls "FileClose" and "FilePrint." The following XML can be used to create this group:
<group id="Grp1" label="Group 1" >
  <button idMso="FileClose" size="large" label="Close me" imageMso="HappyFace" />
  <separator id="Grp1Sep1" />
  <button idMso="FilePrint" size="normal" label="Print me" imageMso="CreateMacro" />
</group >
![]() Note: "imageMso" corresponds with the fixed "idMso" for all office built-in controls. You can determine the idMso of most Word built-in controls using the Quick Access Tab customization dialog and pausing your mouse over a built-in in command list in the "Choose command from" listing. The idMso appears in screen tip in parenthesis e.g., Popular Commands | File (FileSave). The collection
of control images are available through several web links, or
you can download
msoimagebrower a collaborative work by J. Walkenbach and Bruce Volkert
which provides imageMSO information in and Excel file.
Note: "imageMso" corresponds with the fixed "idMso" for all office built-in controls. You can determine the idMso of most Word built-in controls using the Quick Access Tab customization dialog and pausing your mouse over a built-in in command list in the "Choose command from" listing. The idMso appears in screen tip in parenthesis e.g., Popular Commands | File (FileSave). The collection
of control images are available through several web links, or
you can download
msoimagebrower a collaborative work by J. Walkenbach and Bruce Volkert
which provides imageMSO information in and Excel file.
Additionally, a complete list of office Ribbon UI control names and types can be downloaded from Microsoft. See Customize the Ribbon for links.
Group 2 contains the built-in controls "FileNew," "FileSave As" and "MenuPublish." The following XML can be used to create this group:
<group id="Grp2" label="Group 2" >
  <button idMso="FileNew" size="normal" showLabel="false" />
  <separator id="Grp2Sep1" /:gt;
  <button idMso="FileSaveAs" size="large" label="Save Me As" showLabel="false" />
  <separator id="Grp2Sep2" /:gt;
  <menu idMso="MenuPublish" size="large" showLabel="false" label=" " screentip="Publish" />
</group >
Group 2 illustrates how to use the showLabel attribute to hide a control's label.
Group 3 contains the built-in controls "FileSendMenu" and "FilePrepareMenu." The following XML can be used to create this group:
<group id="Grp3" label="Group 3" >
  <menu idMso="FileSendMenu" size="normal" label="Send Me" showImage="false" />
  <separator id="Grp3Sep1" />
  <menu idMso="FilePrepareMenu" size="large" label="Prepare Me" showImage="false" />
  <button idMso="FileSave" size="large" label="Save Me" showImage="false" imageMso="About" />
</group >
This group illustrates how to use the showImage attribute.
Finally Group 4 contains the built-in controls "FileOpen," "FileSave" and "FileClose." The following XML can be used to create this group:
<group id="Grp4" label="Group 4" >
  <button idMso="FileOpen" size="large" image="Insert" />
  <separator id="Grp4Sep1" />
  <button idMso="FileSave" size="large" getImage="RX.GetImage" getLabel="RX.GetLabel"
          getShowImage="RX.GetShowImage" getShowLabel="RX.GetShowLabel" />
  <separator id="Grp4Sep2" />
  <button idMso="FileClose" size="normal" getImage="RX.GetImage" getLabel="RX.GetLabel"
          getShowLabel="RX.GetShowLabel" getShowImage="RX.GetShowImage" />
 </group >
This group illustrates that the ribbon attributes image, getImage, getLabel, getShowLabel and getShowImage are not associated with built-in controls (large or normal).
This concludes this tips page. In the next tips page in this series, Ribbon Images & Labels Part II, I'll review applying images and labels to custom controls.
The information, illustrations and code contained in my "Microsoft Word Tips" are provided free and without risk or obligation.
However, the work is mine. If you use it for commercial purposes or benefit from my efforts through income earned or time saved then a donation, however small, will help to ensure the continued availability of this resource.
If you would like to donate, please use the appropriate donate button to access PayPal. Thank you!
This page was last updated on
March 09, 2021
Website
Privacy Statement
Back to top ![]() Back to
Word Tips
Back to
Word Tips