
The Anchorage
Personal website of Gregory K. Maxey, Commander USN (Retired)
The Anchorage
Personal website of Gregory K. Maxey, Commander USN (Retired)
The information, illustrations and code contained in my "Microsoft Word Tips" are provided free and without risk or obligation.

However, the work is mine. If you use it for commercial purposes or benefit from my efforts through income earned or time saved then a donation, however small, will help to ensure the continued availability of this resource.
If you would like to donate, please use the appropriate donate button to access PayPal. Thank you!
This Microsoft Word Tips & Microsoft Word Help page shows you how to create a dynamic dropdown control on the Microsoft Word 2007-2010 fluent ribbon user interface. For a general introduction to Ribbon customization see my: Customize the Ribbon.
By "dynamic" I mean a control that you as the user can modify without using XML or VBA.
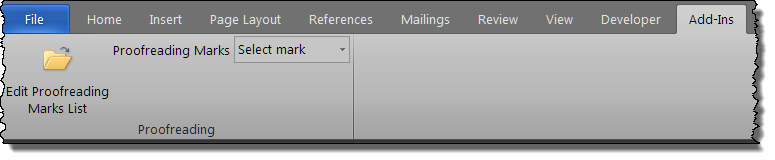
As a practical application for this type of control I decided to create an add-in for annotating proofreading marks in a Word document. The add-in adds a new "Proofreading" group to the built-in ribbon Add-Ins tab. The new group contains the dynamic dropdown control and a toggle button control. The toggle button control is use for making and saving changes to the dynamic dropdown. The new group and controls are shown in the illustration below:
The dropdown control contains a list of proofreading annotations. A partial list is shown below:

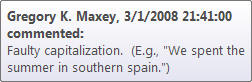
To apply the annotations to the document text, the user simply selects the text in the document and then selects the appropriate annotation. When the user selects the annotation. A Userform with a pre-defined comment is presented. The user may use the pre-defined comment or revise the comment as needed. When the user clicks "Insert" on the userform, the annotation and comment are inserted in the document at the selection. The two illustrations below show the annotation for improper capitalization and the pre-defined comment text.

I included a pretty extensive list of proofreading annotations in the add-in dropdown.
I also wanted the user to be able to easily add annotations, delete annotations, or modify existing annotations. This is accomplished using the "Edit Proofreading Marks List" toggle button control in the Proofreading group.
When this control is pressed the data store for the information presented in the dropdown is opened for the user to edit. The data store consists of a three column table in the add-in template.
A snippet of the data store table is shown below:

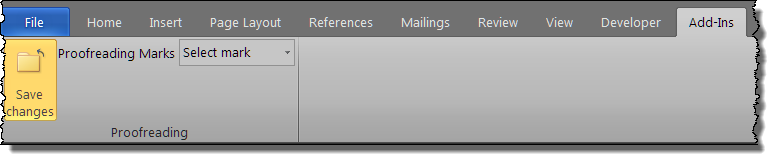
When the data store is opened the toggle button control's label and image changes as shown below. When the user is finished making changes this control is used to save the changes.
So far I have shown you what the add-in does. Again, the purpose of this page is to show you how it is done. Knowing that, you will be able to create your own custom Ribbon tab containing functional toggle button and dynamic dropdown controls. The steps are outlined and discussed below.
<?xml version="1.0" encoding="UTF-8" standalone="yes"?>
<customUI xmlns="http://schemas.microsoft.com/office/2006/01/customui" onLoad="Onload">
 <ribbon>
  <tabs>
   <tab idMso="TabAddIns">
    <group id="Grp1" label="Proofreading">
     <toggleButton id="TB1" size="large" getLabel="GetLabel"
        getPressed="GetPressed" getImage="GetImage" onAction="ToggleOnActionMacro"/>
     <dropDown id="DD1" label="Proofreading Marks" getItemCount="GetItemCount" getItemLabel="GetItemLabel"
         getItemScreentip="GetItemScreenTip" getItemSupertip="GetItemSuperTip" getSelectedItemIndex="GetSelectedItemIndex"
         onAction="MyDDMacro">
     </dropDown>
    </group>
   </tab>
  </tabs>
 </ribbon>
</customUI>
![]() Note: You will see several Word errors when the template opens. This is expected because the callbacks in the XML shown above are looking for data in the VBA project that doesn't exist yet.
Note: You will see several Word errors when the template opens. This is expected because the callbacks in the XML shown above are looking for data in the VBA project that doesn't exist yet.
Option Explicit
Public myRibbon As IRibbonUI
Private myArrayPri() As String 'This array holds the label text
Private myArraySec() As String 'This array holds the pre-defined comment text
Private myArrayTri() As String 'This array holds the screentip text
Private oDocTemp As Word.Document
Private pImage As String
Private bLabelState As Boolean

'This procedure creates a ribbon object for the project
Sub Onload(ribbon As IRibbonUI)
  Set myRibbon = ribbon
End Sub

'This procedure and the succeeding three functions loads the data from the data store into the arrays. When the AddIn loads a new temporary document containing the data store table is created. The data in the table is passed as a variable to the three functions which loads the arrays.
Sub LoadArrays()
Dim aTemplate As Template
Dim oDoc As Word.Document
Dim oTbl As Table
  bLabelState = True
  For Each aTemplate In Templates
    'Change this line if you use a different name for your template
    If aTemplate.Name = "Proofreading Marks AddIn.dotm" Then
      'Open the temporary document.
      Set oDoc = Documents.Add(aTemplate.FullName, , , False)
      Set oTbl = oDoc.Tables(1)
      myArrayPri() = GetLabelArray(oTbl)
      myArraySec() = GetCommentArray(oTbl)
      myArrayTri() = GetScreenTipArray(oTbl)
      'Close the temporary document.
      oDoc.Close wdDoNotSaveChanges
      Exit For
    End If
  Next
End Sub

Function GetLabelArray(ByVal oTbl As Table) As String()
Dim i As Long
Dim tempArray() As String
  ReDim tempArray(oTbl.Rows.count)
  'Loop through the column 1 rows putting the content of each cell in the array.
  For i = 1 To oTbl.Rows.count
    tempArray(i - 1) = Left(oTbl.Cell(i, 1).Range.Text, Len(oTbl.Cell(i, 1).Range.Text) - 2)
  Next i
  GetLabelArray = tempArray
End Function

Function GetCommentArray(ByVal oTbl As Table) As String()
Dim i As Long
Dim tempArray() As String
  ReDim tempArray(oTbl.Rows.count)
  'Loop through the column 2 rows putting the content of each cell in the array.
  For i = 1 To oTbl.Rows.count
    tempArray(i - 1) = Left(oTbl.Cell(i, 2).Range.Text, Len(oTbl.Cell(i, 2).Range.Text) - 2)
  Next i
  GetCommentArray = tempArray
End Function

Function GetScreenTipArray(ByVal oTbl As Table) As String()
Dim i As Long
Dim tempArray() As String
  ReDim tempArray(oTbl.Rows.count)
  'Loop through the column 3 rows putting the content of each cell in the array.
  For i = 1 To oTbl.Rows.count
    tempArray(i - 1) = Left(oTbl.Cell(i, 3).Range.Text, Len(oTbl.Cell(i, 3).Range.Text) - 2)
  Next i
  GetScreenTipArray = tempArray
End Function

'This callback provides the number of items in the dropdown. The number of items is determined by the
'number of labels contained in the label array.
Sub GetItemCount(ByVal control As IRibbonControl, ByRef count)
  On Error Resume Next
  If IsNull(myArrayPri(0)) Then
    LoadArrays
  End If
  On Error GoTo 0
  Select Case control.id
    Case "DD1"
      count = UBound(myArrayPri)
    Case Else
      'Do Nothing
  End Select
End Sub

'This callback provides the label for each item in the dropdown. Since it is called once for each item in the dropdown, we simply set the label to the corresponding item in the array containing the label data.
Sub GetItemLabel(ByVal control As IRibbonControl, Index As Integer, ByRef label)
  Select Case control.id
    Case "DD1"
      label = myArrayPri(Index)
    Case Else
      'Do nothing
  End Select
End Sub

'This callback sets the displayed item in the dropdown control.
Sub GetSelectedItemIndex(ByVal control As IRibbonControl, ByRef Index)
  Select Case control.id
    Case "DD1"
      Index = 0
    Case Else
      'Do nothing
  End Select
End Sub

'This callback provides the screentip for each item in the dropdown. Again, since it is called once for each item in the dropdown, we simply set the screentip text to the corresponding item in the array.
Sub GetItemScreenTip(ByVal control As IRibbonControl, Index As Integer, ByRef screentip)
  Select Case control.id
    Case "DD1"
      screentip = myArrayTri(Index)
    Case Else
      'Do nothing
  End Select
End Sub

Sub GetItemSuperTip(ByVal control As IRibbonControl, Index As Integer, ByRef supertip)
  Select Case control.id
    Case "DD1"
       supertip = myArraySec(Index)
    Case Else
      'Do nothing
  End Select
End Sub

'This is the dropdown control onAction callback. It is the workhorse of this project or the procedure that actually does something in the document. The first thing it does is declare a Userform object. The Userform provides the user interface to display the pre-defined comment text and offer the user the opportunity to edit the comment text. The Userform and code are shown following this discussion.
Sub MyDDMacro(ByVal control As IRibbonControl, selectedId As String, selectedIndex As Integer)
Dim oFrm As Userform1
Dim pUserInt As String
  Select Case control.id
    Case "DD1"
      'Cancel action if no document is open.
      If Documents.count < 1 Then
        myRibbon.InvalidateControl control.id
        Exit Sub
      End If
      'Notify user to select text prior to making an annotations
      If Selection.Type = wdSelectionIP Or wdNoSelection Then
        MsgBox "Please select the proofreading error in the text before inserting comments."
        myRibbon.InvalidateControl control.id
        Exit Sub
      End If
      Select Case selectedIndex
        Case Is = 0
          'Do Nothing
        Case Else
          'Capture the user's initials
          pUserInt = Application.UserInitials
          Set oFrm = New Userform1
          'Write the pre-defined comment text in the Userform textbox.
          oFrm.TextBox1 = myArraySec(selectedIndex)
          With oFrm.TextBox1
           .SetFocus
           .SelStart = 0
           .SelLength = Len(.Text)
          End With
          oFrm.Show
          'Insert the comment in the document.
          If oFrm.Tag = 1 Then
            'Set the user initials = to the annotation
            On Error GoTo Err_Handler
            Application.UserInitials = myArrayPri(selectedIndex)
            On Error GoTo 0
            Selection.Comments.Add Selection.Range, oFrm.TextBox1.Text
          End If
          Unload oFrm
          Set oFrm = Nothing
          'Restore the user initials
          Application.UserInitials = pUserInt
          myRibbon.InvalidateControl control.id
      End Select
    Case Else
      'Do Nothing
  End Select
  Exit Sub
Err_Handler:
  If Err.Number = 4609 Then
    'Label was longer than 9 characters. Truncate annotation in document.
    Application.UserInitials = Left(myArrayPri(selectedIndex), 9)
    Resume Next
  End If
End Sub

'This callback defines the image displayed on the toggle button control.
Sub GetImage(control As IRibbonControl, ByRef image)
  Select Case control.id
    Case "TB1"
      If pImage = "" Then pImage = "FileOpen"
      image = pImage
    Case Else
      'Do Nothing
  End Select
End Sub

'This callback defines the label displayed on the toggle button control.
Sub GetLabel(ByVal control As IRibbonControl, ByRef label)
 Select Case control.id
   Case "TB1"
     If bLabelState Then
       label = "Edit Proofreading Marks List"
     Else
        label = "Save changes"
     End If
  Case Else
    'Do Nothing
  End Select
End Sub

'This callback sets the state of the displayed toggle button. (i.e., button flush or button depressed)
Sub GetPressed(control As IRibbonControl, ByRef returnValue)
  Select Case control.id
    Case "TB1"
      If pImage = "" Then pImage = "FileOpen"
      If pImage = "FileOpen" Then
        returnValue = False
      Else
        returnValue = True
      End If
    Case Else
      'Do nothing
  End Select
End Sub

'This is the toggle button control onAction callback.
Sub ToggleOnActionMacro(ByVal control As IRibbonControl, bToggled As Boolean)
  'User clicks to edit the list.
  If bToggled Then
    'Defined new image
    pImage = "FileClose"
    'Call procedure to open the data store for editing.
    EditPRMarks
    'Repopulate the arrays.
    LoadArrays
    bLabelState = False
    'User clicks to Save changes.
  Else
    pImage = "FileOpen"
    'Call procedure to save and close the data store.
    SavePRMarksChanges
    bLabelState = True
  End If
  myRibbon.InvalidateControl control.id
  myRibbon.Invalidate
End Sub

'Procedure to open the data store for editing.
Sub EditPRMarks()
Dim aTemplate As Template
Dim oTbl As Table
  For Each aTemplate In Templates
    'Change this line if you use a different name for your template
    If aTemplate.Name = "Proofreading Marks AddIn.dotm" Then
      Set oDocTemp = aTemplate.OpenAsDocument
    End If
    Exit For
  Next
End Sub

'Procedure for saving changes to the data store.
Sub SavePRMarksChanges()
Dim oTbl As Table
  If Not oDocTemp Is Nothing Then
    With oDocTemp
      Set oTbl = .Tables(1)
      myArrayPri() = GetLabelArray(oTbl)
      myArraySec() = GetCommentArray(oTbl)
      myArrayTri() = GetScreenTipArray(oTbl)
      .Save
      .Close
    End With
  End If
End Sub
![]() See: Installing Macros for instructions on how to set up and use the macros provided in this Microsoft Word Help & Microsoft Word Tips page.
See: Installing Macros for instructions on how to set up and use the macros provided in this Microsoft Word Help & Microsoft Word Tips page.

Option Explicit
Private Sub CommandButton1_Click()
  Me.Tag = 1
  Me.Hide
End Sub

Private Sub CommandButton2_Click()
  Me.Tag = 0
  Me.Hide
End Sub
![]() For more on template add-ins and how to load them, see: Organizing Your Macros/Template Add-ins at: Installing Macros
For more on template add-ins and how to load them, see: Organizing Your Macros/Template Add-ins at: Installing Macros
That's it! I hope you have found this tips page useful and informative. If you don't want to take the trouble to build your own add-in you can download the complete project here: Proofreader Marks Add-In
The information, illustrations and code contained in my "Microsoft Word Tips" are provided free and without risk or obligation.
However, the work is mine. If you use it for commercial purposes or benefit from my efforts through income earned or time saved then a donation, however small, will help to ensure the continued availability of this resource.
If you would like to donate, please use the appropriate donate button to access PayPal. Thank you!
This page was last updated on
March 09, 2021
Website
Privacy Statement
Back to top ![]() Back to
Word Tips
Back to
Word Tips