The Anchorage
Personal website of Gregory K. Maxey, Commander USN (Retired)
The Anchorage
Personal website of Gregory K. Maxey, Commander USN (Retired)
The information, illustrations and code contained in my "Microsoft Word Tips" are provided free and without risk or obligation.

However, the work is mine. If you use it for commercial purposes or benefit from my efforts through income earned or time saved then a donation, however small, will help to ensure the continued availability of this resource.
If you would like to donate, please use the appropriate donate button to access PayPal. Thank you!
This Microsoft Word Tips & Microsoft Word Help page will show you how to “master” form fields and put them to work for you.
The basic form fields are text fields, checkboxes, and dropdown fields. Word assigns a bookmark name to each form field when it is created. The default bookmark names are Text1, Check1, and DropDown1 respectively. The default name is applied with the next sequential number as each new field is added.
![]() Note: Fields are not renamed automatically when fields are deleted or inserted between existing fields. See:
Rename Formfields Globally
Note: Fields are not renamed automatically when fields are deleted or inserted between existing fields. See:
Rename Formfields Globally
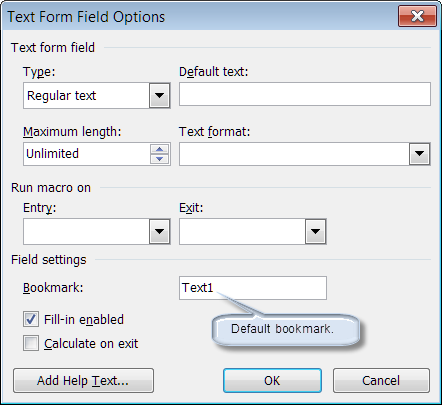
You can see the bookmark name assigned to any field when the form is unprotected by double clicking on the field opening Form Field Options dialog box.
When the form is protected you can use a macro to determine the bookmark name of the selected form field:
Sub GetFldBkMrkName()
  If Selection.FormFields.Count = 1 Then
    MsgBox Selection.FormFields(1).Name
  ElseIf Selection.FormFields.Count = 0 And Selection.Bookmarks.Count > 0 Then
    MsgBox Selection.Bookmarks(Selection.Bookmarks.Count).Name
  End If
lbl_Exit:
  Exit Sub
End Sub
![]() See: Installing Macros for instructions on how to set up and use the macros provided in this Microsoft Word Help & Microsoft Word Tips page.
See: Installing Macros for instructions on how to set up and use the macros provided in this Microsoft Word Help & Microsoft Word Tips page.
When you open a Form Field Options dialog box, notice the two windows labeled “Run Macro on” “Entry” and “Exit." These and the macros they designate are key collaborators in controlling form field behavior.
I am not very good at dreaming up practical examples, so I am simply going to give some fanciful examples of how you can put form fields to work for you. It is up to you to come up with something practical. Fair enough?
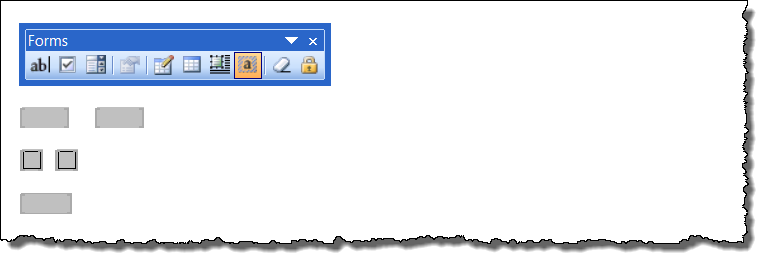
Open a new documented and display the "Forms" toolbar (View>Toolbars>Forms.
![]() Notes:
Notes:
1. This tips page, illustrations and examples were developed using Word 2003. It is wholly functional with Word 2007/2010.
2. In Word 2007/2010 the form field controls are at Developer tab>Controls>Legacy Forms. If you use form fields frequently see my: Add Classic Form Controls

In the first example you will see how to set the value in a dependent form field and perform a simple validation of a form field entry.
Sub ROEx1()
Dim oFFld As FormFields
Dim oBkMrk As Bookmarks
Dim oBkMrkRng As Word.Range
  Set oFFld = ActiveDocument.FormFields
  Set oBkMrk = ActiveDocument.Bookmarks
  ActiveDocument.Unprotect
  If oFFld("Text1").Result = "" Then
    'Identify current Bookmark range and insert text
    Set oBkMrkRng = oBkMrk("myBkMrk").Range
    oBkMrkRng.Text = "Text1 field can not be left blank"
    'Re-insert the bookmark
    oBkMrk.Add "myBkMrk", oBkMrkRng
    oFFld("Text2").Result = ""
  Else
    oFFld("Text2").Result = " "
    Set oBkMrkRng = oBkMrk("MybkkMrk").Range
    oBkMrkRng.Text = " "
    'Re-insert the bookmark
    oBkMrk.Add "myBkMrk", oBkMrkRng
    oFFld("Text2").Result = oFFld("Text1").Result
  End If
  ActiveDocument.Protect wdAllowOnlyFormFields, NoReset:=True
lbl_Exit:
  Exit Sub
End Sub
Sub ROEn1()
Dim oFFld As FormFields
Dim oBkMrk As Bookmarks
  Set oFFld = ActiveDocument.FormFields
  Set oBkMrk = ActiveDocument.Bookmarks
  If oFFld("Text1").Result = "" Then
    oBkMrk("Text1").Range.Fields(1).Result.Select
  End If
lbl_Exit:
  Exit Sub
End Sub


![]() Note: Word MVP Graham Mayor offers extensive coverage of “validating” form fields in his website article: Check for uncompleted formfield.
Note: Word MVP Graham Mayor offers extensive coverage of “validating” form fields in his website article: Check for uncompleted formfield.
Next I will demonstrate how you can use a checkbox result to set the result of other checkboxes.
Sub ROEx2()
Dim oFFld As FormFields
  Set oFFld = ActiveDocument.FormFields
  If oFFld("Check1").CheckBox.Value = True Then
    oFFld("Check2").CheckBox.Value = True
  Else
    oFFld("Check2").CheckBox.Value = False
  End If
lbl_Exit:
  Exit Sub
End Sub
![]() Notes:
Notes:
1. You could use similar code to set the value in a textbox based on the state of a checkbox control.
2. As you've see, form control is limited to On Entry and On Exit methods only. There is no way you can click a check box and see instantaneous changes in other fields.
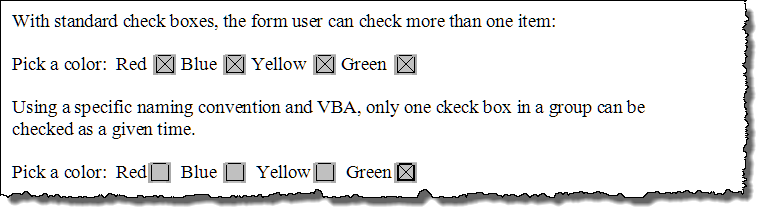
With some careful construction of the formfields and a little VBA wizardry, it is possible to setup form field checkboxes that will function as an exclusive group such that only one checkbox in the group can be selected at a time. For example, consider the following form:
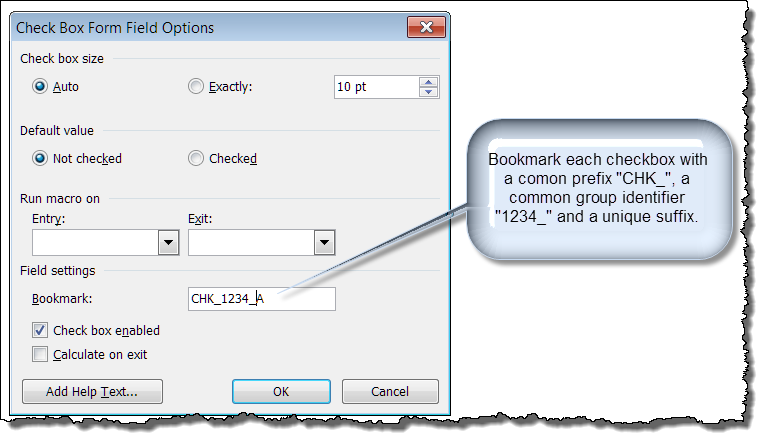
Sub ExclusiveCheckBoxes()
Dim strTemp As String
Dim oFF As FormField
Dim strGroupID As String
Dim strSequenceID As String
Dim i As Long
Dim strSequenceNext As String
  strTemp = "ABCDEFGHIJKLMNOPQRSTUVWXYZ" 'Permits up to 26 checkboxes per group
  Set oFF = Selection.FormFields(1)
  If oFF.CheckBox.Value = True Then
    strGroupID = Left(oFF.Name, 8)
    strSequenceID = UCase(Right(oFF.Name, 1))
    If strSequenceID Like "[A-Z]" Then
      'Clear all GroupID ChkBoxes including the CB selected (ensure only one CB in group is selected).
      For i = 1 To Len(strTemp)
        strSequenceNext = strGroupID & "_" & Mid(strTemp, i, 1)
        If ActiveDocument.Bookmarks.Exists(strSequenceNext) Then
          ActiveDocument.FormFields(strSequenceNext).CheckBox.Value = False
        End If
      Next i
      'Set the CB that was selected
      oFF.CheckBox.Value = True
    End If
  End If
lbl_Exit:
  Exit Sub
End Sub
With the dropdown field you can use the selected item to control formatting of the dropdown field or set other text, checkbox or dropdown field values.
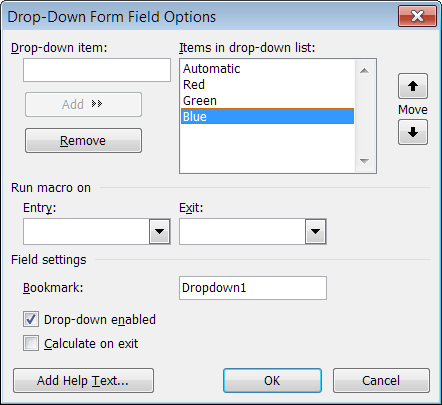
Sub ROEx3()
Dim oFFld As FormFields
  Set oFFld = ActiveDocument.FormFields
  Select Case oFFld("DropDown1").Result
    Case "Automatic"
      ActiveDocument.Range.Font.Color = wdColorAutomatic
    Case "Red"
      ActiveDocument.Range.Font.Color = wdColorRed
    Case "Blue"
      ActiveDocument.Range.Font.Color = wdColorBlue
    Case "Green"
      ActiveDocument.Range.Font.Color = wdColorGreen
    Case Else
    'Do nothing
  End Select
lbl_Exit:
  Exit Sub
End Sub
I've published a separate tips page on this topic: Linked Formfield Dropdown Lists
That's it! I hope you have found this tips page useful and informative. I hope you can see how the collaborator macros that you can set to run on exit or entry will help you master and control your form fields. You can download the demonstration document used to create this tips page here: Master Your Formfields
The information, illustrations and code contained in my "Microsoft Word Tips" are provided free and without risk or obligation.
However, the work is mine. If you use it for commercial purposes or benefit from my efforts through income earned or time saved then a donation, however small, will help to ensure the continued availability of this resource.
If you would like to donate, please use the appropriate donate button to access PayPal. Thank you!
This page was last updated on
March 09, 2021
Website
Privacy Statement
Back to top ![]() Back to
Word Tips
Back to
Word Tips