The Anchorage
Personal website of Gregory K. Maxey, Commander USN (Retired)
The Anchorage
Personal website of Gregory K. Maxey, Commander USN (Retired)
The information, illustrations and code contained in my "Microsoft Word Tips" are provided free and without risk or obligation.

However, the work is mine. If you use it for commercial purposes or benefit from my efforts through income earned or time saved then a donation, however small, will help to ensure the continued availability of this resource.
If you would like to donate, please use the appropriate donate button to access PayPal. Thank you!
This Microsoft Word Tips & Microsoft Word Help page will show you how to incorporate interactive checkboxes (or any symbol pairs) into an unprotected Word document.
The process involves using one of two symbol characters as the "displayed" result in a MacroButton field. The VBA procedure assigned to the MacroButton is used to evaluate the field code text, determine the current character symbol displayed, and then change the field code text to display the opposite symbol in the pair. Each time a symbol character displayed as the field result is double-clicked, the VBA procedure toggles the symbol displayed.
![]() Note: MacroButton fields can be set to execute on single or double click. I use the double-click setting and believe it is the default. You can change between double and single click by executing a single line of code shown below in the VB Editor immediate window.
Note: MacroButton fields can be set to execute on single or double click. I use the double-click setting and believe it is the default. You can change between double and single click by executing a single line of code shown below in the VB Editor immediate window.
The basic technique requires two elements. First, a properly constructed MacroButton field. The field can be created manually, but it is easier for me to show you a procedure that creates the required field automatically. The following procedure will create a checked box (Wingding character 254) at the insertion point in your document.
Sub InsertInteractiveCheckbox()
Dim oFld As Word.Field
Dim oRng As Word.Range
  Set oFld = Selection.Fields.Add(Range:=Selection.Range, Type:=wdFieldEmpty, _
             Text:="MACROBUTTON ToggleCheckbox", PreserveFormatting:=False)
  Set oRng = oFld.Code
  oRng.Collapse wdCollapseEnd
  oRng.InsertSymbol 254, "WingDings"
lbl_Exit:
  Exit Sub
End Sub
![]() Notes:
Notes:
1. The MacroButton field defines the procedure to call as "CheckIt."
2. See: Installing Macros for instructions on how to set up and use the macros in this tips page.
The second required element is the called procedure shown below:
Sub ToggleCheckbox()
Dim oFld As Word.Field
Dim oRngTarget As Word.Range
Dim i As Long
Dim StrFont As String
Dim strCharNum As Long
  Set oFld = Selection.Fields(1)
  'i represents the character position of the symbol in the field code text.
  i = 29
  'Define target (or where symbol goes)
  Set oRngTarget = oFld.Code.Characters(i)
  'What symbol is it?
  strCharNum = AscW(oRngTarget.Text)
  'Toggle it
  If strCharNum = 111 Then
    oRngTarget.Font.Name = "Wingdings"
    oRngTarget.Text = ChrW(254)
  Else
    oRngTarget.Font.Name = "Wingdings"
    oRngTarget.Text = ChrW(111)
  End If
  'Clear variables
  Set oRngTarget = Nothing
  Set oFld = Nothing
lbl_Exit:
  Exit Sub
End Sub
After inserting the ToggleCheckbox procedure in a VBA project module, you are ready to use your interactive checkbox. Go ahead and give it a try!!
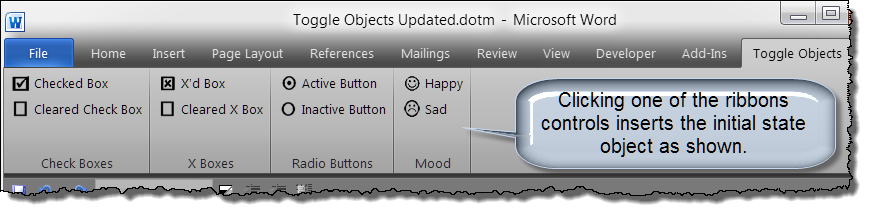
By simply changing the character codes (i.e., 111 and 254) in the procedures above, you can create practically any toggle pair. Or, you can download my "Toggle Objects© Updated" template add-in pack using the link at the end of this tips page. The add-in contains four built-in symbol pairs shown below and has undergone a significant overhaul.

![]() Notes:
Notes:
1. Return visitors may have noticed the absence of autotext and buildingblocks in the methods and template described in this tips page. These changes are a result of a clever suggestion and feedback from James Cole![]() . Thanks James!!
. Thanks James!!
2. Based on user feedback, I've discovered that using the simple ASCII decimal value with some symbol pairs produces undesirable results. Accordingly, in these cases, you will need to use the Unicode values for the symbol pairs (e.g., the active and inactive radio button symbol pair 161 and 164 won't work. Use the Unicode values (-3932 and -3935) instead. To determine the Unicode value of a symbol in your document, just select the single symbol character and run this procedure:
Sub GetSymbolUnicodeValue()
Dim SelFont As Variant
Dim SelCharNum As Long
Dim sCode As String
  Select Case Len(Selection.Range)
    Case Is = 0
      MsgBox "Nothing selected!"
    Case Is = 1
      With Selection
        With Dialogs(wdDialogInsertSymbol)
          SelFont = .Font
          SelCharNum = .CharNum
        End With
      End With
      MsgBox SelFont & " " & SelCharNum
    Case Else
      MsgBox "Select only the character to evaluate, and run the macro again"
  End Select
lbl_Exit:
  Exit Sub
End Sub
The add-in pack consists of a .zip file containing a Word 2003 and a Word 2007/2010 version of the add-in. Both add-ins provide a simple user interface. The Word 2007/2010 interface is shown here:
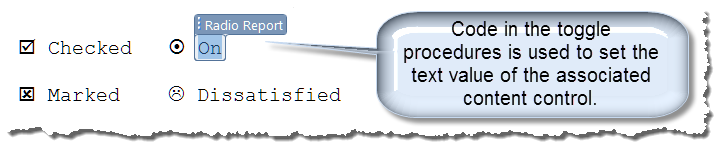
With some relatively easy VBA techniques you can adapt the basic code contained in the add-in and perform additional actions when the toggle occurs. For example, here I have used VBA to set the value in a document content control associated with each symbol pair. In a Word 2003 document, you could use bookmarks in place of the content controls.
Or, you could modify the toggle procedures and create sequence procedures. Here a single field (field code displayed) is used to sequence through and display the numerals 0 - 10.

James Cole had suggested eliminating a dependence on template stored autotext/building blocks in my earlier Toggle Objects© add-in. Evaluating the ASCII value of the symbol character nested in the field code as shown above has achieved that.
There are still circumstances where the older method using template stored autotext/building blocks can be useful. The template add-in contains two working examples. I will demonstrate the method here.
![]() Notes:
Notes:
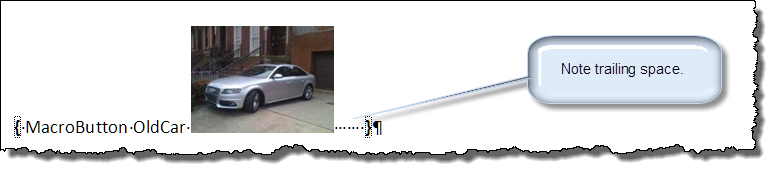
1. Unfortunately, after changes Microsoft made to the drawing layer object introduced with Word 2007, images will no longer trigger MacroButton fields. You have to provide some trailing space in the field construction to serve as "click" space. In Word 2003, you can eliminate the trailing space and click/double-click directly on the image to toggle the object.
2. Doug Robbins has come up with a general work-around. If you insert the image in the Macrobutton field using an "IncludePicture" field (e.g., {MacroButton MacroToRun { IncludePicture "Drive/Path/imagefile.png"}}) then the macro will trigger.
3. I've opted for an alternative solution which uses application events. The solution is demonstrated in the template add-in.

![]() Note: If you are using Word 2003, ALT+F3 opens the Create AutoText dialog. Use the same "OldCar" name for the dialog entry.
Note: If you are using Word 2003, ALT+F3 opens the Create AutoText dialog. Use the same "OldCar" name for the dialog entry.
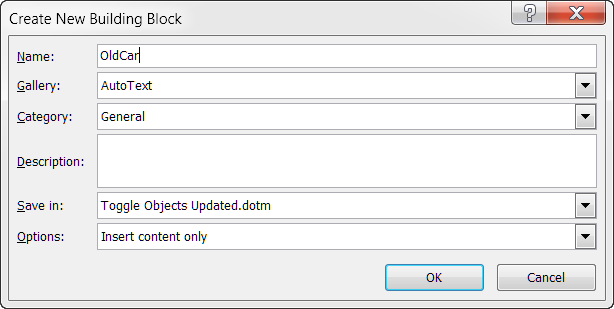


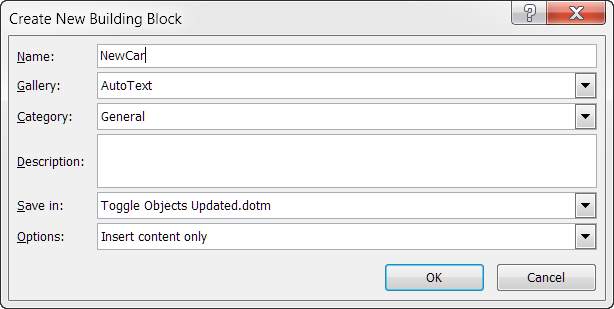
Option Explicit
'Declare module level variables
Private oAutoTextOldCar As AutoTextEntry
Private oAutoTextNewCar As AutoTextEntry
Private bOneOrTheOther As Boolean

Public Sub AutoOpen()
Dim oTmp As Template
  If Not bOneOrTheOther Then
  For Each oTmp In Templates
    'Change following line to match your named template
    If oTmp.Name = "Toggle Objects Updated.dotm" Then
      Set oAutoTextOldCar = Templates(oTmp.FullName).AutoTextEntries("OldCar")
      Set oAutoTextNewCar = Templates(oTmp.FullName).AutoTextEntries("NewCar")
      Exit For
    End If
  Next
End If
lbl_Exit:
  Exit Sub
End Sub

Public Sub AutoExec()
bOneOrTheOther = True
Dim oTmp As Template
For Each oTmp In Templates
  'Change following line to match your named template
  If oTmp.Name = "Toggle Objects Updated.dotm" Then
    Set oAutoTextOldCar = Templates(oTmp.FullName).AutoTextEntries("OldCar")
    Set oAutoTextNewCar = Templates(oTmp.FullName).AutoTextEntries("NewCar")
    Exit For
  End If
Next
lbl_Exit:
  Exit Sub
End Sub

Sub NewCar()
  oAutoTextOldCar.Insert Where:=Selection.Range
lbl_Exit:
  Exit Sub
End Sub

Sub OldCar()
  oAutoTextNewCar.Insert Where:=Selection.Range
lbl_Exit:
  Exit Sub
End Sub
lbl_Exit:
  Exit Sub
End Sub
In addition to images pairs as demonstrated, you can also create text pairs or text sequences. There is practically no limit.
The add-ins contain the basic code to create the single checkbox, code to create and insert the four built-in pairs, and code necessary for the intermediate and advanced demonstrations. Download the template add-in pack here: Toggle Objects© Add-Ins Pack.
![]() For more on template add-ins and how to load them, see: Organizing Your Macros/Template Add-ins at: Installing Macros
For more on template add-ins and how to load them, see: Organizing Your Macros/Template Add-ins at: Installing Macros
That's it! I hope you have found this Microsoft Word Help & Tips page useful and informative.
The information, illustrations and code contained in my "Microsoft Word Tips" are provided free and without risk or obligation.
However, the work is mine. If you use it for commercial purposes or benefit from my efforts through income earned or time saved then a donation, however small, will help to ensure the continued availability of this resource.
If you would like to donate, please use the appropriate donate button to access PayPal. Thank you!
This page was last updated on
March 09, 2021
Website
Privacy Statement
Back to top ![]() Back to
Word Tips
Back to
Word Tips